If you, like me, went with the entry level Steam Deck option with only 64 GB of internal storage, you likely realized quite soon that some games wont fit on it.
One option is to use the microSD expansion card slot. For current-gen games the throughput of only about 150 MB/s does not seem to degrade loading performance compared to a NVMe SSD. However, given that the internal storage is upgradable, the only logical choice for keeping your PC master race status is to cram in the fastest NVME SSD inside that thing.
Specifically, you will need a one-sided SSD in the M.2 2230 for factor so it fits the space inside the Steam Deck. I went with the KIOXIA Client-SSD BG5 512GB. Kioxia is the Toshiba spin-off for SSD drives, if you wonder about the brand. Although it is a PCIe 4.0 drive, its peak read throughput of 3.5 GB/s is within the practical limits of PCIe 3.0 of the Steam Deck. Also, the active power consumption of 4.1W is quite close to the 3.8W drawn by the custom PHISON PS5013 E13 SSD that Valve uses.
You can follow the iFixit Guide for the steps to actually swap the SSD. Make sure to transfer the ESD shielding wrap to the new SSD.
To get Steam OS on the new drive, follow the official recovery instructions and select the “Re-image Steam Deck” script. This will install Steam OS on the blank SSD – similar to how you would install Ubuntu from a live USB.
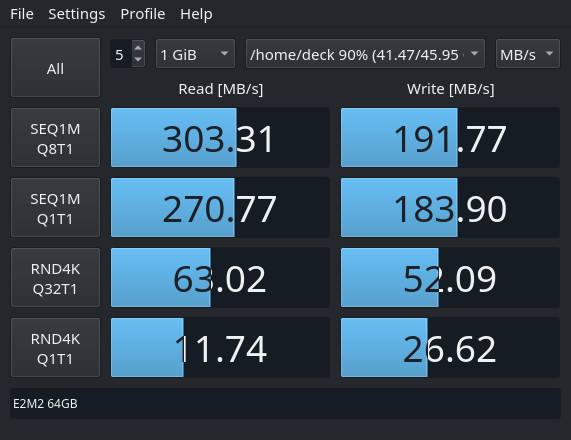
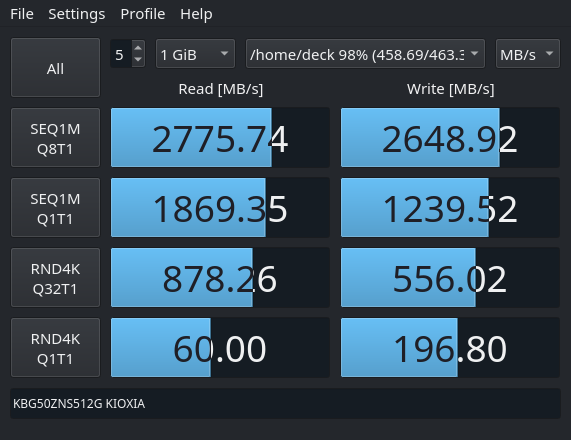
Benchmarking results
Next, I wanted to actually compare the speed of the upgraded NVMe SSD with the one of the stock eMMC memory. To this end I used KDiskMark – an open-source alternative to CrystalDiskMark that runs on Linux natively.
The tests were performed on SteamOS 3.3.1 using KDiskMark 2.3.0.
eMMCNVMeThe median of 3 KDiskMark runs
In short, the NVME offers roughly one order of magnitude faster throughput over the eMMC. Whether you feel this in-game, highly depends on the given game. For older titles, even the eMMC is so fast, that you cannot read the hints on the loading-screen. However, for something like the Flight Simulator 2020 that shuffles huge assets around, it will surely be noticeable.
Finally, the peak read performance of 3.5GB/s is not reached. This might be due to the PCIe 3.0 bottleneck – I did not bother putting the drive in a PCIe 4.0 device. Still, there is a significant advantage in writing performance over the older Kioxia BG4 series, that only do 1.4 GB/s.
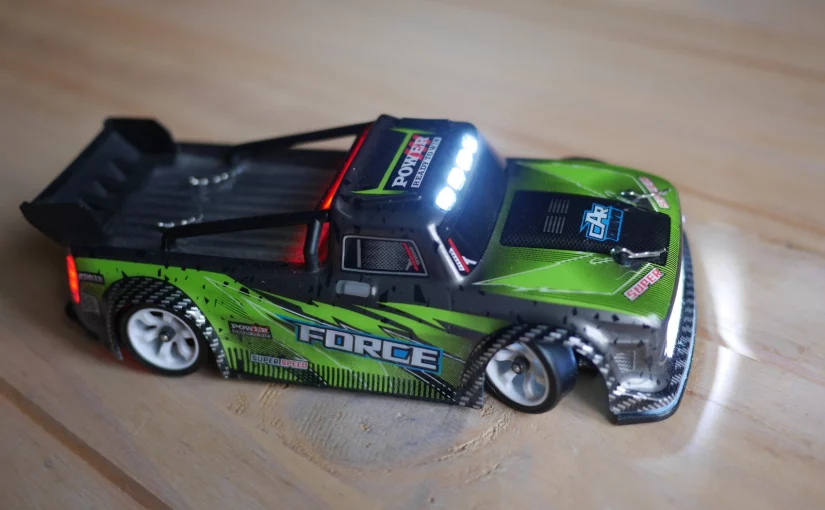
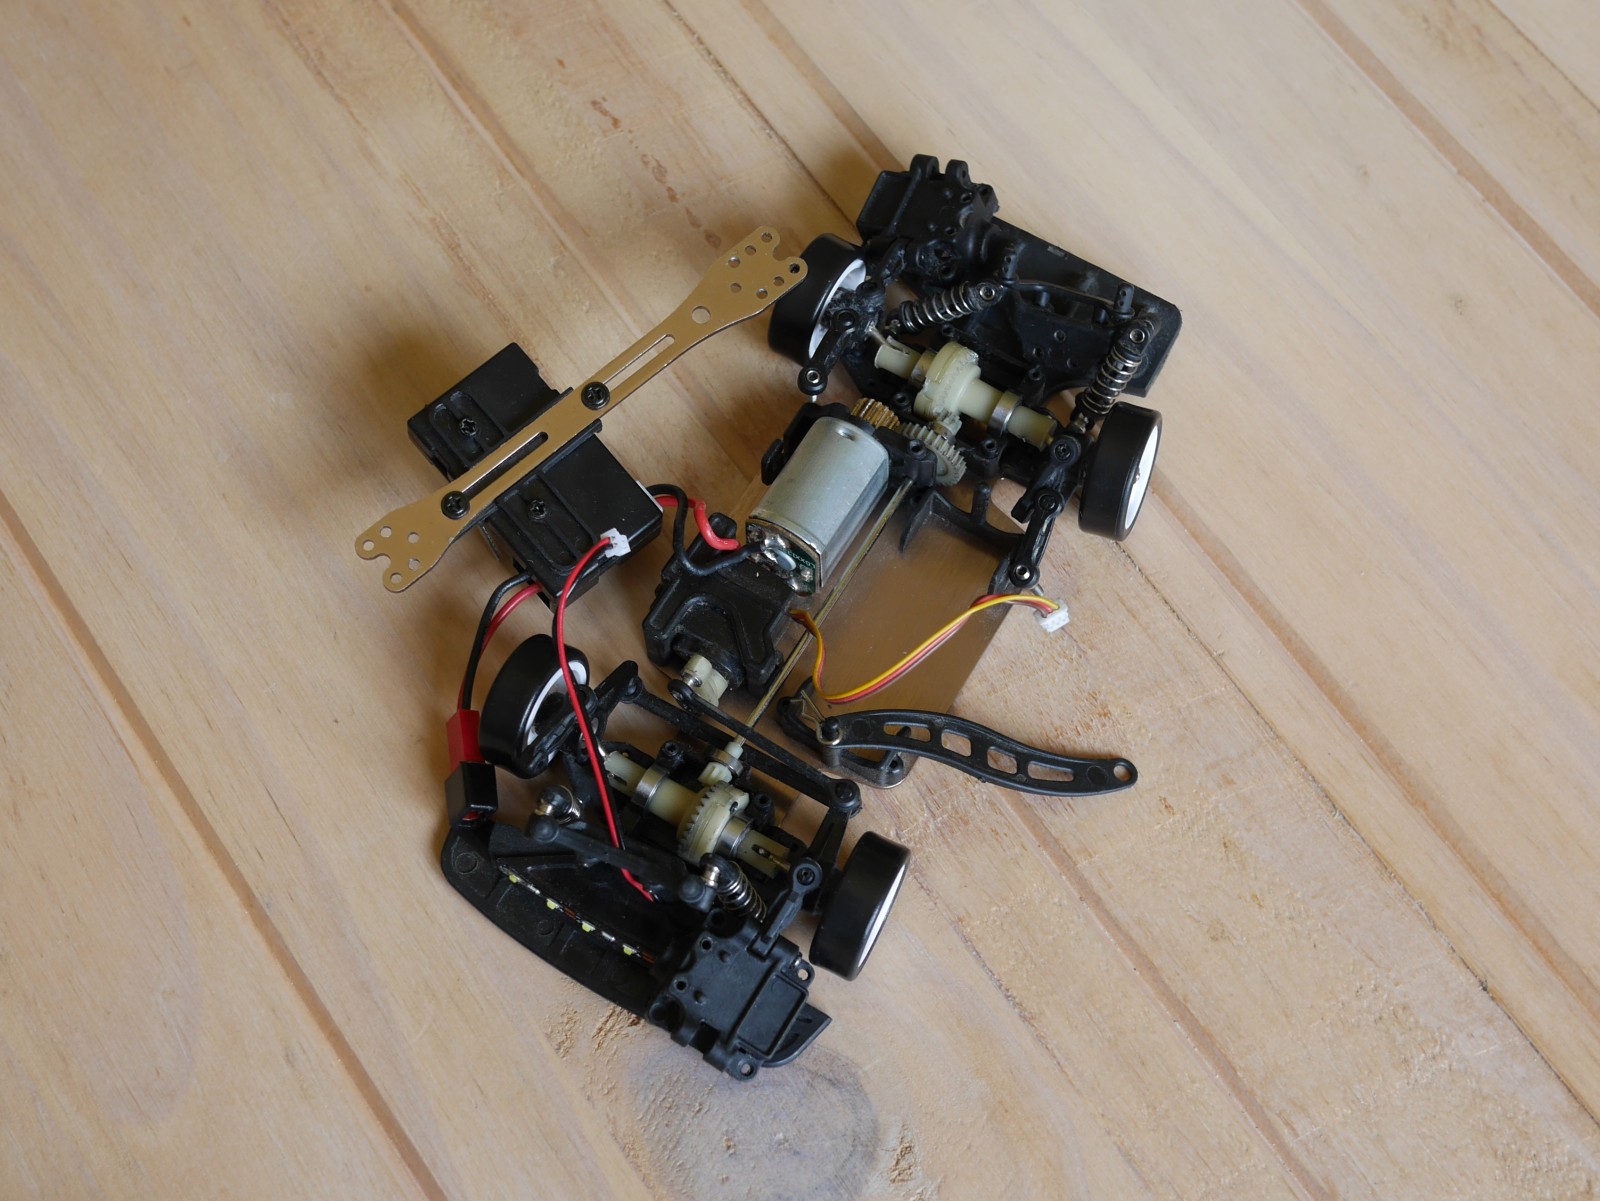
This car is the latest iteration of the K989 (rally car) platform, of which there is also variant specifically for drifting, namely the K969 porsche. However you still should go with the more recent 284131 as it comes with an upgraded radio that has no dead-zone when compared to the previous one. This will give you better control of the car. Additionally, the 284131 now has metal ball-heads on the shocks and on the servo horn which allow those parts to move more smoothly. Then, it comes with a preinstalled light-kit, that helps guessing the direction of the car from far away. Also, some adjustments were made compared to the K989, to cope with the heat generated by the motor; the transmitter module was rotated by 90° to move it away from the motor and the motor pinion is now all brass, making it more heat resistant.
The only downside is really the ugly hoonitruck chassis, but at least this will be authentic after we do the drift-conversion.
The included battery lasts for about 20min and can be fully charged in about 25min, if your USB charger can deliver 2.5W. If you use an USB port older than 3.0 charging will take much longer. Note, that even if you get a kit with multiple batteries you should take a break of about 10min between runs to allow the motor to cool down. Otherwise it will break much faster.
Drift conversion
Out of the box, the 284131 is tuned for fast acceleration and handling at high speed
The differentials are so stiff, that you can consider them locked. This gives you best acceleration
The turning-radius is limited which prevents flipping over at high speed
The stiff shocks reduce body-lean, additionally lowering the risk of flipping
Traction is mainly achieved by the grippy rubber-tires
For drifting however, we generally run at lower speed and need precise handling there. This basically means undoing all of the choices listed above.
Drifting with the changes suggested in this post
Some of the changes are easy to do, others are more involved
Replace the rubber-tires by some hard-plastic ones. We must get rid of some grip to be able to slide sideways. I suggest just going with the K969 tires, that only cost about 5€.
Remove the spacers from both front and back suspension to make it soft. This will increase forward grip while drifting.
Use the upper hole on the servo-horn to get a tighter turning-radius. Unfortunately the stock ball-head does not fit in the upper hole and you cannot get the old servo-horn any more. I suggest using the “MINI-Q 3.5mm ball-head” instead. It will set you off by about 3€.
Most crucially, we need locked differentials in the back and opened differentials in the front. The locked differential will cause the back to lose traction and drift. Contrary, the open differential will keep traction and allow us to control the drift. This is a difference to the K969, where both differentials are locked and the car merely slides (like on ice) instead of drifting.
The good news is that the stock diffs are so stiff that you can just keep them in the back and they will behave as if they were locked.
Making differentials work
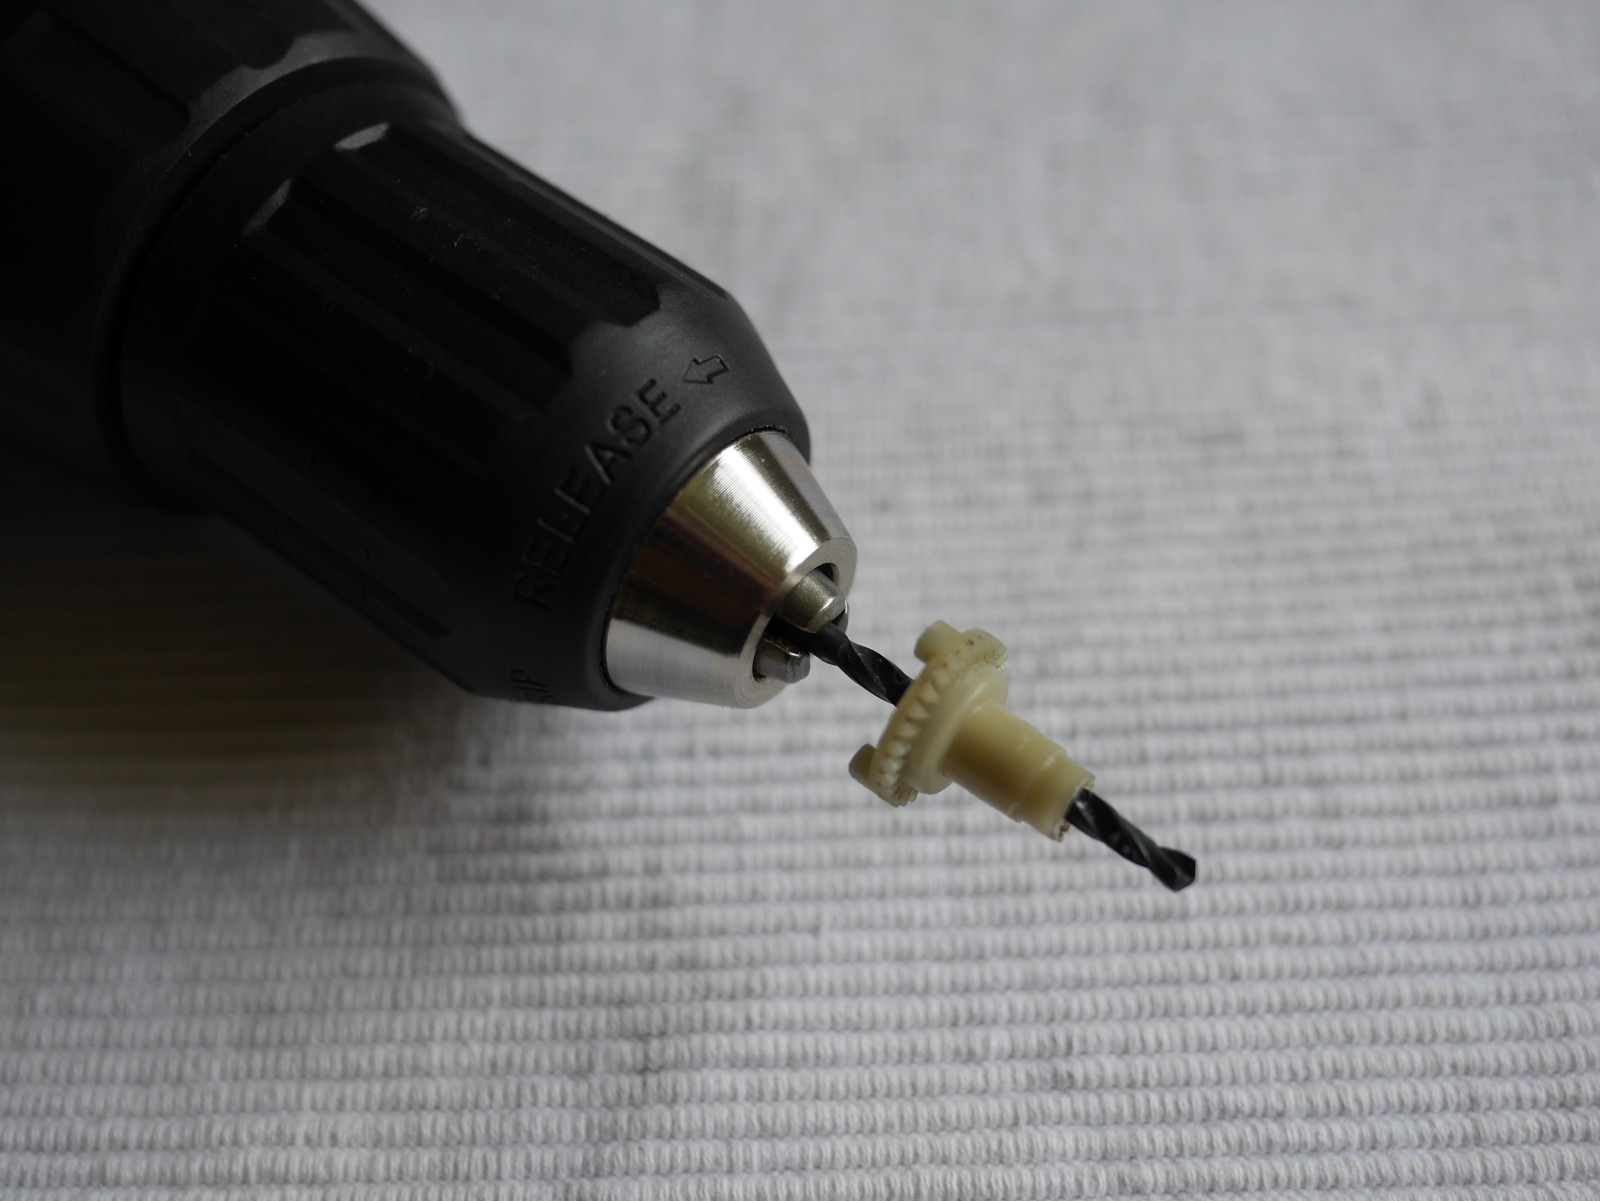
The bad news is that getting actually working (i.e. open) differentials is not that easy. The cheapest option is to dissemble the stock one and loose it up. For this, I recommend using a (3mm) drill to widen the diff housing. If you try to use sandpaper on the diff arms, you will probably not make it uniform enough to run smoothly.
Loosening the diffDiff orientation for referenceLiPo tester
One thing to watch out when adjusting the diff is that both diff-arms have the same resistance. You can hold down the center and rotate each arm to test this by hand. Also, when assembled, the car should accelerate in a straight line.
If you dont want to go through the hassle, you can also just buy the Mini-Z MD005 diff (15€) and a pair of extended 11mm swing-shafts (10€) to compensate for the shorter diff arms.
If you want the best diff possible, you can go for the Mini-Z MDW018 ball diff or the MDW017 one way diff. Especially the latter gives you even better controls for drifting. However each of those costs as much as the whole 284131 RTR kit.
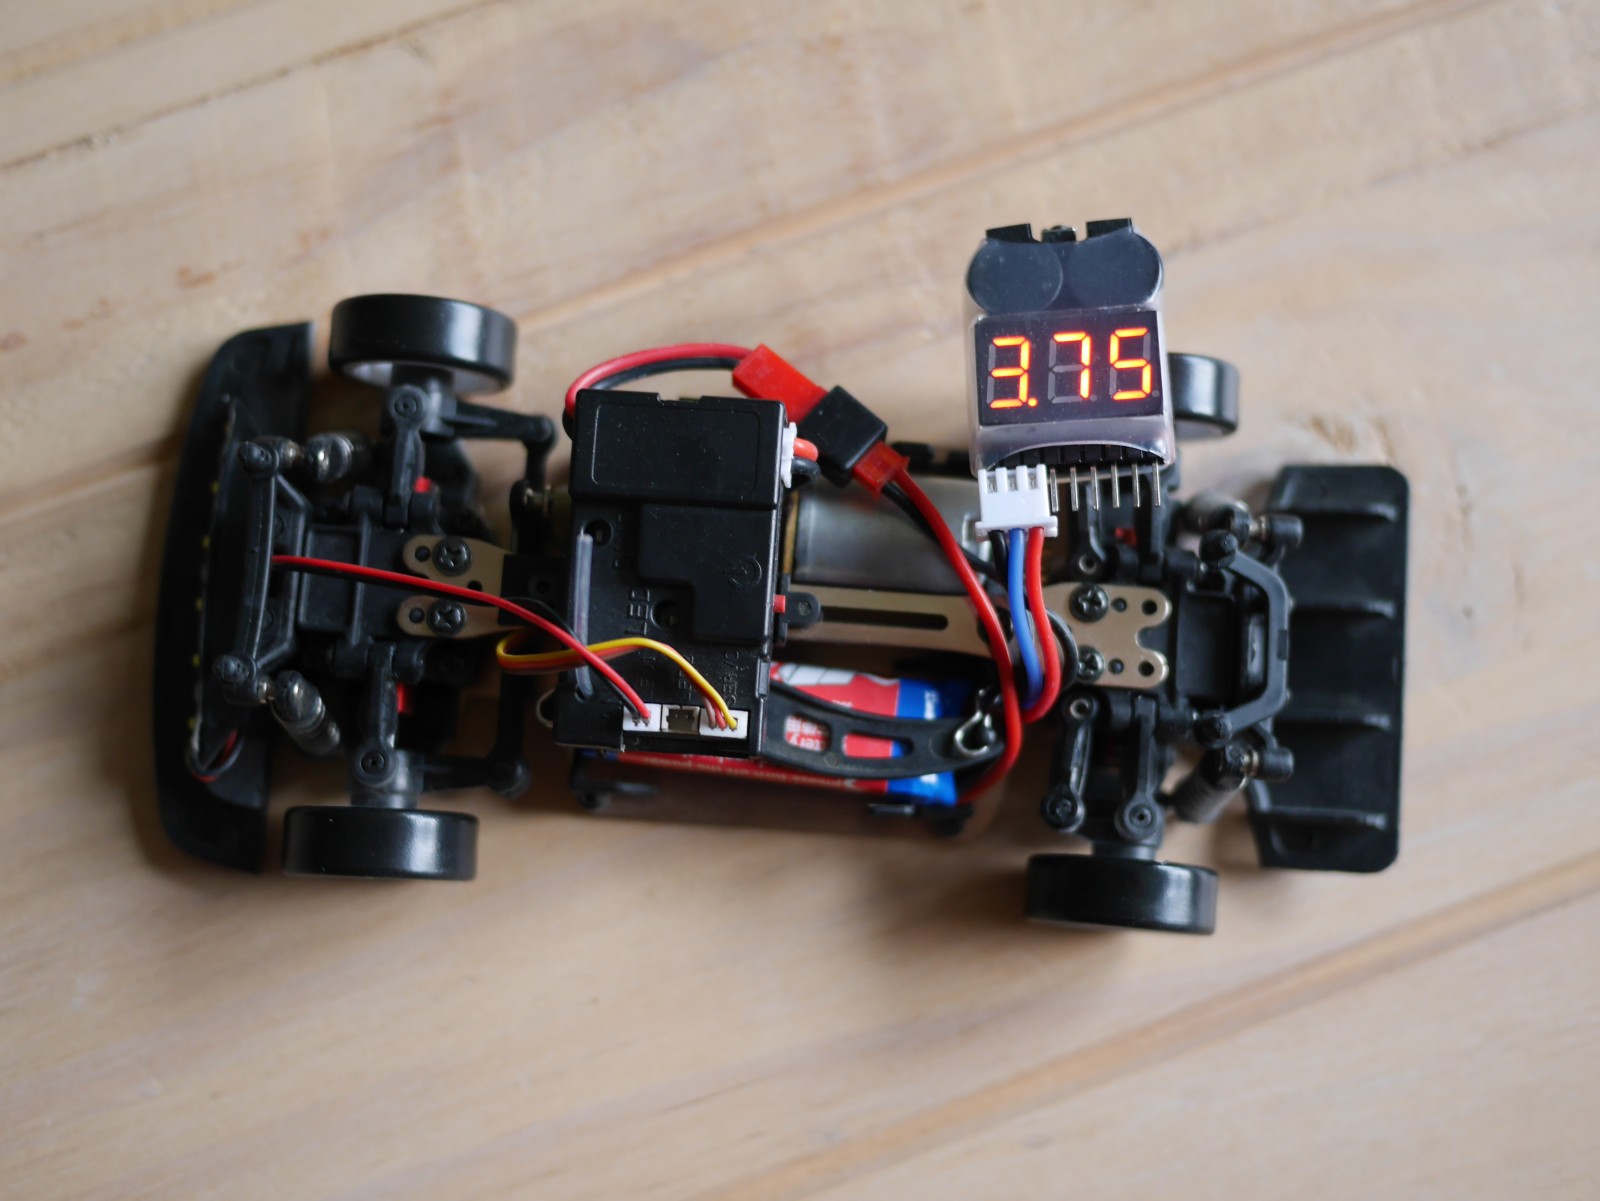
Lipo tester for storing the batteries
When ordering stuff anyway, make sure to also get a Lipo tester. Those cost about 2€ and allow monitoring the charge of the battery. This is useful when you want to take a break for a few days. In this case the battery should be at 3.8V per cell. Otherwise you risk permanently damaging the battery. To get there, you can keep the tester connected to the white-plug while driving and set the beeper to that voltage. If the beeper is too loud, you can dampen it by putting some cotton wool into the housing.
Bad upgrades
There are also some bad upgrades you can buy. Those either are wither unnecessary or actually worse than the stock parts. Particularly, this concerns the metal replacement parts. Metal parts are harder to manufacture at high precision, so you might actually degrade the performance by installing them. Also, they make the car heavier and thus decrease acceleration.
Generally, I would say that you do not need any of them for drifting. However, if you do touring and any of the plastic parts break, you might consider replacing those with a metal equivalent.
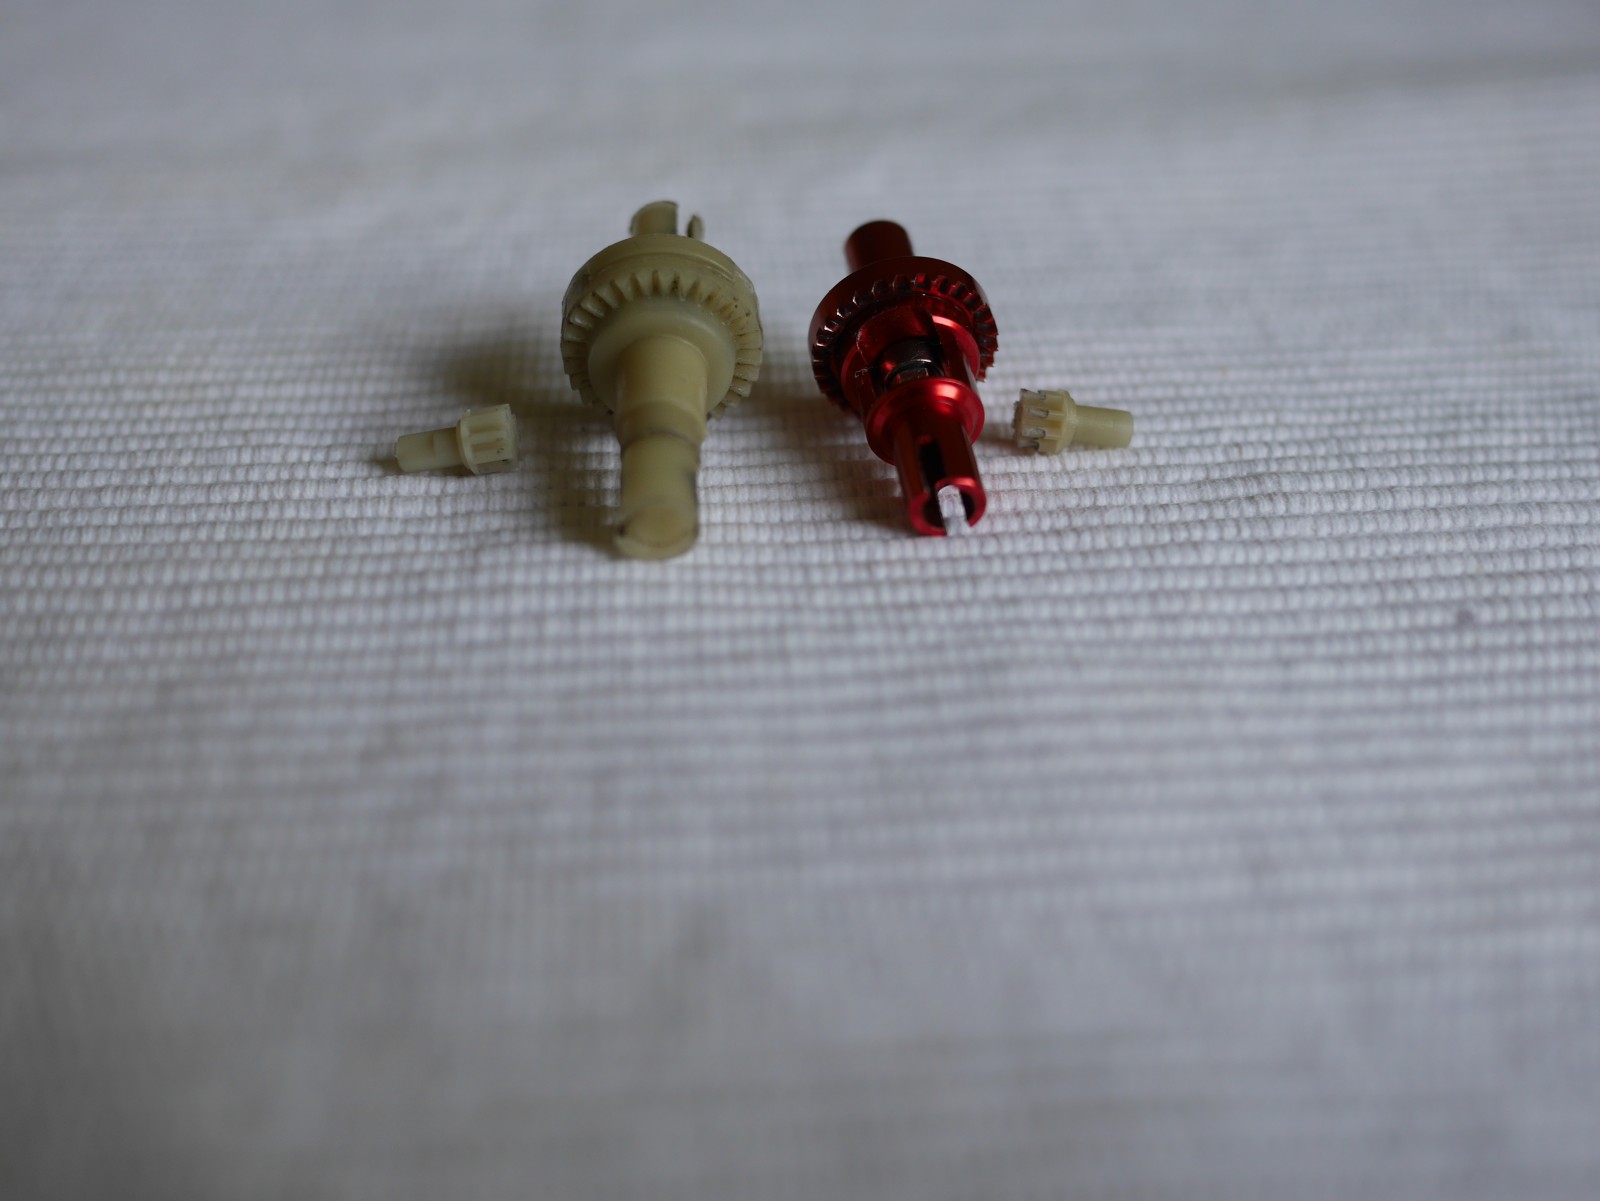
All metal ball differentials
Stock diff, good pinion – Metal diff, eaten pinion
You can get a all-metal ball diff on Aliexpress for about 8€. After some run-in those work very well and are smoother than what you get by fixing the stock ones. Unfortunately those all-metal cogs (which are also shorter then stock) will eat-up the plastic center-shaft pinion in no time as we have high traction on the front wheels when drifting.
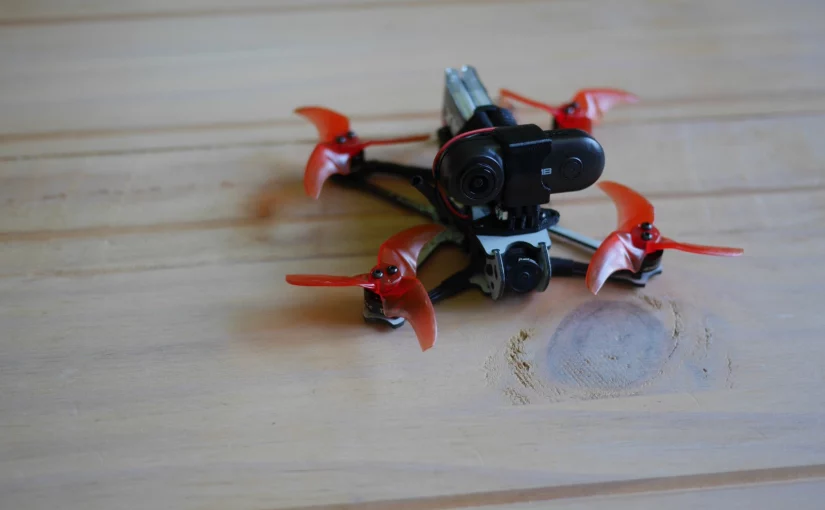
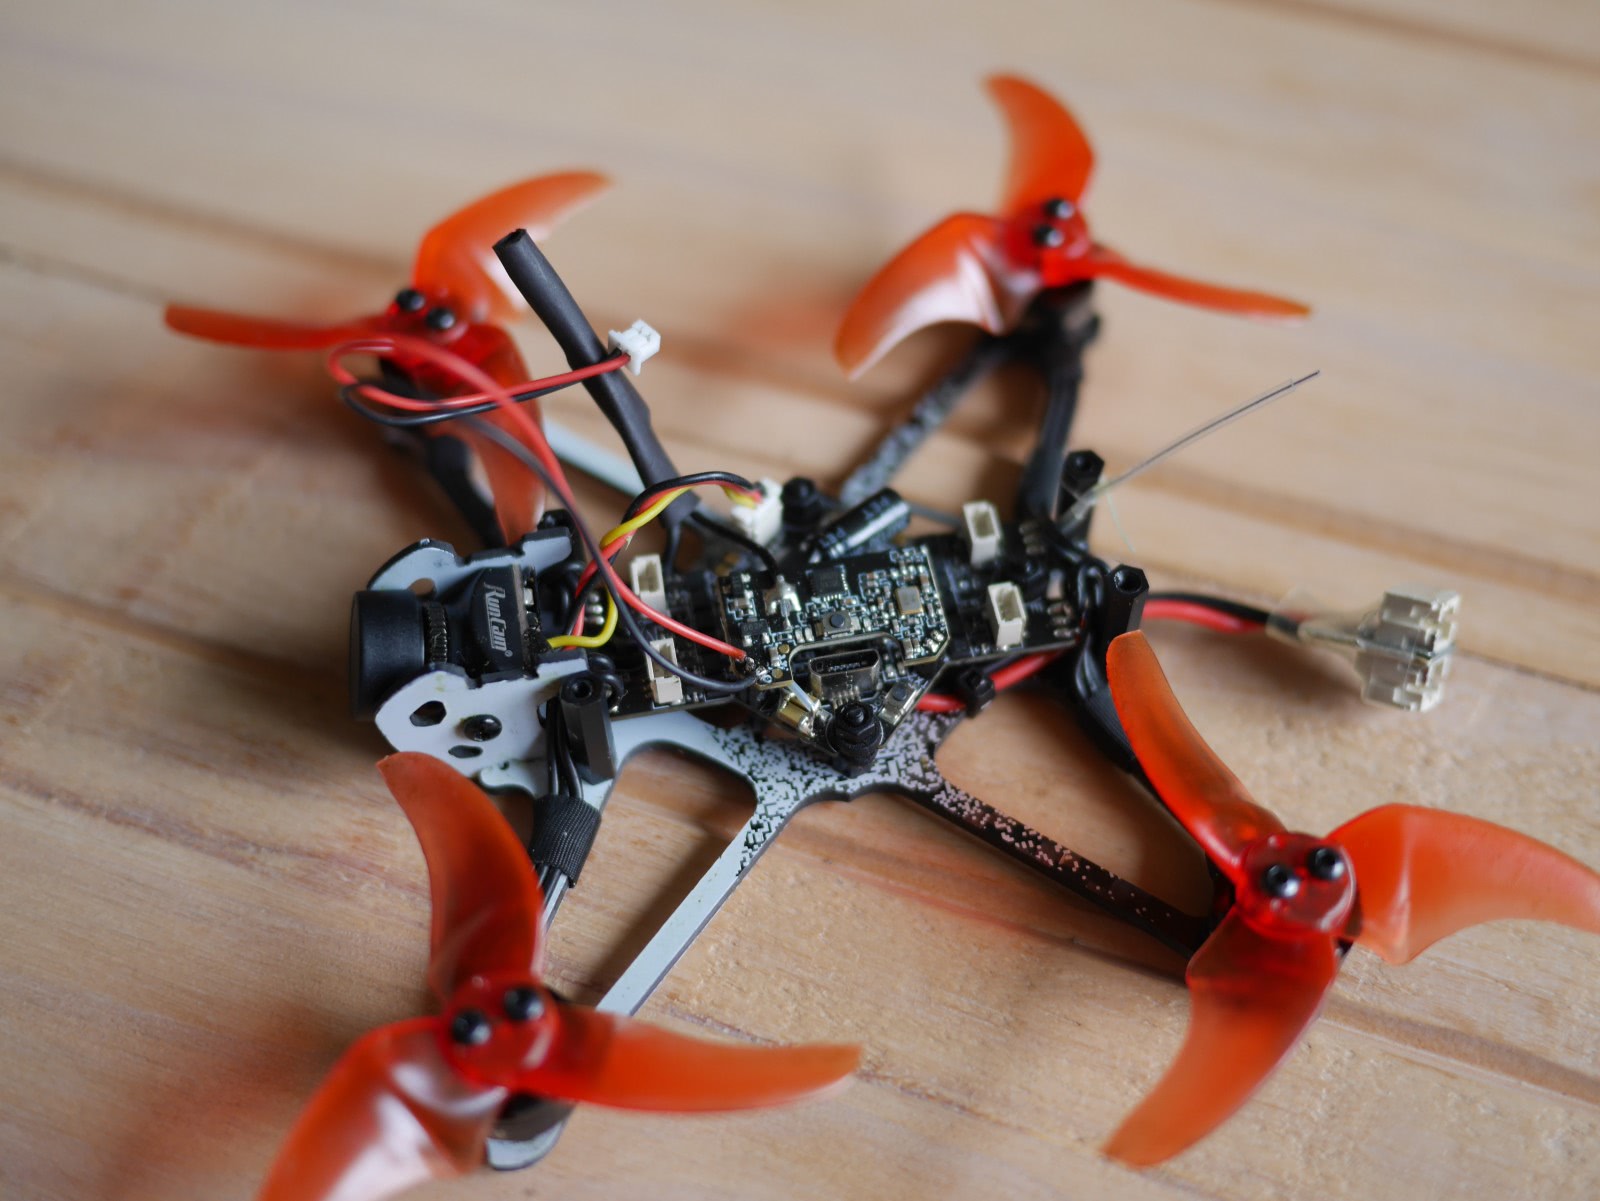
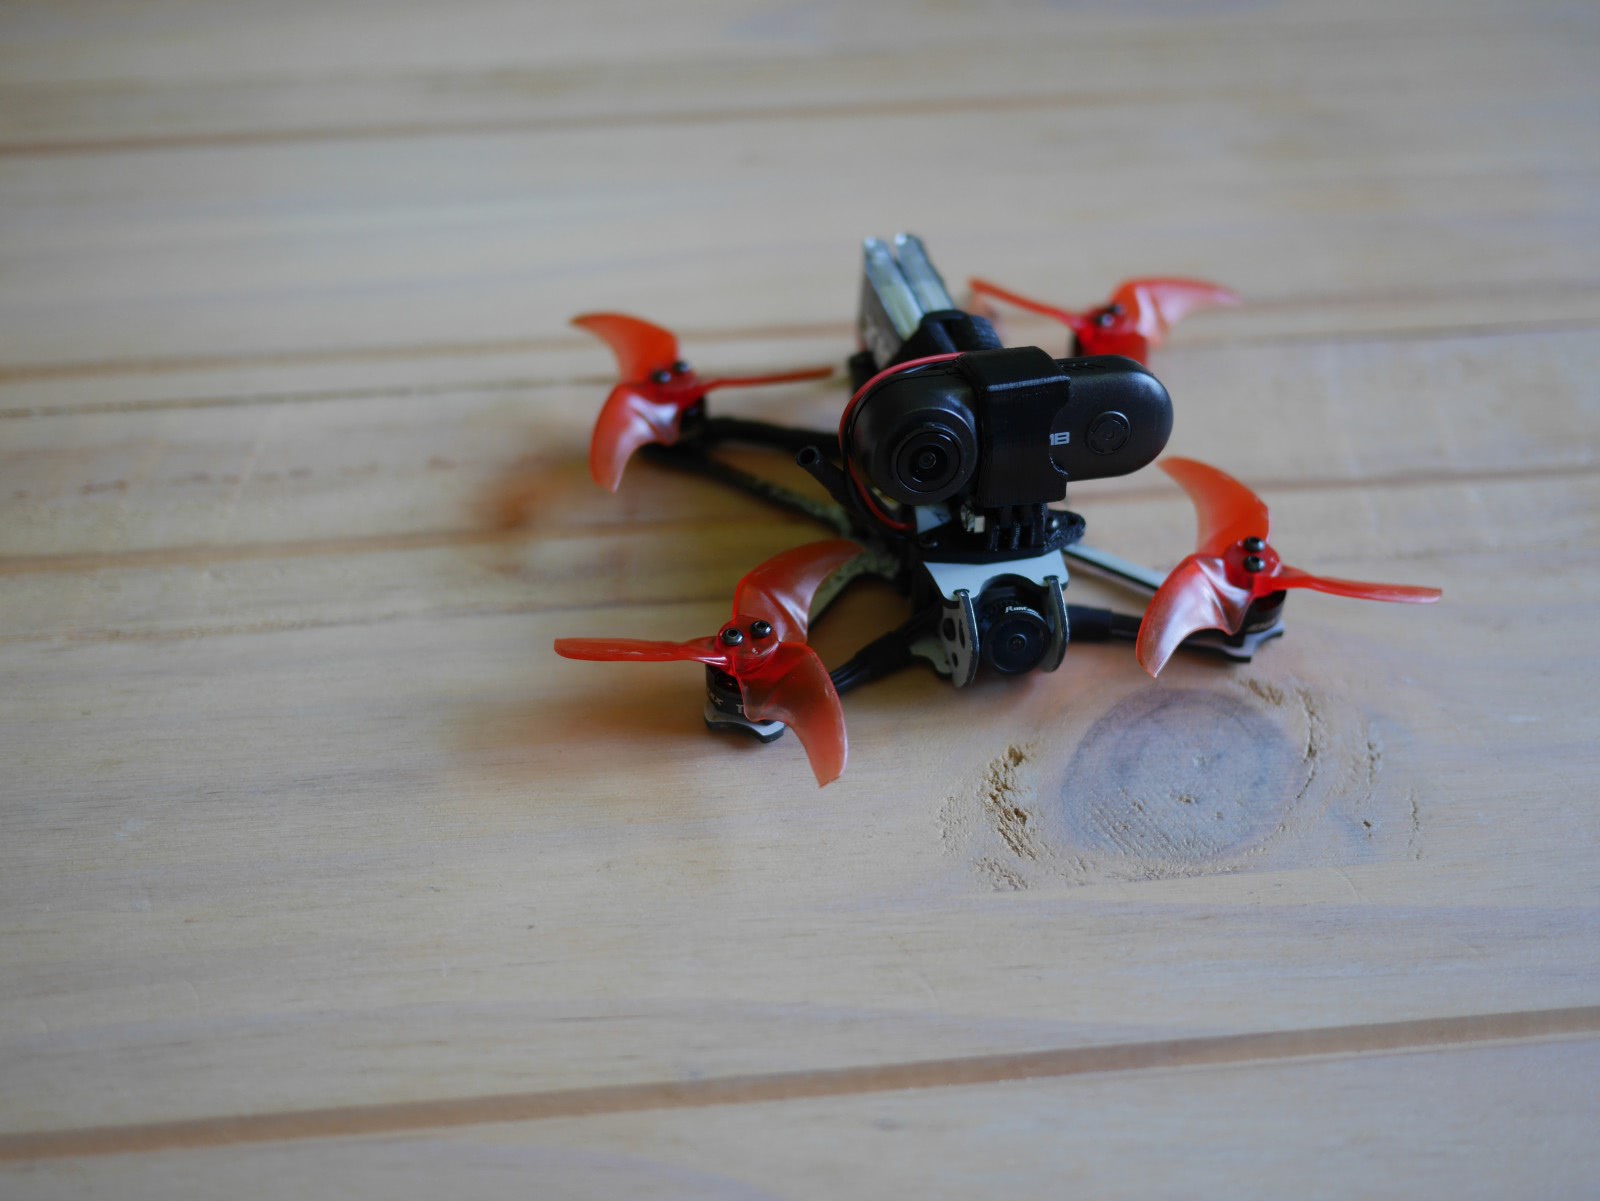
In this post I will show you how you can shoot some cinematic footage with your TH II Freestyle by mounting a RunCam Thumb on top. This cam only weights 13g including the mount and thus does not impact the flight-time and performance much. Also, it is easy to remove it again in case you want the full performance back.
The procedure is quite simple as you only need to solder two wires and can use the stock parts for the rest. You need the package that includes the 3D-printed mount though.
Note that there is a new “naked” RunCam Thumb variant now, which only weights 6.6g that you can use to further reduce the weight.
Mounting
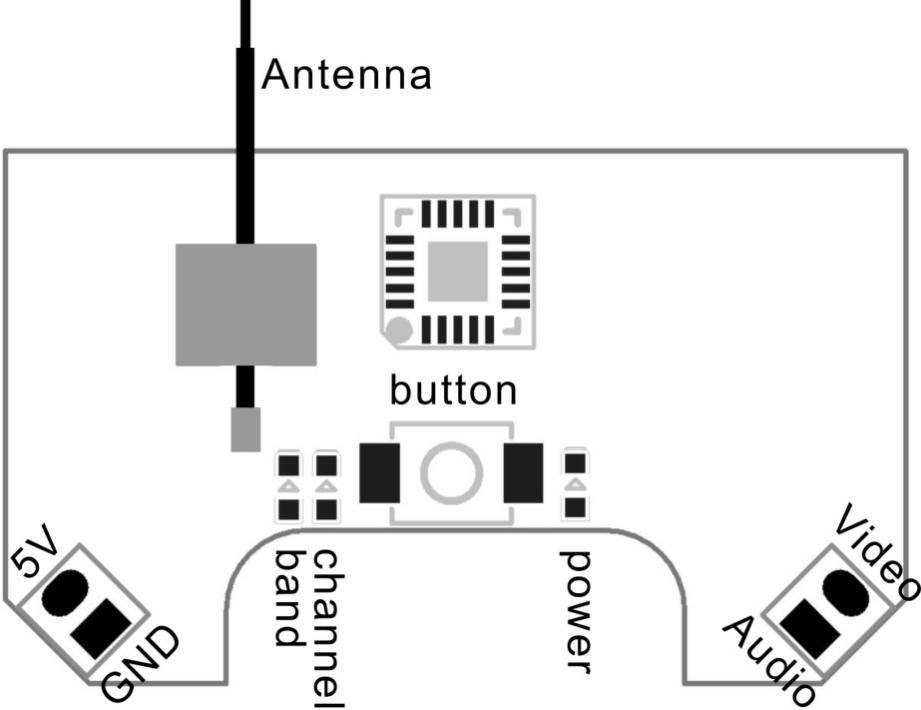
First, we need to solder-on the power-connector. For this, remove the top plate so you get an easier access to the pins.
We will use the 5V connection coming from the controller-board, which also powers the VTX. The images below show the result and the board schematic for an overview.
Plug soldered to the VTXVTX board schematicRouting the cable
To keep the power-cable away from the rotors, you should route it behind the VTX antenna.
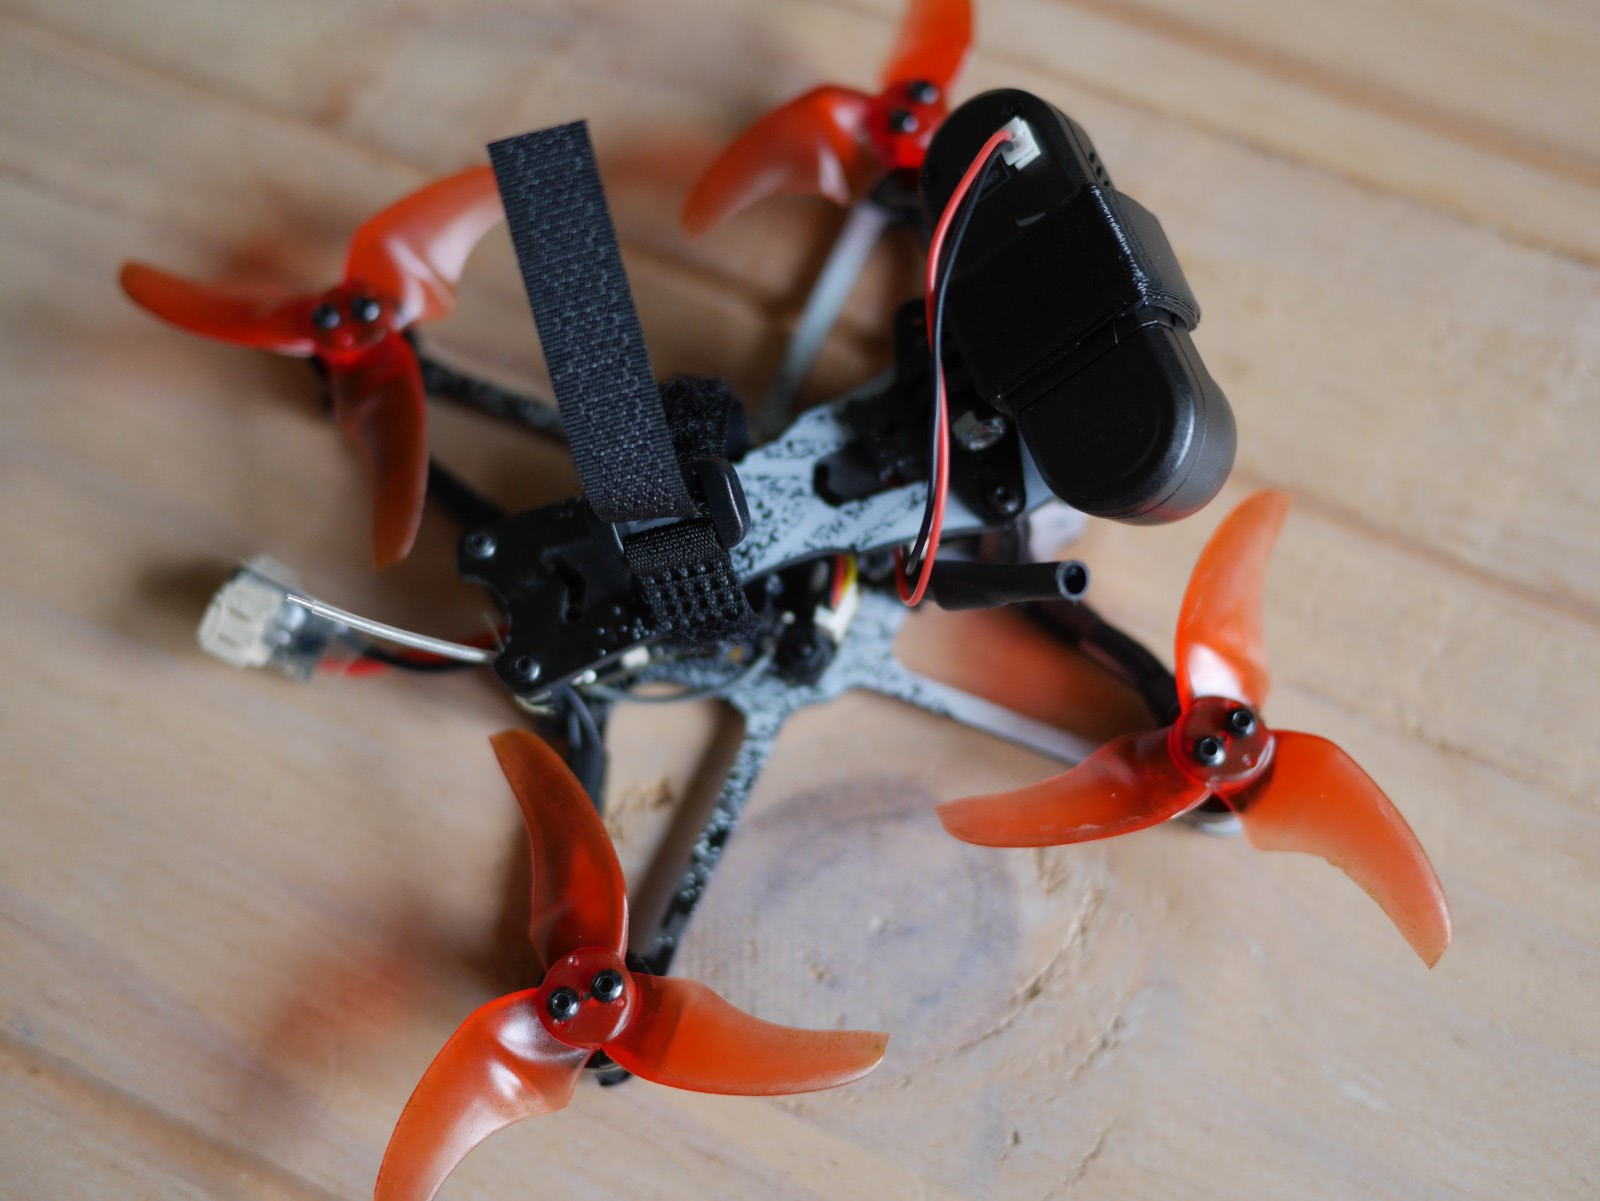
The camera-mount itself, can be attached by using the screws that hold the top plate – they are long enough to keep both in place. Note, that I shifted the mount to the left to keep the center of mass and the lens closer to the middle of the quad.
Gyroflow Results
There are some reports about issues when using Gyroflow with the RunCam Thumb recorded data.
Below are the results of the v2.1.0 firmware with Gyroflow v1.1. I disabled the zoom and increased the FOV to include the invalid regions so you can see the gyro compensation in action
You can see how Gyroflow removed the radial distortion and keeps the image-center steady by shifting the frame based on the gyro data. So the gyro based stabilization definitely works.
After being absent from the RC world for some time, I recently took another look at the advances FPV drones have made. The last time, I was mainly into RC helicopters as FPV flight seemed a fiddly and expensive thing to do.
But progress did not stop and nowadays there are multiple options to get a complete FPV kit for 200-300€. I picked the Tinyhawk III RTF kit and here are some impressions of using it and how it compares to alternatives.
Coming from RC helicopters it is amazing how durable the drone is. I literally learned flying using stock parts only and keep on flying them as of today.
When getting used to maneuver the drone, I found the default tune in the 3 flight modes Angle, Horizon and Air quite helpful. In Angle Mode the drone tilt is limited to about 20° so you wont get too fast and you can focus on throttle and momentum control while flying inside. Switching to Horizon mode is a nice intermediate step. The Angle is no longer limited so you can go fast. This requires you to actively break like in Air mode. However, as the drone still auto levels you can safely fly inside. After flying Horizon mode inside, going outside and using Air mode was surprisingly easy for me.
In total it took me about 2 Weeks going from bumping into the ceiling and floor on Angle mode to confidently flying Air mode outside.
The only casualty is a small dent in the lower right prop, which I did not bother switching so far.
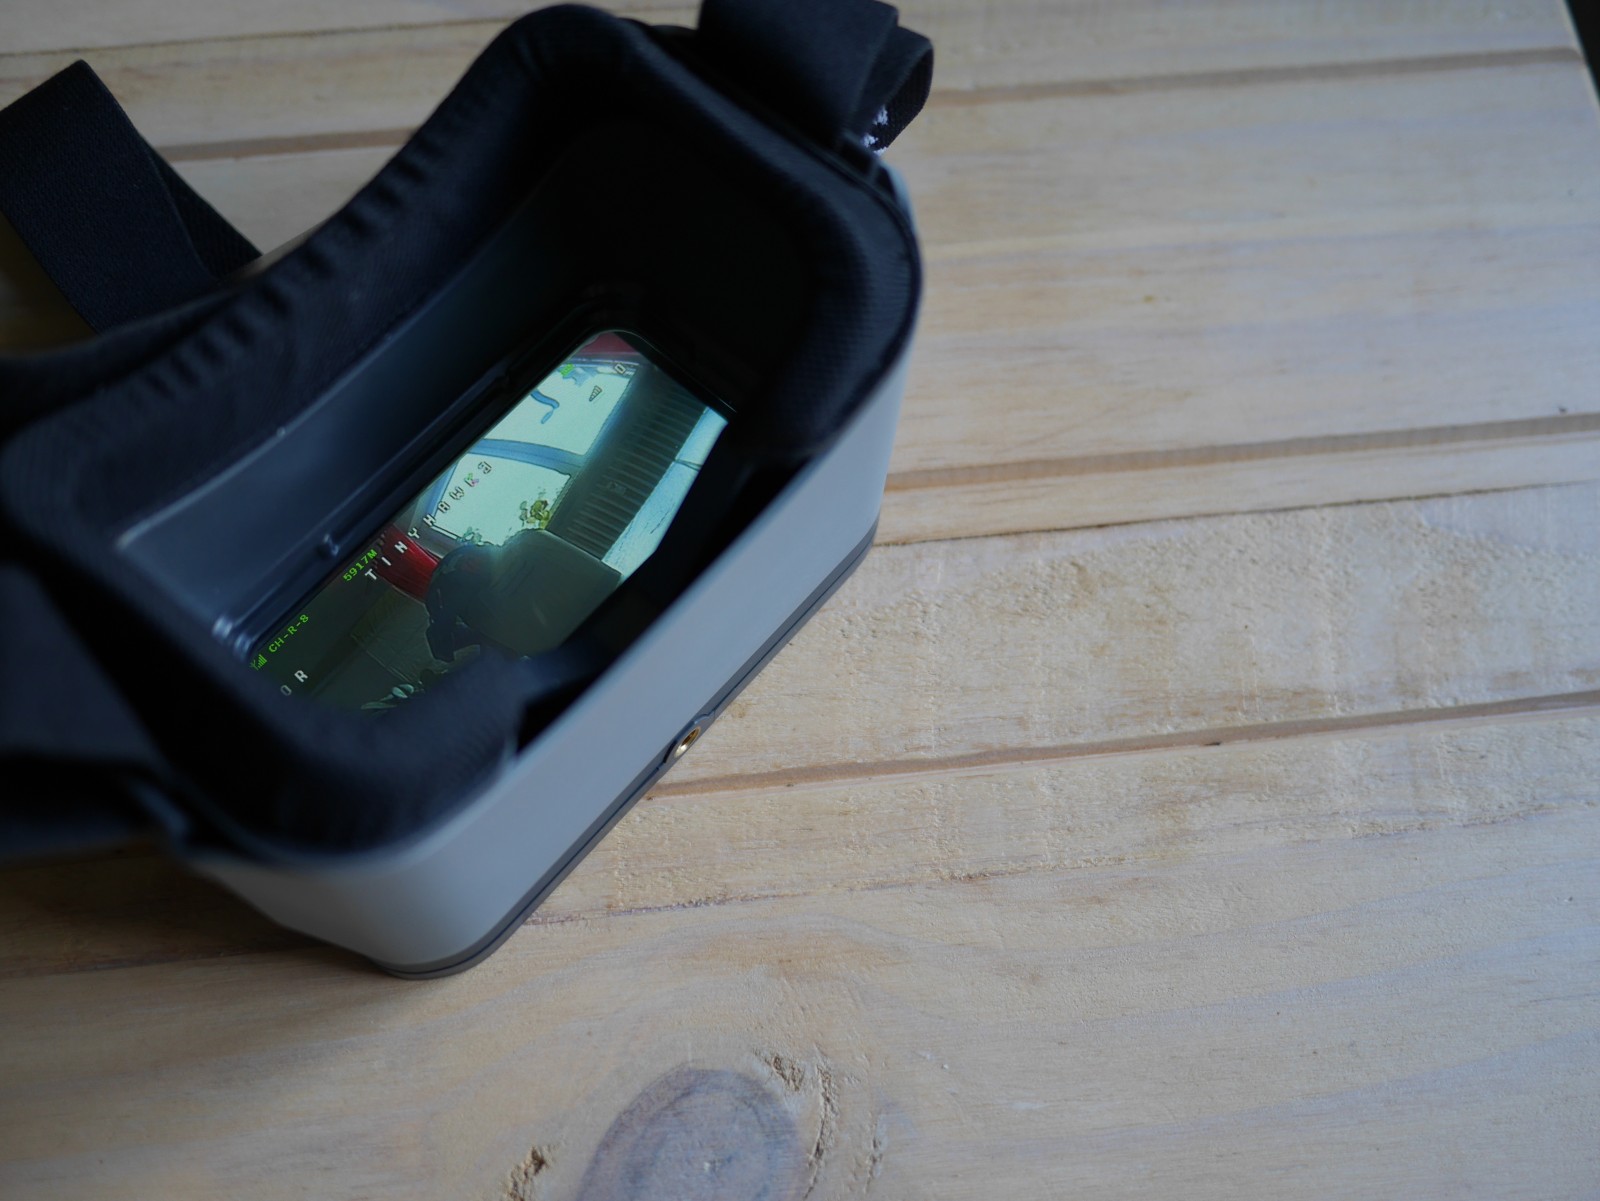
Goggles: Transporter 2
The part that made me choose this particular RTF Kit are the Googles as they are very well though out.
First, you can adjust the focal-length in 3 steps. This is useful if you are near-sighted or if you want to adjust the FOV from immersive to a tunnel view.
Then, the display resolution of 800×480 px is a good fit for analog FPV, where video is transmitted via NTSC (720×480 px). The internal DVR records precisely this resolution when set to D1 mode. There is also a HD mode, but you will not get anything out of it as the incoming image is the bottleneck. Speaking of which; the RunCam Nano 4 on the Tinyhawk has a resolution of 800 TVL (800×600 px) which again fits in nicely.
Note that the DVR recording is quite bad as it saves white frames as soon as there is some noise in the image, but it gets the job done if you want to review your flight or need to find the drone.
Ultimately, the detachable display unit can be re-purposed once you decide to upgrade to better Goggles – even though I think one can stick with the Transporter 2 Goggles for a while.
One upgrade you can do straight away though, is replacing the linear antennas by a set of polarized ones. This will reduce interference due to reflected signals in closed spaces. A possible choice here are a pair of Foxeer Lollipops that you can get for about 18€.
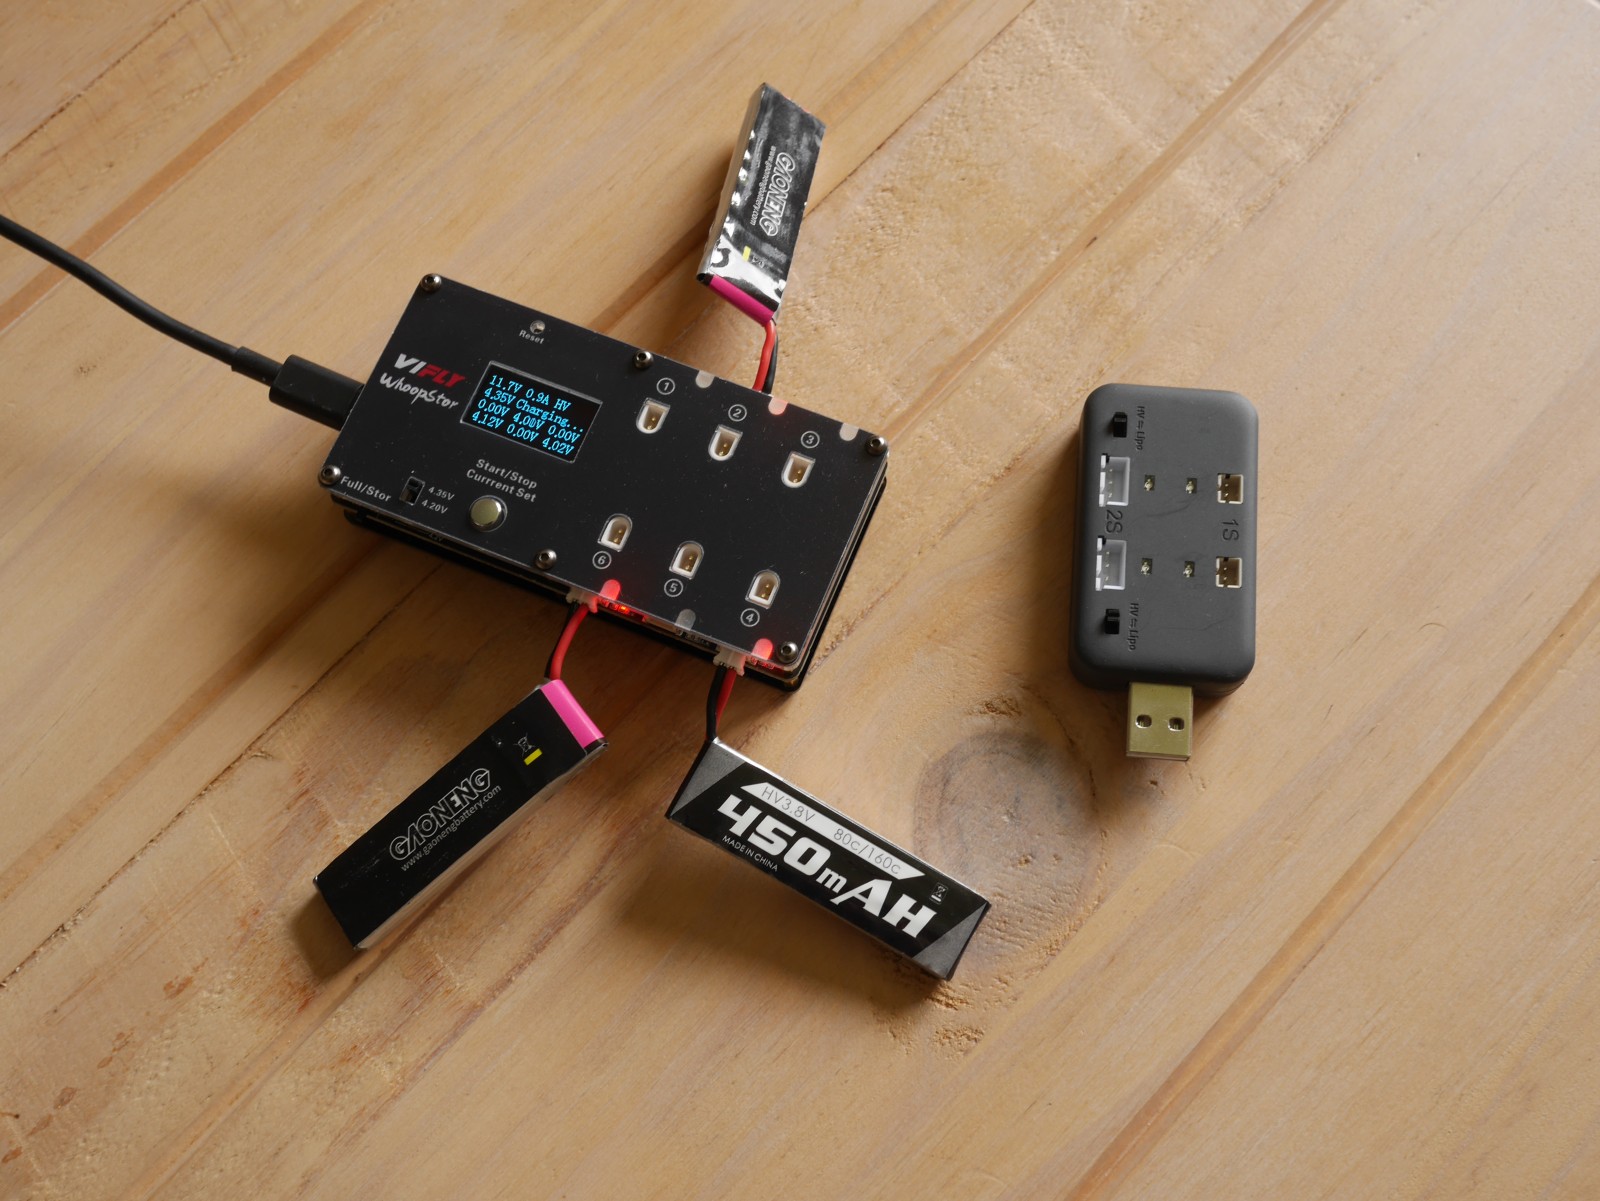
Battery and Charger
The weakest part is probably the battery & charger. For starters it only comes with one battery which the bundled charger takes about 90 min to charge (likely at 0.3A). Also, you can only charge two batteries at a time.
Fortunately the required 450mAh HV batteries are quite cheap. If you order a pack of 5 from China you can get them for about 4.5€ per piece. You should do that.
As for upgrading to a better charger, the VIFLY WhoopStor for about 33€ is an affordable option. It can charge up to 6 batteries at up to 0.9A. This allows charging the 450mAh batteries at 2C speeding up charging by 3x compared to the bundled charger. On top, it supports checking the battery voltage as well as storage-charging for when you need some days off from flying. The only thing it lacks compared to a “big” charger is resistance measurement of the batteries.
WhoopStor (left) and bundled charger (right)
Alternatively, you can get a serious charger, like the ISDT 608AC straight away. But that alone is about 65€ and needs an a serial, balanced charging cable that is about 5€ on top. With this setup you will have to always charge exactly 4 batteries at a time. Having that charger makes moving to actual 4S in the long run easy though.
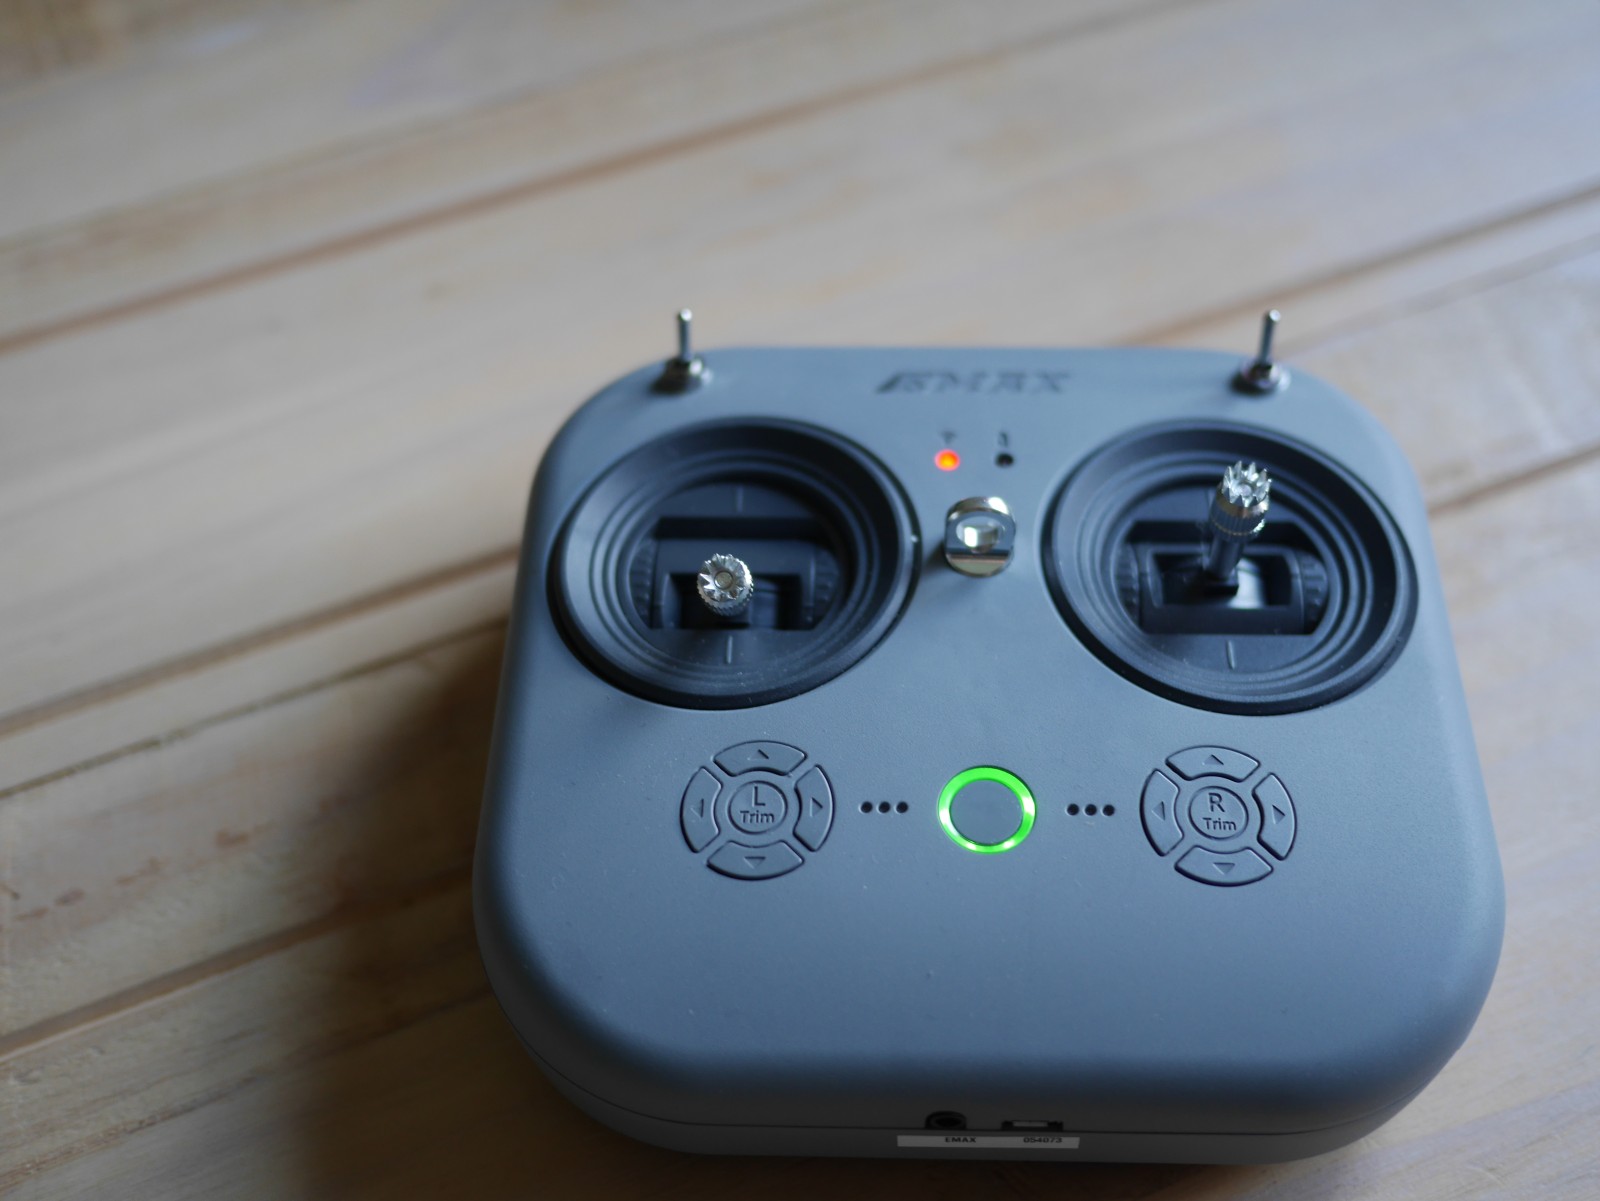
Remote: E8 Transmitter
The Transmitter only supports the FrSky D8 and D16 protocols – although there is really no reason to switch it to D16 as there are only 8 channels on the remote and telemetry is shown in your video signal anyway.
More importantly, it is usable as Joystick when connected to the PC, where each channel is reported as a separate axis – so it will work fine with all FPV Simulators.
Also notable: the radio uses a standard 18650 battery that is compatible with other radios and is worth about 10€.
It would have been nice to have a module bay to be able to attach a ELRS module – however none of the comparable RTF kits in the price range offer this. There cost needs to be cut somewhere I guess.
Speaking of ELRS; you are not really missing out on that with a tinywhoop. D8 still allows you to go for about 1km. The limiting factor will be more likely the tiny RX antenna on the drone and the VTX power. Also, even if you could manage to get that far with the Tinyhawk, retrieving it if it something goes wrong will be a PITA. ELRS really only starts making sense with GPS powered drones, where you got return to home as a failsafe.
I keep hearing that one should go ELRS from the start or you will end up swapping your RX modules on the drones if you only decide to go ELRS later. This is BS as you can just continue using the old remote for the old drones or get a remote that supports both ELRS and D8, like e.g. the Commando 8.
Alternatives
The following alternative Kits that are in a similar price-range and are all brushless, as brushed motors are really not worth the money you save.
EMAX EZ Pilot Pro
This saves you 60$, while you get the same Radio and almost the same Goggles and Drone. The Goggles have no DVR though and you will not get the nice carrying case.
BETAFPV Cetus Pro
This is also about 60$ cheaper than the Tinyhawk 3. However, the Goggles are way worse: no DVR, fixed focal-length and fixed screen.
What you get here is an easier Angle mode, with altitude-hold and hover-stabilization. The flipside of it is that it is not compatible with the betaflight configurator which is the standard when it comes to tuning the drone – in case you wanted to e.g. configure the OSD content.
Additionally, the drone uses the more modern BT2.0 connector/ batteries. However, the 1S setup does not draw enough Amps for this to make an actual difference. Also, as it is only used on BETAFPV Drones there is less choice of batteries and they are currently more expensive. Then there is the even more modern GNB27 connector at the horizon.. If you prefer Apple products, the above will probably not bother you though.
GEPRC TinyGo
This is a 2S drone, so you get more power, which makes it better outdoors but worse indoors. Much worse radio; requires 4xAA batteries, has worse gimbals and most importantly does not work as a Joystick when connected to a PC. Worse Goggles; there is a DVR, but the focal-length is fixed as is the screen.
The deal-breaker is the used FHSS (Futaba) protocol though. This is virtually not used by any other Drone on the market, so you cannot just get another BNF drone to fly with the same radio. And if you upgrade the Radio you will have to go for a multi-protocol version to still be able to fly the drone instead of being able to get the cheaper D8/ D16 only variant.
Where to go next
The following BNF drones are compatible with the Radio and also run on the 450mAh PH2 batteries that you likely piled up while flying.
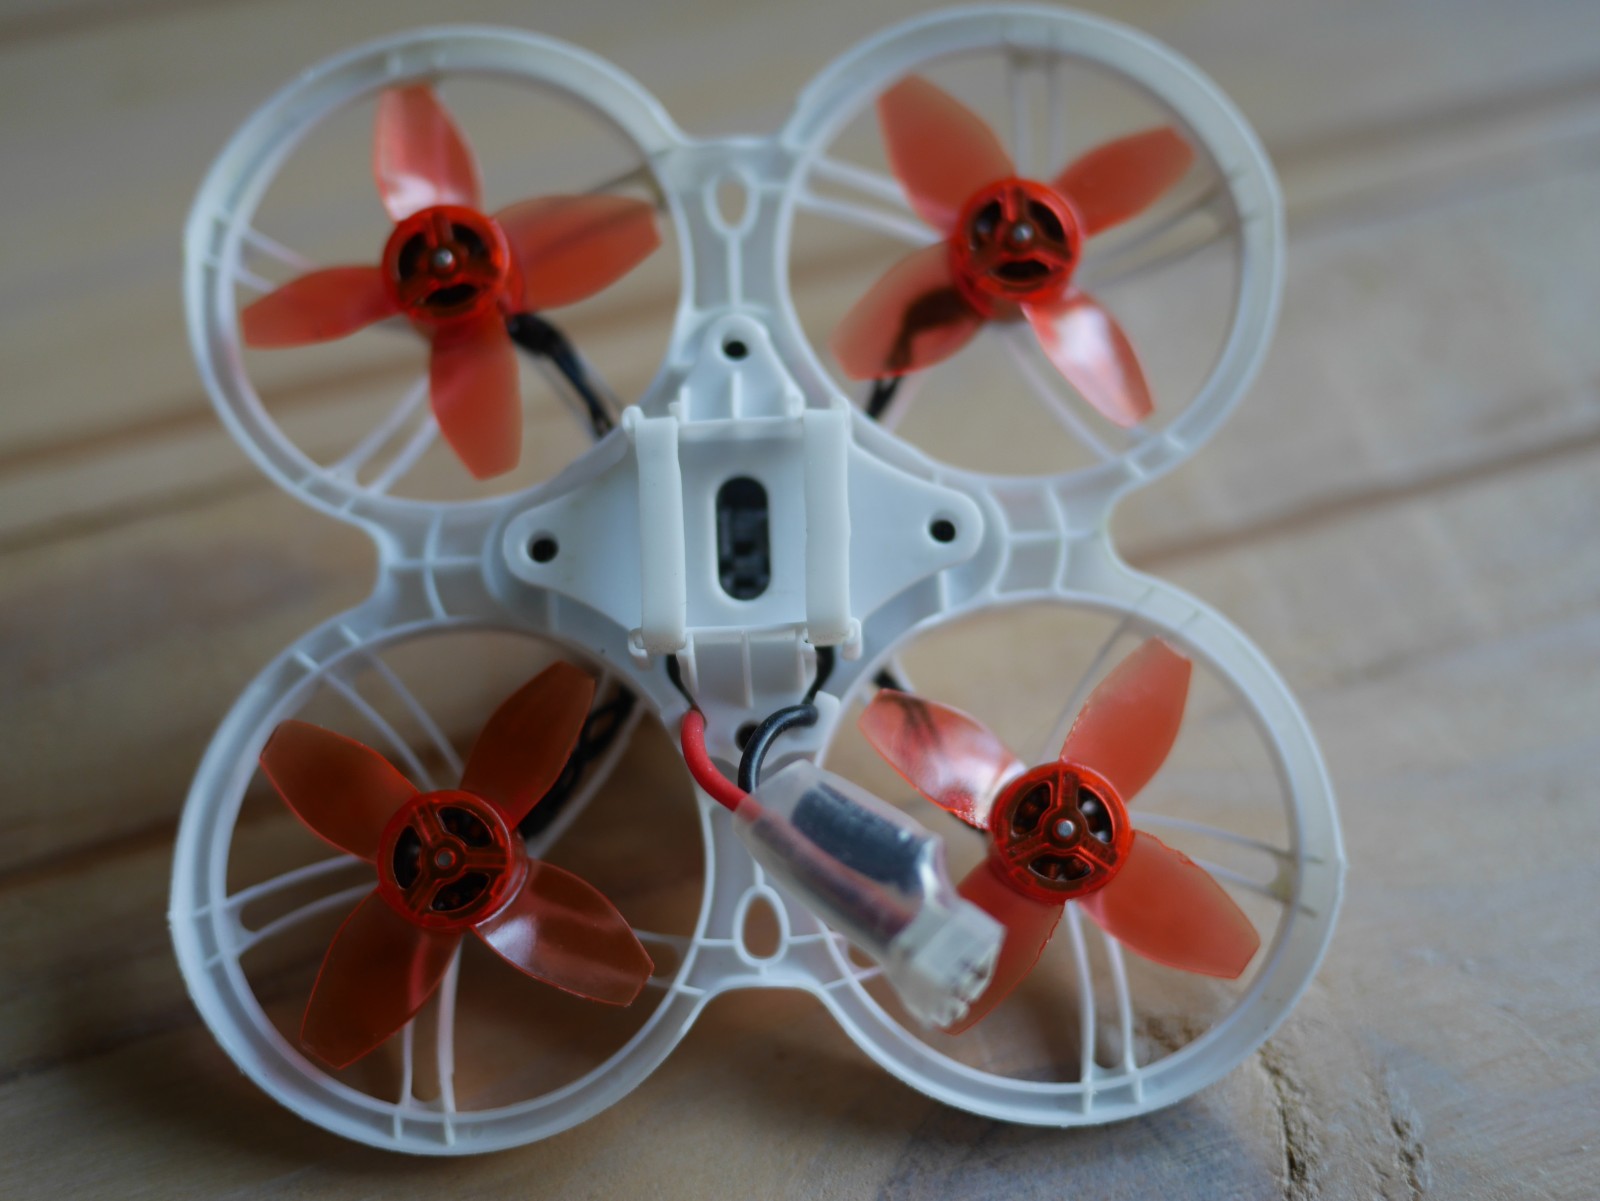
Happymodel Mobula 7 1S HD
The drone is very similar to the Tinyhawk III, however it comes with the RunCam Split 3 lite. On top of FPV streaming, it can simultaneously record the video as 1080p @ 60fps to a microSD card. The drone provides gyro logging too, so you can further stabilize the results with gyroflow at the PC. So if you want to produce nicer videos, this is a good upgrade.
Notably, the drone comes with a serial, balanced charging board as discussed in the charger section above.
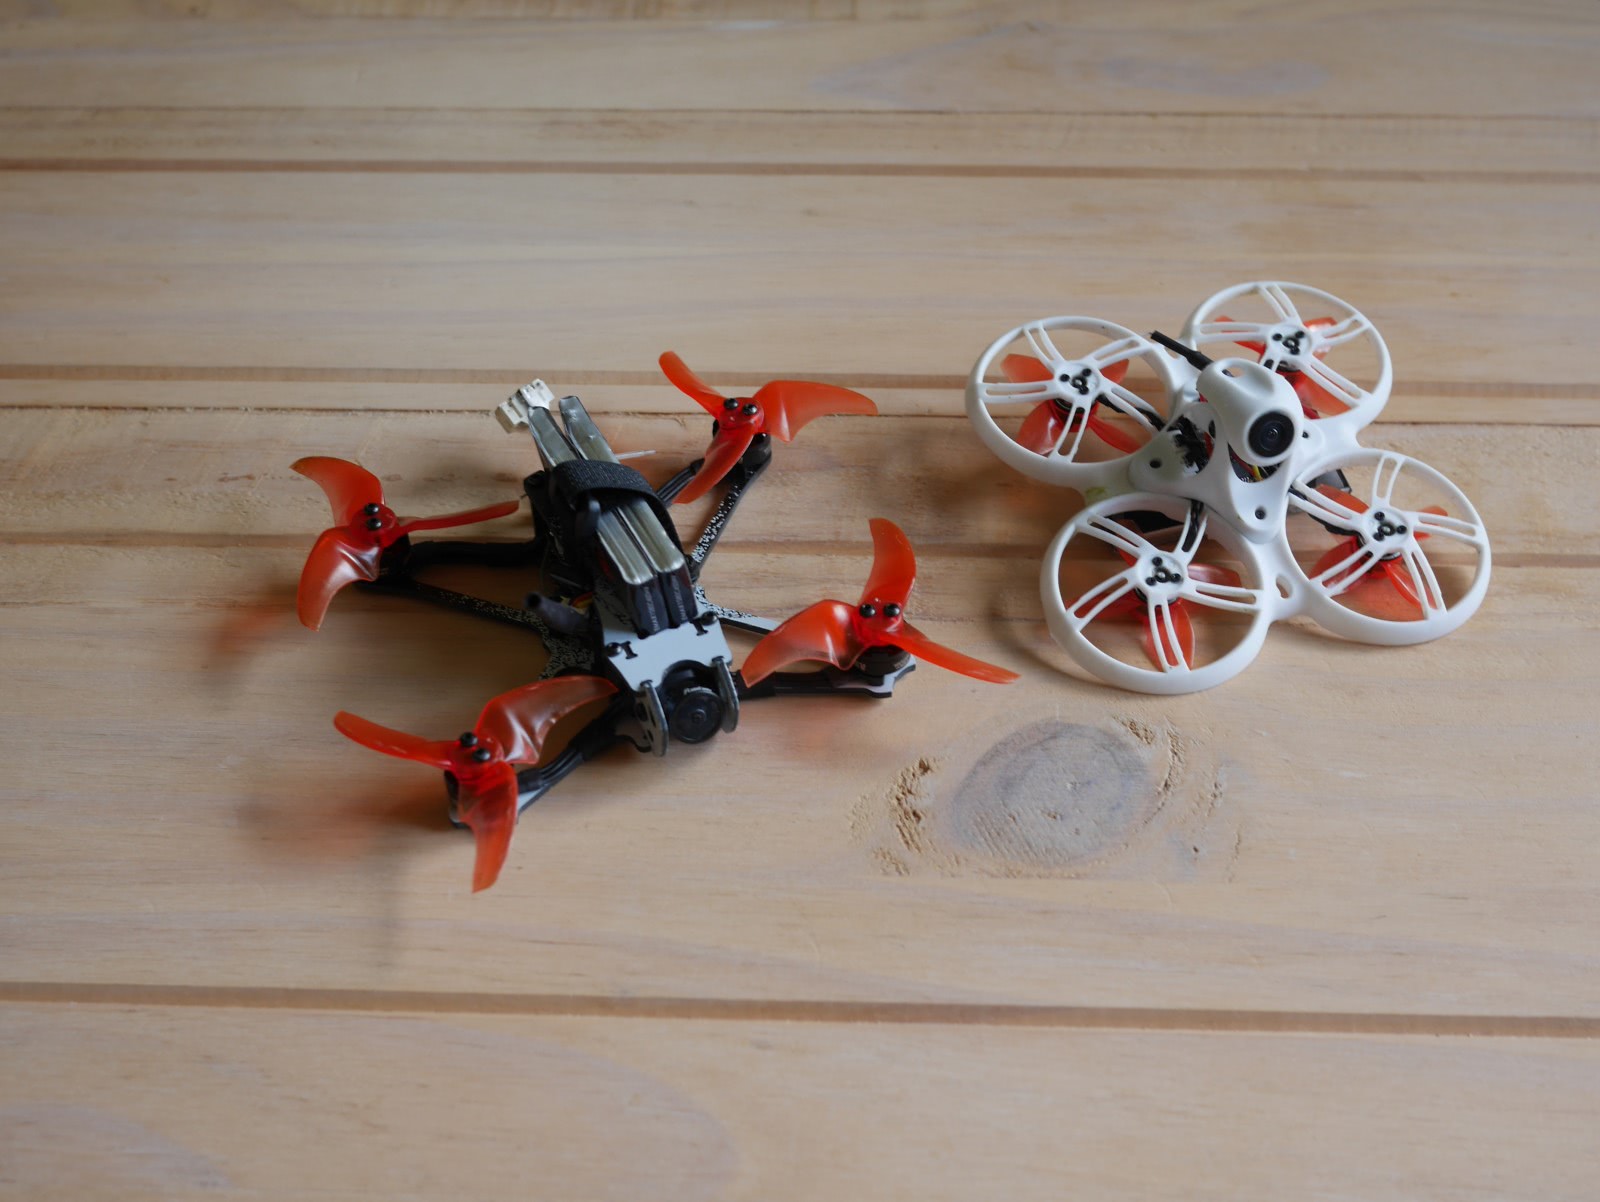
EMAX Tinyhawk II Freestyle
This is the drone to upgrade to if you prefer to fly outdoors. It is larger and heavier than the Tinyhawk III. Also it is more powerful as it flies on 2S. The latter is realized using the battery connector, so you still can use the 1S batteries.
TH II Freestyle – TH IIITH II Freestyle with the RunCam Thumb
If you like tinkering, you can also get nicer videos out of it by packing a RunCam Thumb on top. The drone is powerful enough to carry to extra ~12g of weight. Note, that this requires soldering-on a power connector for the camera to the flight-controller as the cam has no internal power-supply.
Usage with Ubuntu
If you want to use the betaflight-configurator on Ubuntu, make sure that you have permissions to access the USB serial device by being in the dialout group as:
sudo usermod -a -G dialout $USER
The Remote is just plug-and-play (as a USB HID Gamepad) and is correctly recognized by e.g. FPV.SkyDive, which itself nicely runs on Linux through Steam/ Proton.
BlueJay ESC firmware
People online ™ are telling that one can get increased flight-time by replacing the ESC Firmware by BlueJay and enabling the bidirectional DShot protocol.
Actually, my flight-time decreased by 15% (from 4:44 min to 4:02 min) when switching to bluejay & bidirectional DSHOT300.
Youtube Channels to follow
Unfortunately there are a lot of youtube channels with a wide reach that have no clue what they are talking about. Dudes sitting in a basement that get a commission when something is sold is not a good combination. Here are some channels that are actually good
If you want a equal loudness for your Music library the go to solution and the de-facto standard is ReplayGain. If you are using a music streaming service, the provider is typically taking care of that for you – but maybe you want to migrate towards your own streaming solution.
ReplayGain analyses your audio files and stores their deviation from the baseline loudness as a tag. A compatible audio player can then read the tag and correct the playback volume so all you tracks have the same loudness.
Of course things get messy once you look at details like what the baseline loudness should be and how to determine loudness in the first place. Therefore we set the baseline once and for all as 89db and consider even tracks of the same album individually. If you disagree, feel free to branch off reading up the details now.
The next issue is that ReplayGain was born in a time where mp3 was synonymous to digital music, hence the algorithm was first implemented as the mp3gain CLI tool. Nowadays you also need aacgain and vorbisgain to cover all your formats, which is cumbersome to automate.
The larger issue with ReplayGain is that it defines loudness of a track by its peak volume. While a sane choice in theory, in practice the music and advertising industries raced to increase the perceived loudness without raising the peak volume. As broadcasters also used peak volume normalization, one could blow your eardrum with that very special advertisement. Therefore the EBU R 128 was proposed which at its core is RMS based, meaning it is considering the average volume of the track.
Remember that ReplayGain merely adds a correction value to the tracks? This allows us to compute that correction value based on the R128 algorithm for a better normalization, which is exactly what the <a href="https://github.com/desbma/r128gain">r128gain</a> tool does. Being written in modern day, r128gain also processes all possible audio files by hooking into ffmpeg as a filter.
So, without further ado, this is the command to normalize your Music library:
# pip3 install r128gain
r128gain -p -r Music/
This will preserve "-p" the file timestamps and recursively "-r" process all files in the given directory.
Trouble shooting
Note that if you previously used mp3gain, your files might contain non-standard lower-case replaygain_* tags, while r128gain will only write REPLAYGAIN_* tags. To avoid confusing players with different values, you should remove the non-standard tags. This can be automated with eyeD3
In this post I want to note some quirks one needs to consider when updating the BIOS of a Gigabyte Mainboard while using Linux.
But first I want to appreciate the support that Gigabyte/ AMD provide. I still get BIOS updates in 2021 for the mid-range B350 chipset originally released in 2017. Also, the ability to update from within Linux was just added to the BIOS along the way. So Kudos for that!
Preparing the update
The easiest way to update the BIOS is doing so from within the UEFI using the Gigabyte Q-Flash utility. I dont recall when exactly it was added, but going through the changelog, it should have been at revision F30.
Having Q-Flash available, you can just download the BIOS update and copy the BIOS image (e.g. AB350NGW.51d in my case) to /bin/efi, which is the EFI partition readable by the BIOS. Next, just reboot into the BIOS and point the Q-Flash utility to that file.
Post-update quirks
Unfortunately, the BIOS update overwrites some important settings. Most notably your Machine Owner Keys (MOK) that are required for Secure Boot with DKMS modules (e.g. nvidia driver) are lost.
So after update, change the following settings
CSM Support: disabled
Secure Boot: enabled
Secure Boot Mode: standard
After this you have to re-enroll your MOK again by running:
sudo update-secureboot-policy --enroll-key
Upon reboot you will be greeted by the EFI menu, where you should select “Enroll MOK” and and enter the code that you chose previously.
You can verify that everything went right by rebooting and running
mokutil --sb-state
Also, if you want to Docker or any kind of Virtualisation, you have to re-enable AMD Secure Virtual Machine (SVM), which is inconveniently buried under
M.I.T > Advanced Frequency Settings > Advanced CPU Settings > SVM Mode: enabled
This post will be for those of you that care about privacy – i.e. if you want that information about you is exclusively under your control. In that context not only Google is to blame, but actually most of the cloud services we know and use today.
Still Google will serve us as a nice placeholder as it is the market-leader when it comes to providing free services in exchange for your user-profile that Google in turn uses to sell target advertising. Even if you are fine with that, Google is also infamous for killing services – which might hit the one you rely on eventually.
As the world is moving mobile-first, a prerequisite for replacing a service is that we can easily integrate the replacement with an Android device. Some might wonder why I chose Android here, given that it is made by Google. See, the problem is not who makes a service/ device, but who controls it. And with Android the main leverage for Google is bundling its services. If you take them away, the device itself is fully under your control – in contrast to Apple/ iOS.
At the heart of our efforts will be Nextcloud. This started as an open-source alternative to Dropbox/ Google Drive, but is nowadays grown into a platform for a plethora of different services. The main selling-point is that you can just install Nextcloud on your own machine – ensuring that your data stays private. The software being Open-Source also means that it is not under control of a single corporation – in fact Nextcloud was forked from its predecessor Owncloud after a corporation tried to put the screws on its users.
Note, that if you are serious about this, you will need to invest around 500€ to get a machine for hosting that is decently fail-safe. If you rather want to be cheap, you can also just use a RaspberryPi to get away with less than half of that amount. For inspiration, you can take a look on the built I use or on the list of commercial nextcloud device providers.
Files & Photos
By using the Nextcloud Android App, you can directly replace Google Drive/ Dropbox as this is the core functionality of Nextcloud.
Additionally, the App allows you to automatically back-up your Photos/ Videos and free the local storage so you can stop using Google Photos too.
Contacts & Calendar
Nextcloud also supports Contacts and Calendar out of the box. To integrate them with into your Android Device there is the DAVx5 app. This app will function as an additional data provider, so you can just continue using the stock Google Contacts and Calendar apps. Those will, however, stop sending any data to Google.
This is especially useful, if you run a small-business and must ensure that your customer data is private according to the CCPA/ GDPR.
Nextcloud News
An often overlooked part of your privacy is Google News (also part of Google Now). Each time you view an article there, Google can mine your interests and political views – similar to what Facebook does. And by now you should know where these things can lead.
Another drawback here is that the Google Algorithm will create a bubble for you by only showing content coherent with your current world-view. I still prefer to manually choose the news sources – to create that bubble myself.
To do that, one usual subscribes some Web-feeds using a Feed aggregator like the Feedly service – similar to what Google Reader used to offer, before being killed by Google.
Most of you are probably just stream music via Spotify/ Youtube Music, but keep in mind that these services merely rent the songs and as such they can arbitrarily disappear from your library.
Therefore, I like to have my own copy of the song. Unfortunately it is very inconvenient to juggle mp3s around for getting the music to various devices.
Google Play Music used to offer best of both worlds for me, where you could upload your own music files and manage your playlists in one place. Additionally, you could make the music available offline by pinning individual playlists on your device. Unfortunately, that concept did not allow Google to arbitrarily inject ads into my music stream and therefore the service got killed as well.
Nextcloud Music to the rescue! This app picks up your music library via Nextcloud files and allows to stream that via the Browser or the Subsonic API. This is where the DSub Android Player takes over. As with Play Music, you can either stream the library or pin individual songs/ playlists for offline use.
Other
If you clicked on the links above, you probably noticed the F-Droid alternative app store for Android. Getting your apps there ensures that you are using verified packages and open-source software. You can easily use it alongside with the Play Store. If that is too inconvenient for you, all of the above apps are also available via the Play Store.
Finally, there is the web-browser. If you do not log in with your Google Account, using Chrome is mostly safe. However, I suggest switching to Firefox. See the my original article on that topic for details. In short; the main reason is the availability of extensions. Those allow you to block ads on the mobile web too and use Youtube in the backround.
Header Image: Digital Chains by stanjourdan (CC-BY-SA-2.0)
The Lego 42043 “Arocs” is regarded as the best technic set to date by many. It has motorized functions controlled via a gearbox, features a pneumatic arm and also uses an actuator. Furthermore, all axles have a suspension and it features two-axle steering. So no matter what functionality you are interested in, this set probably has it.
Showcase of the functions
Unfortunately, the set went out of production in 2017. So if you want to experience the build today, you have to search for a used set in good conditions. As the model is quite popular, chances are high that you will have to pay more than the original cost.
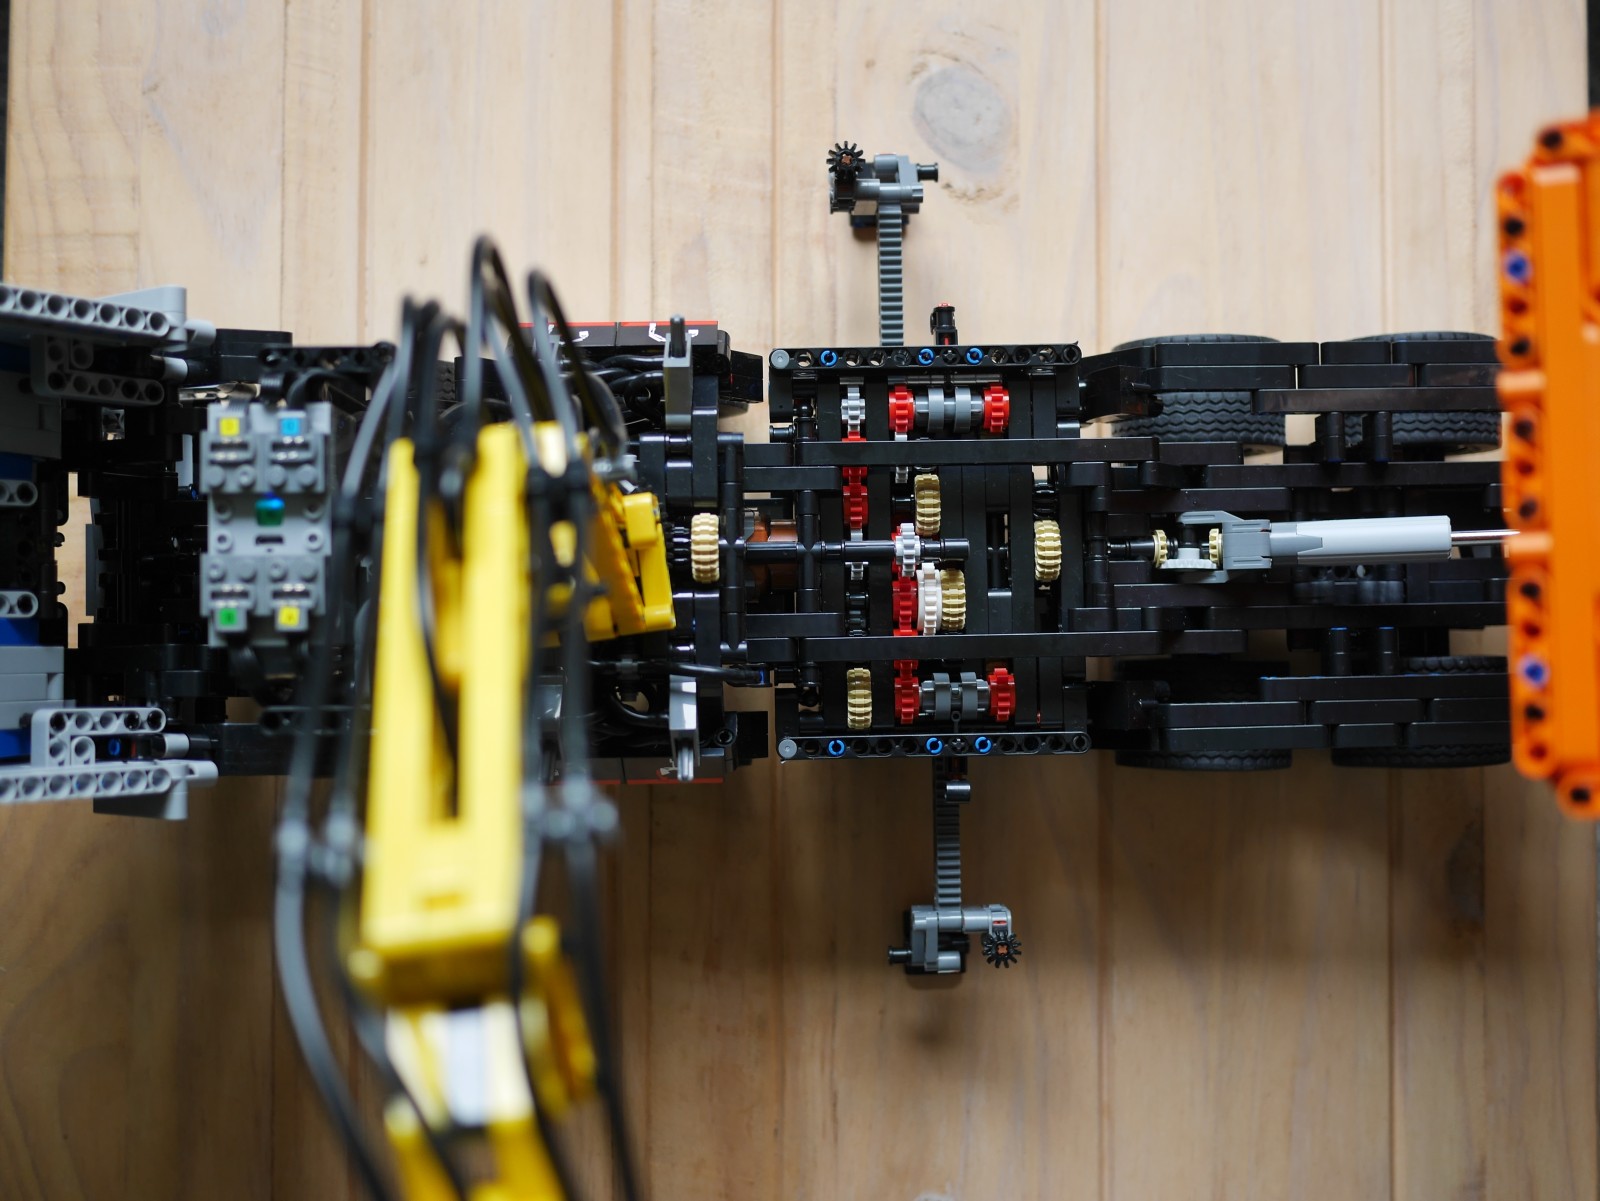
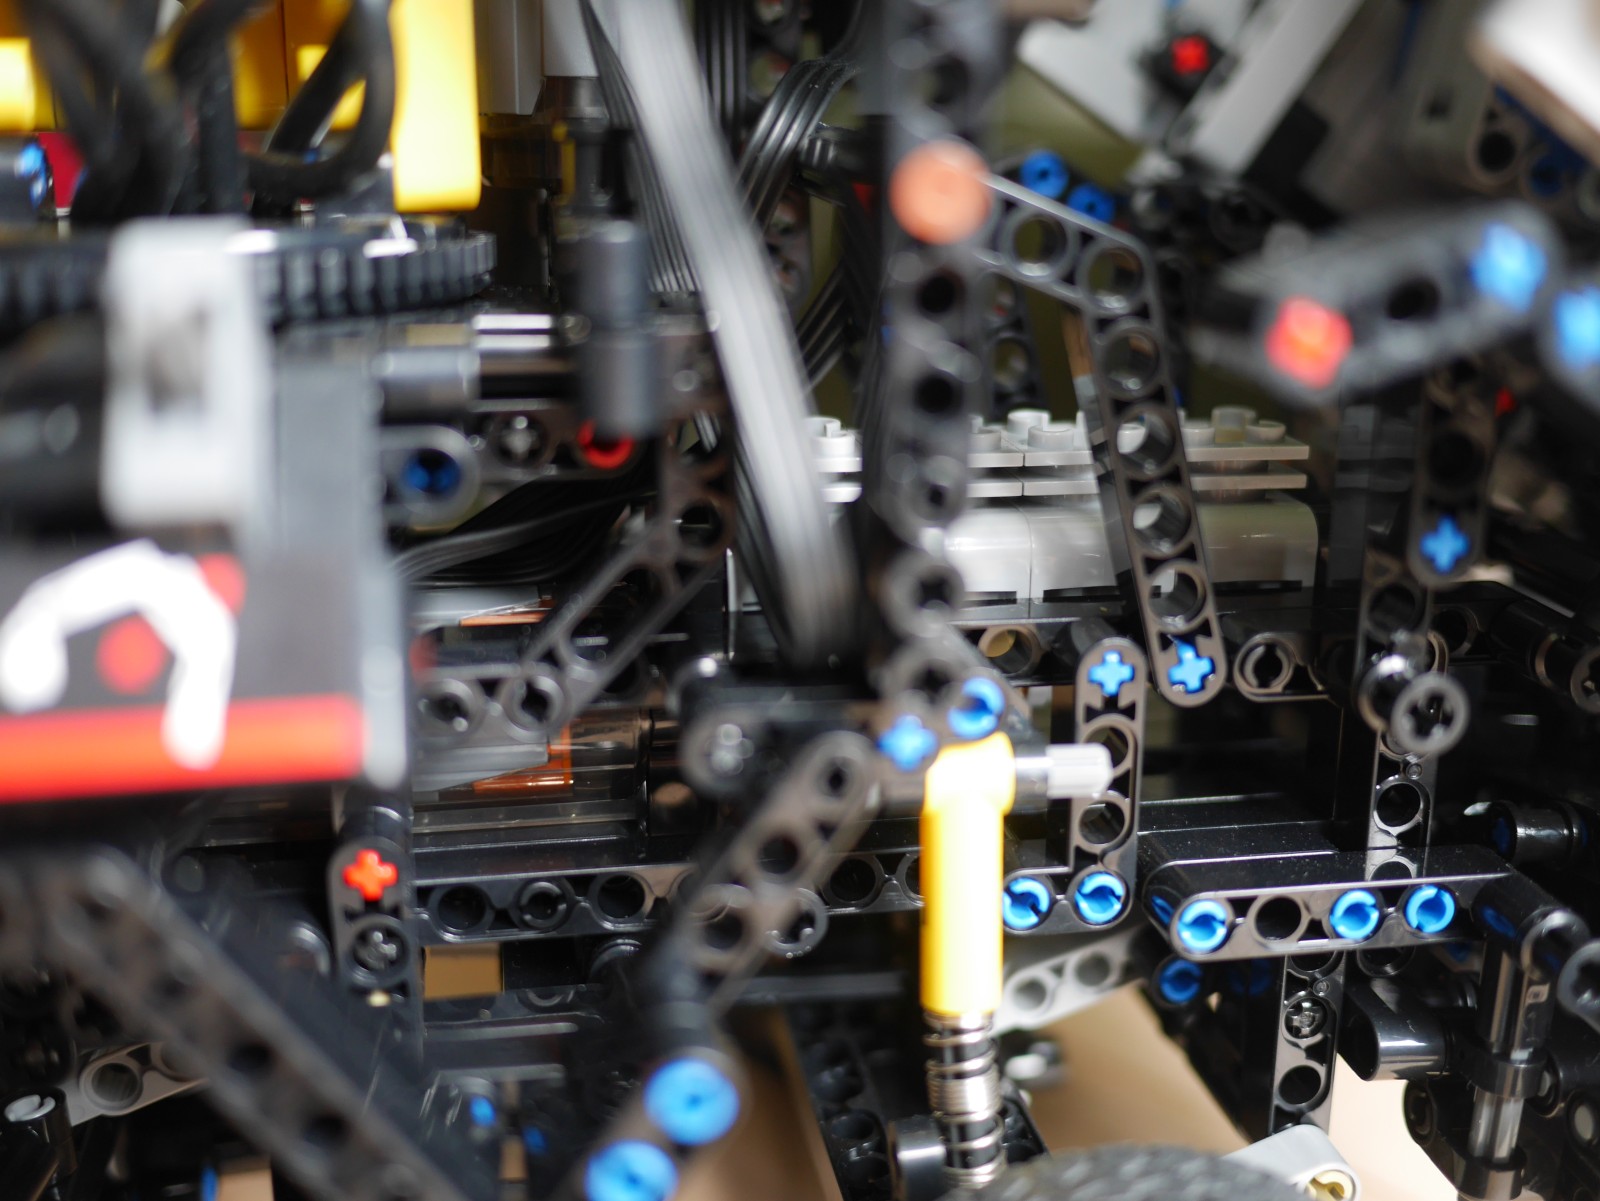
the gearbox in full glory
Fortunately, Mould King released its own version of the “Arocs” which keeps the set alive today. Instead of being a verbatim copy of the set like the Models by Lepin/ King (which are also hard to come by nowadays), Mould King did modify the set in several ways, which we will look at in the following.
Note, that the set is still a copy of the 42043 set, which was designed by Markus Kossmann (see the original license plate). But if you want to literally pay him tribute by buying one of his sets, you will have to get the Liebherr 42100, which is the only one still available today.
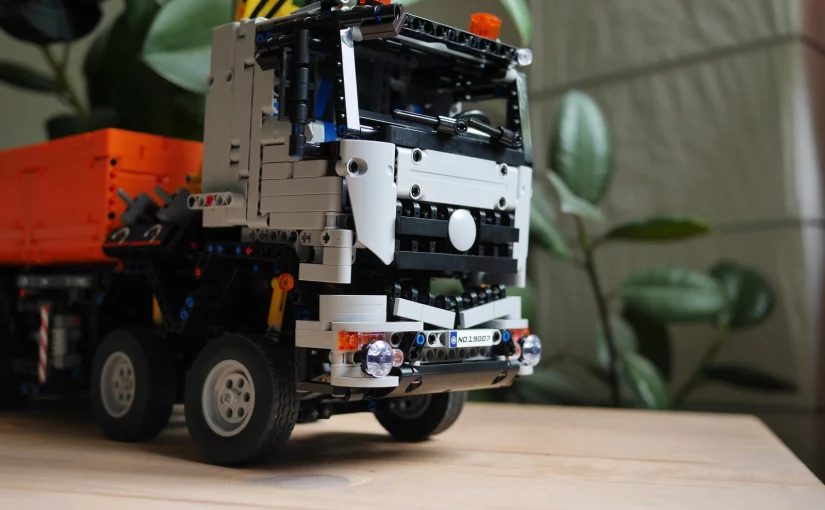
Color Scheme
The most obvious change that Mould King did is using a different color scheme. While it feels strange at first if you are used to the original Arocs looks, it is actually quite accurate.
The gray cabin is indeed more common than the white one. It makes sense as this is an off-road vehicle traveling over dust and dirt. But also the orange loading area exists in reality – even though one still can argue that it looks off there as well.
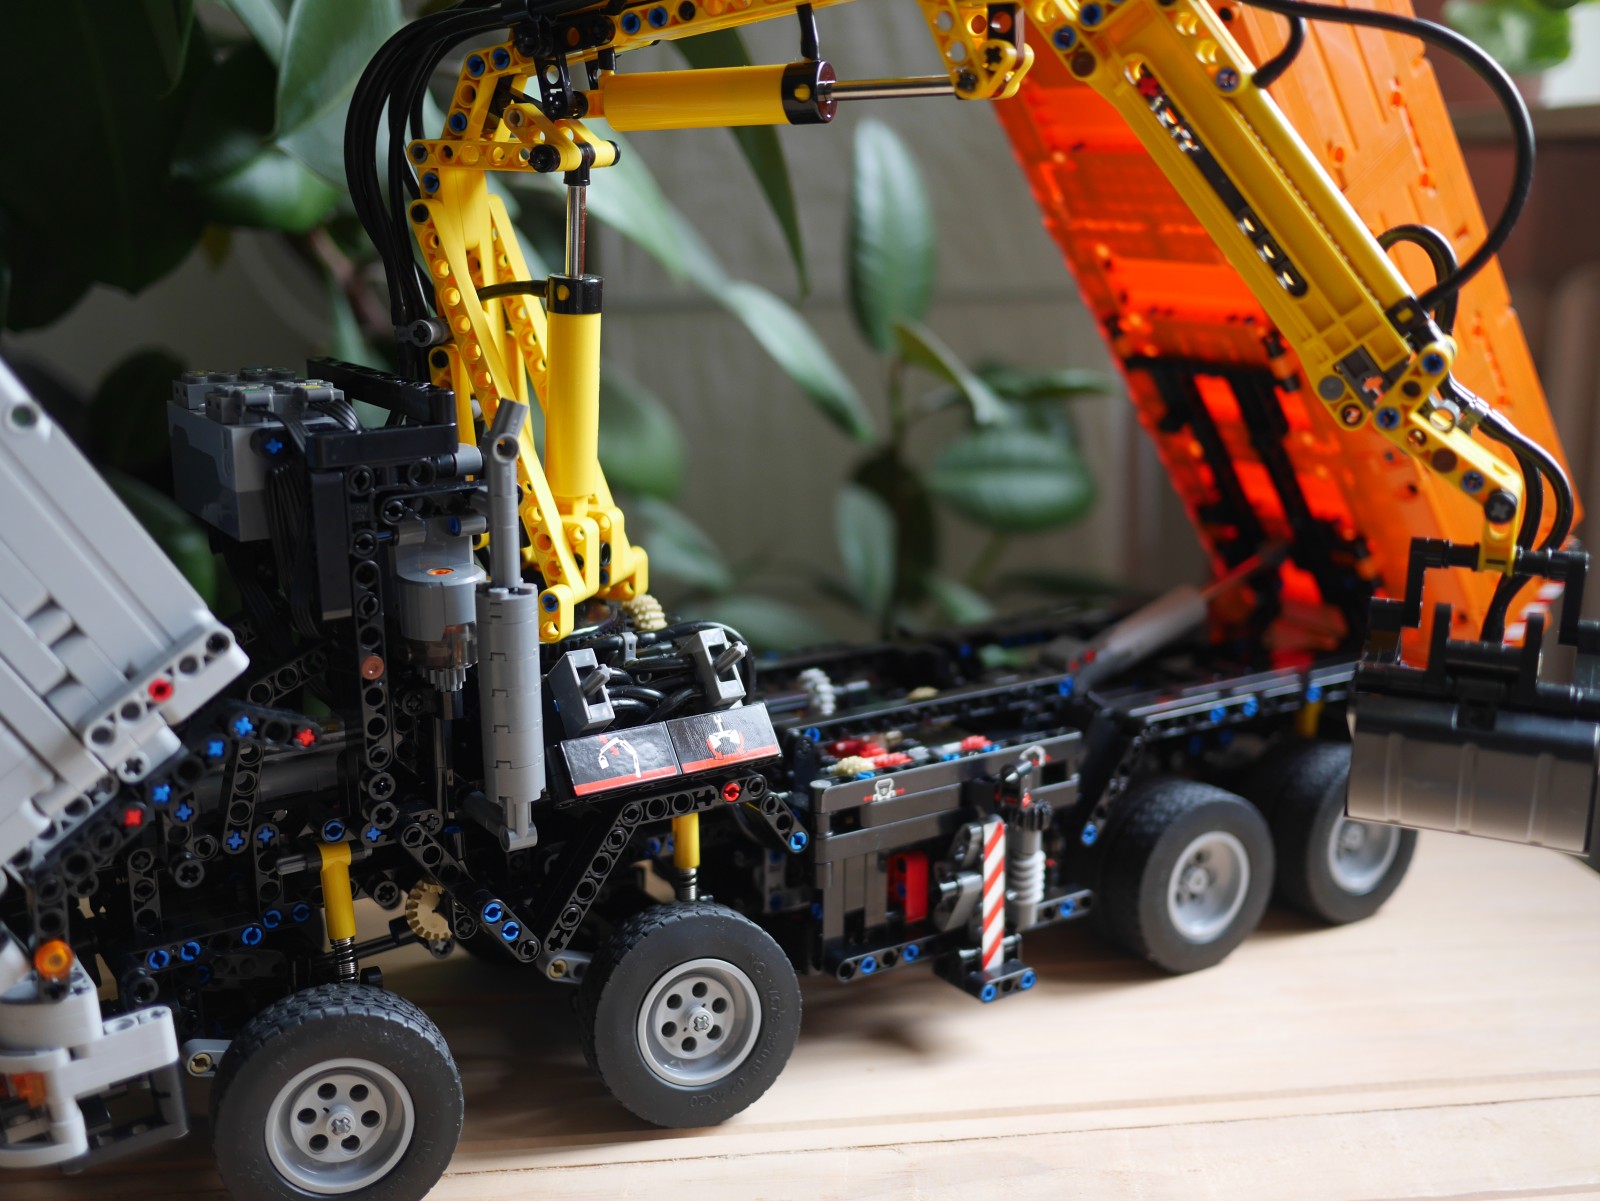
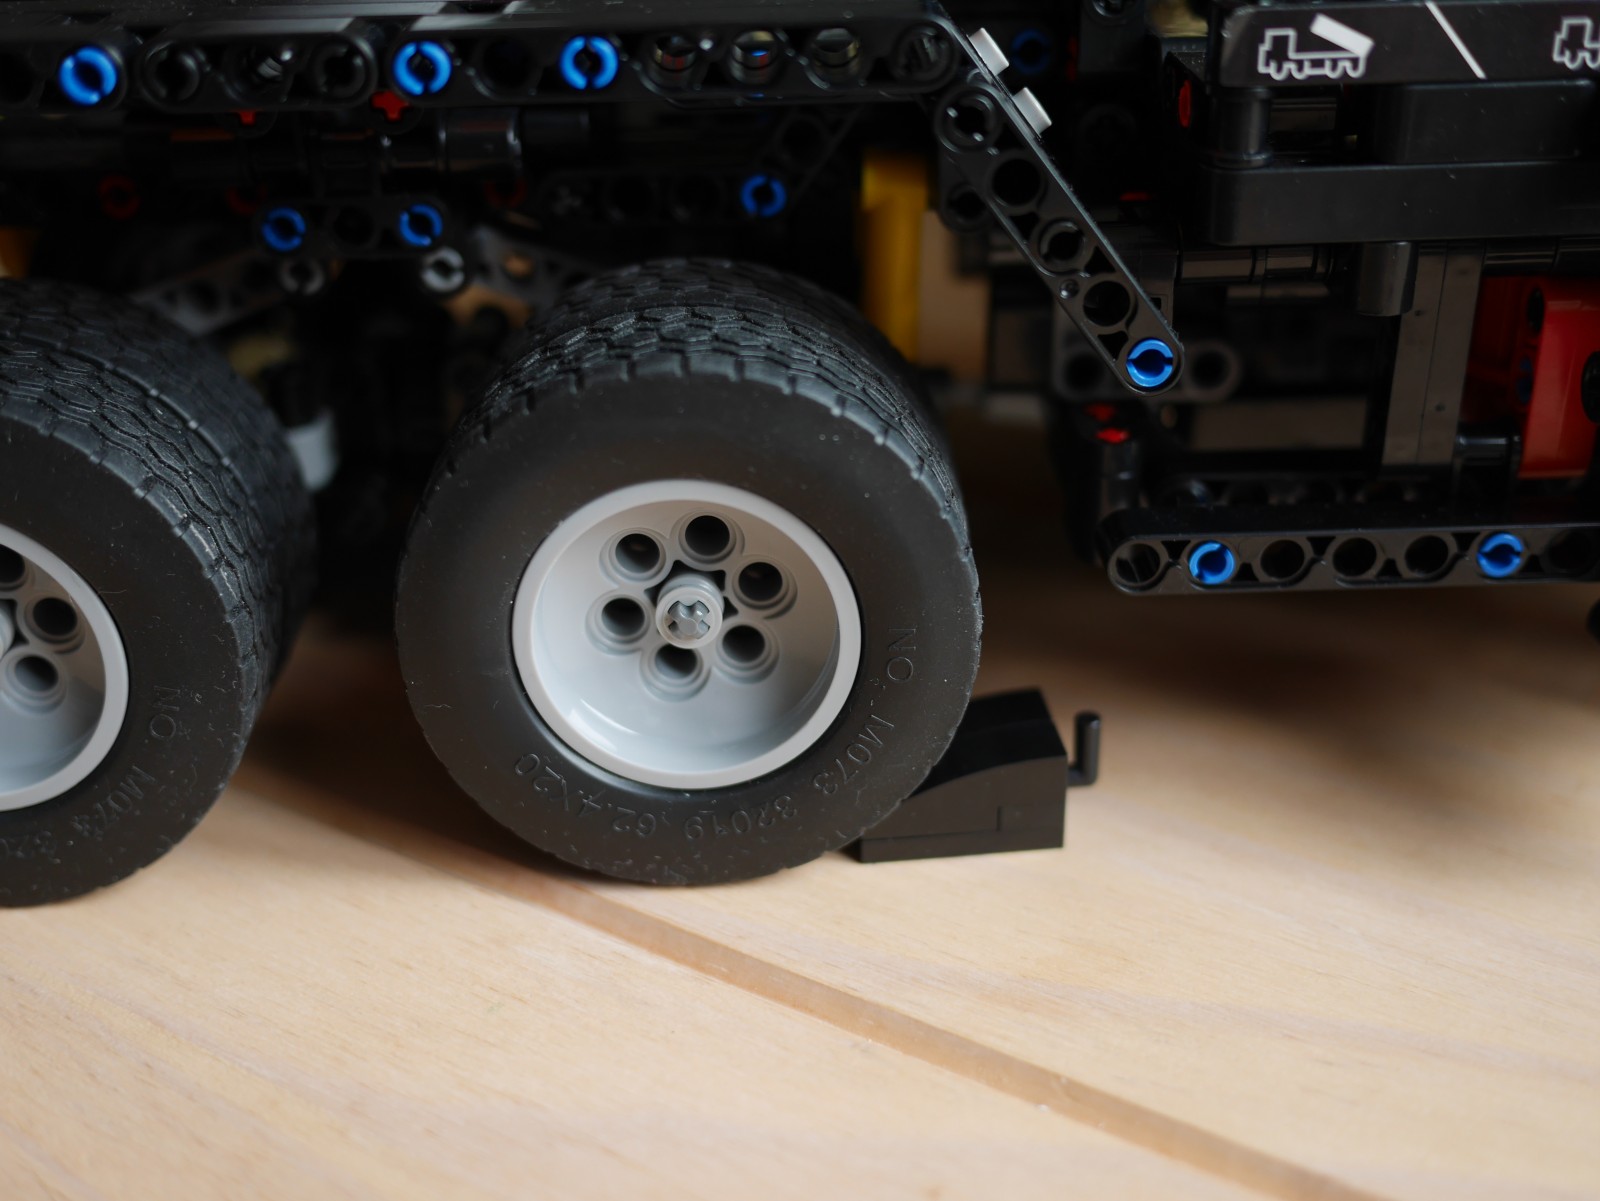
When we get over this difference, we can turn to some details that are strictly improvements. The first thing to note here is the all yellow-black pneumatic arm. Mould King uses a yellow gear-rack here, which makes the pneumatic elements neatly blend-in. Furthermore, all pneumatic hoses are black. Although this requires more attention while building, the result looks much better than the red-gray-yellow soup of the original. Next, the bottom part is now mostly black. The useless yellow bricks are gone and we get black axle-pin connectors instead of original red ones. They overdid it a little here though, by making the wheel-stoppers black as well.
Full remote control
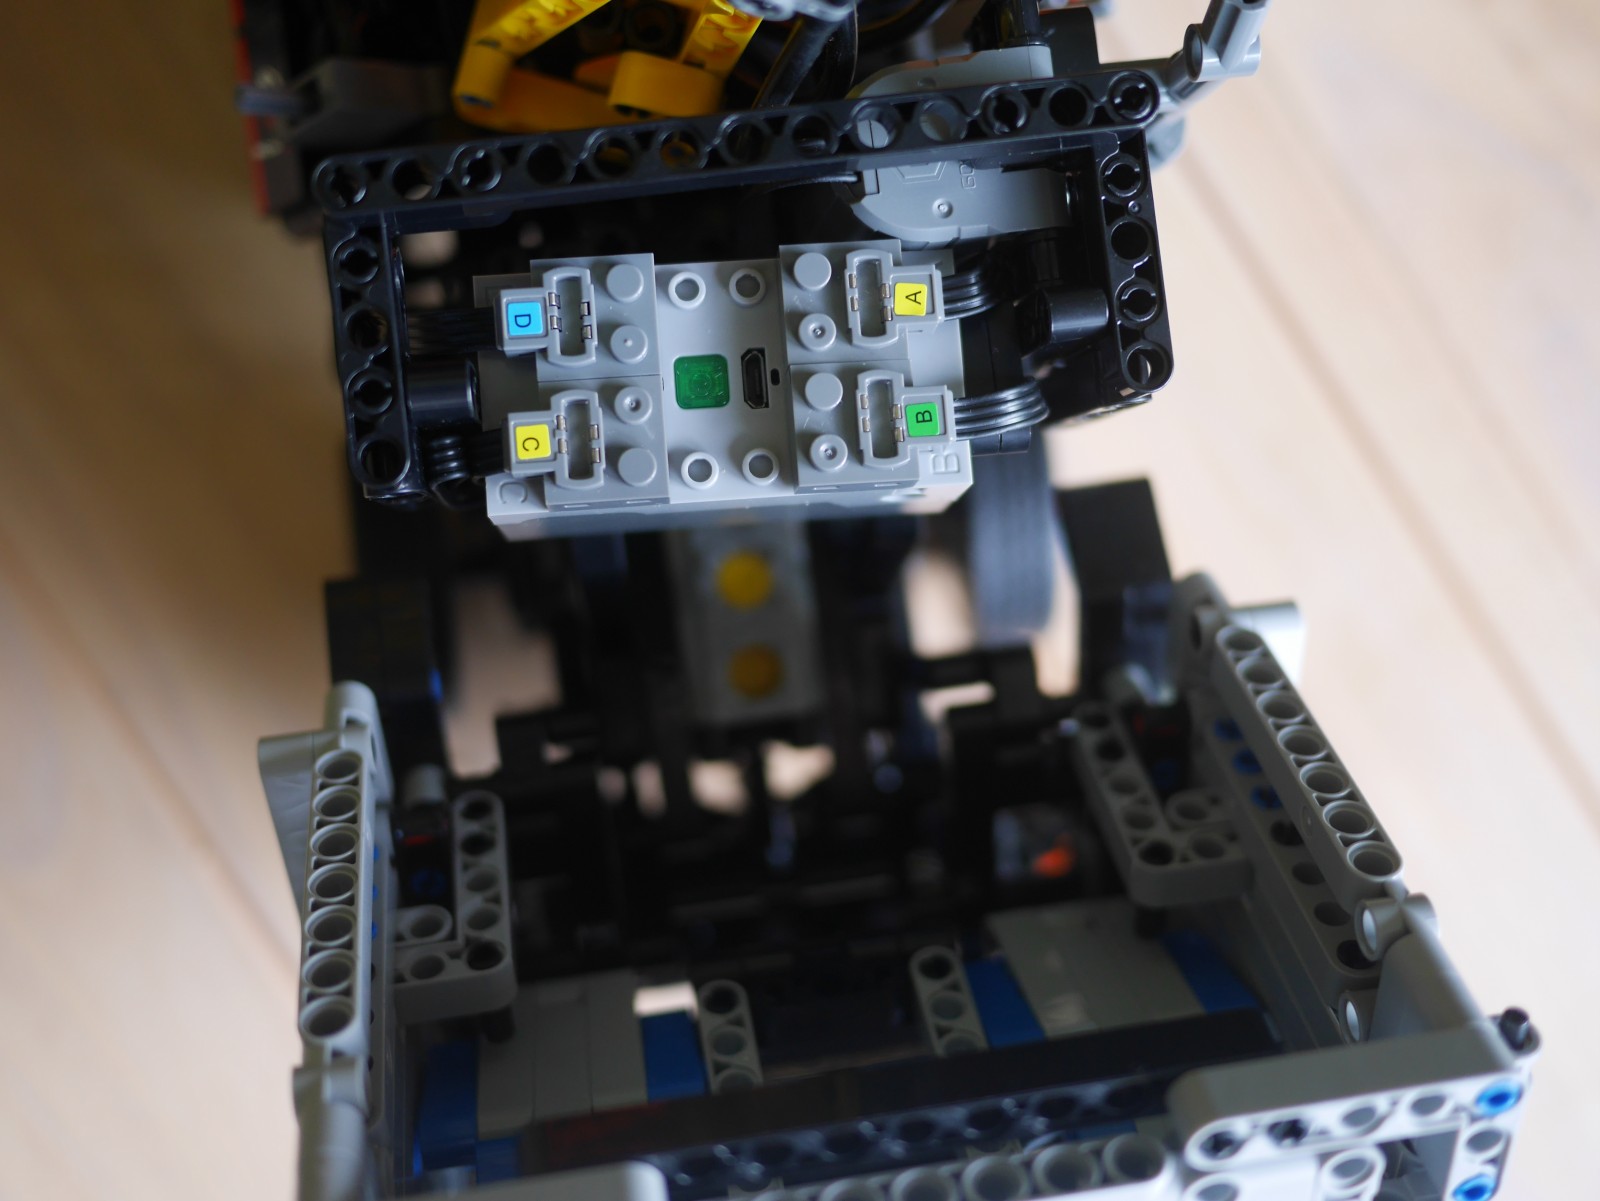
In contrast to the original model, the Mould King version also adds motorized driving to the set. The drive is handled by a single L-Motor, while the steering is handled by a servo motor.
Both motors included in the set support proportional controls, but unfortunately the included battery-box does not handle proportional steering. I used one spare battery box from the excavator instead.
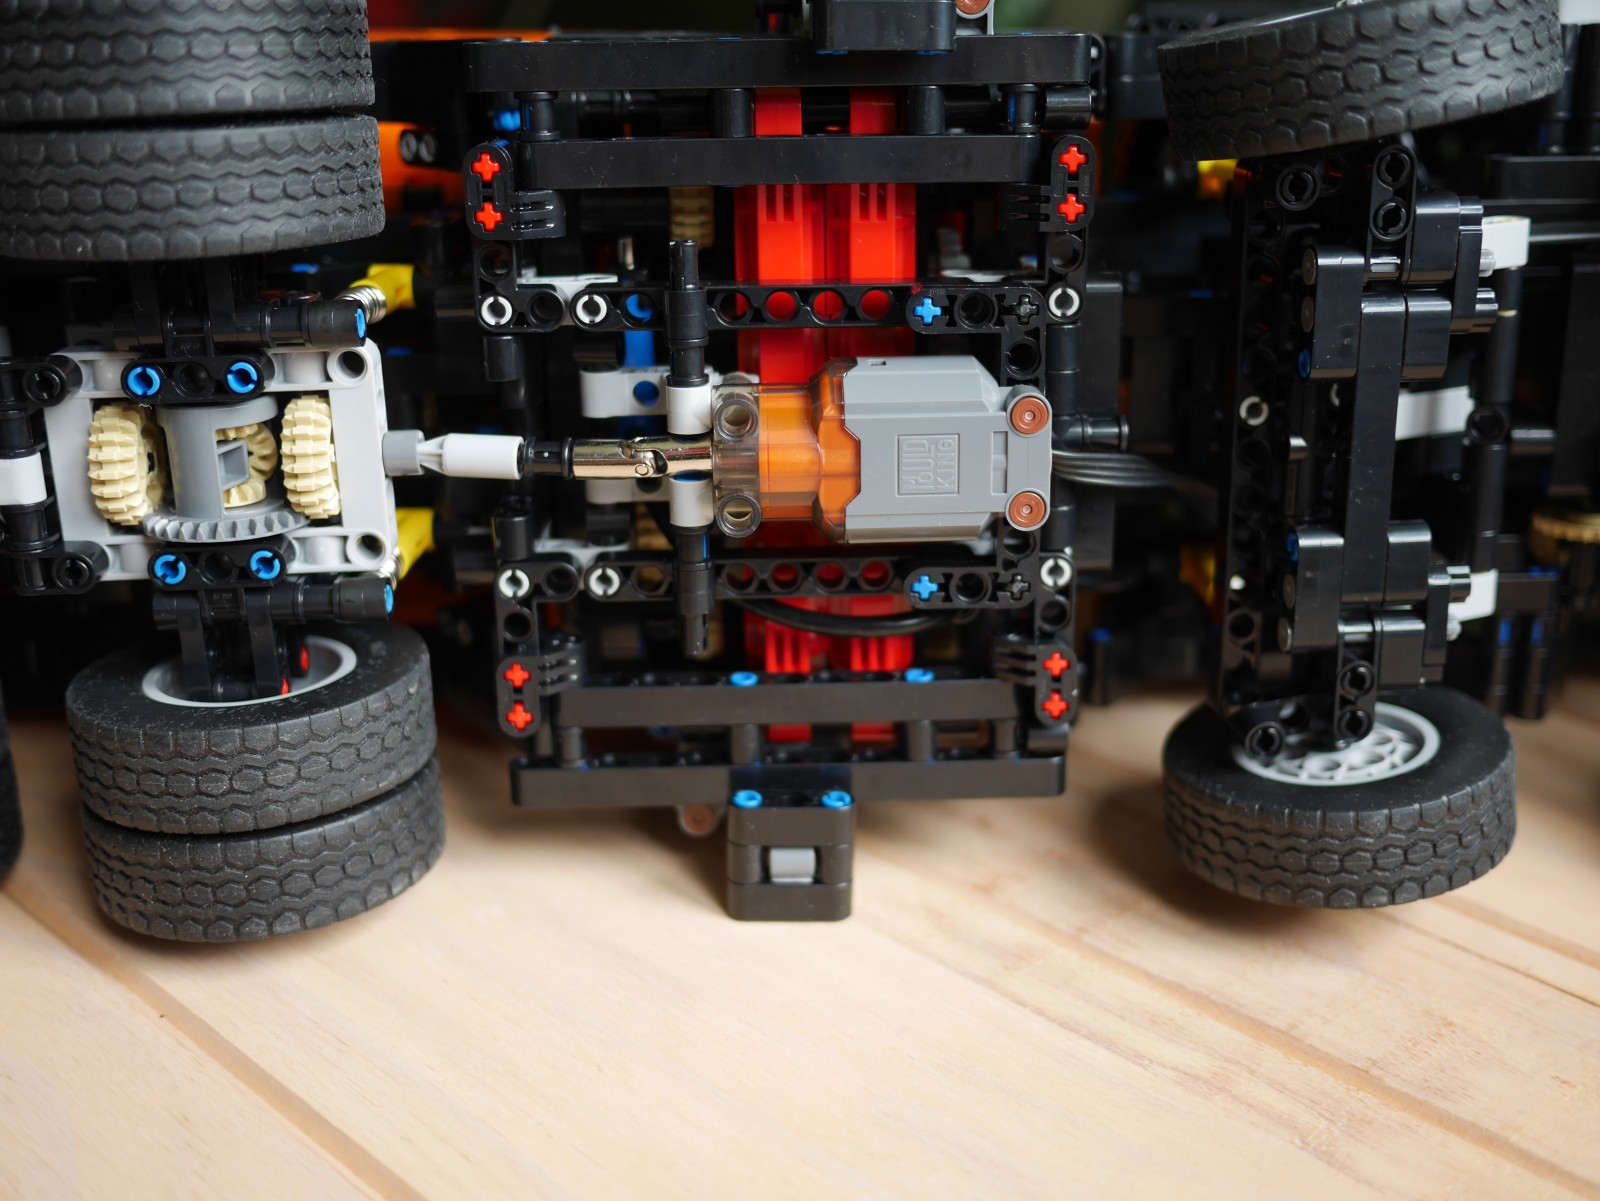
even the wheel-stoppers are blackmetal universal-joint for the drive-tainonly 4 cylinders, but motorized
As a nice touch they include a metal universal-joint for the drive-train. This is needed to handle the torque if you decide to hit reverse while the 2.4 kg heavy set is moving forward. The rest of the parts will still ache in pain though.
Due to motorization, the wheels no longer drive the pistons below the cabin. Here, Mould King went totally over the top and included a separate M-Motor to do that. To make room for it, they had to reduce the pistons from 6 in the original to 4. Note, that you can just skip the motor at Step 170 and use it elsewhere as it is not needed otherwise.
Remaining differences
As this is not a licensed set, there are no Mercedes brandings anywhere. If you are in dire need for some, you can get the shield with the printed logo off the new Zetros set for about 5€.
Furthermore there are no small panels in the front of the cabin – for whatever reasons.
Interested in getting the set? Support this Site by using the following affiliate Link:
Due to the larger depth of the battery box compared to the original, you cannot fully close the cabin. The beams that hold the seats will get in the way. This results in a increased gap at the front radiator region.
Fortunately, this is fairly easy to fix at Step 228: Only use the Axle-Pin connectors for the L-shaped battery holder to give it some play and place the pin in the middle on the other side. This will move the battery-box by one stud and allows the cabin to fully close.
The set is based on the MOC-68495 by JurgenKrooshoop, but unfortunately there is no cooperation this time. Therefore, the thing is yellow instead of the red-white scheme used by the MOC, which I would have preferred.
The MOC creator even rage-quit Rebrickable, when he found out about this set. But don’t worry, he is doing fine and has returned meanwhile. In my opinion he overreacted, as everybody is standing on the shoulders of a giant, namely Lego 8043 as we will discuss below.
A quick function test with the new 6-Channel Remote
Unfortunately MouldKing did not replace the blue technic pins as they did with the Forklift. However, they did include 2 carbon axles. Those are used to connect the actuator pair that lifts the arm. Technically they are not needed though, as the arm is not that heavy.
While having a similar part count to the Forklift, the Excavator is easier to build. Part of this is that 84 of the parts are used for the tracks, but another part is that this is:
The final form of Lego 8043
This is actually the 4th iteration of a (at the time of writing) 10 year old Lego set:
It was born in 2010 as the Lego 8043, which is likely modeled after the real-life JCB JS330. The original model used 1123 parts.
The MOC creator JurgenKrooshoop, then created the “Ultimate 8043” version, which notably already featured a more powerful XL-Motor, an improved drive-train and simultaneous control of all power functions. This bumped the part count to about 1300.
In 2015 he then released another update as MOC-68495. This morphed the appearance into a Link Belt 250X3, replacing the yellow parts with the native red-white color scheme. Here, he generally added casing to the model and slightly increased its size which raised the part count to 1929.
Mould King then copied the MOC in 2020, but felt like returning to the original yellow color scheme. They also removed the LED lights and ported the model their own power-functions. This reduced the part count to 1830.
With the last changes, some even think that the Mould King version is a clone of the original Lego set. We can probably conclude here, that all excavators look the same if you take away the color.
But still, when building the Mould King Model, one can tell its Lego 8043 origins – the construction of the tracks and drivetrain and the way the motors are placed will give it away.
So if you skipped the 8043 back then and want to get the building experience today, I would say you get it here – and some nice improvements on top too.
This brings us back to the missing cooperation between the MOC creator and MouldKing. As I see it, Lego did the heavy lifting with this particular model. However, both JurgenKrooshoop and MouldKing have their fair share in that we can enjoy this great model today. So if you want to support the MOC creator as well, you can pay him for his instructions.
Manual Errata
Step 292: The Light should face front
Interested in getting the set? Support this Site by using the following affiliate Link:
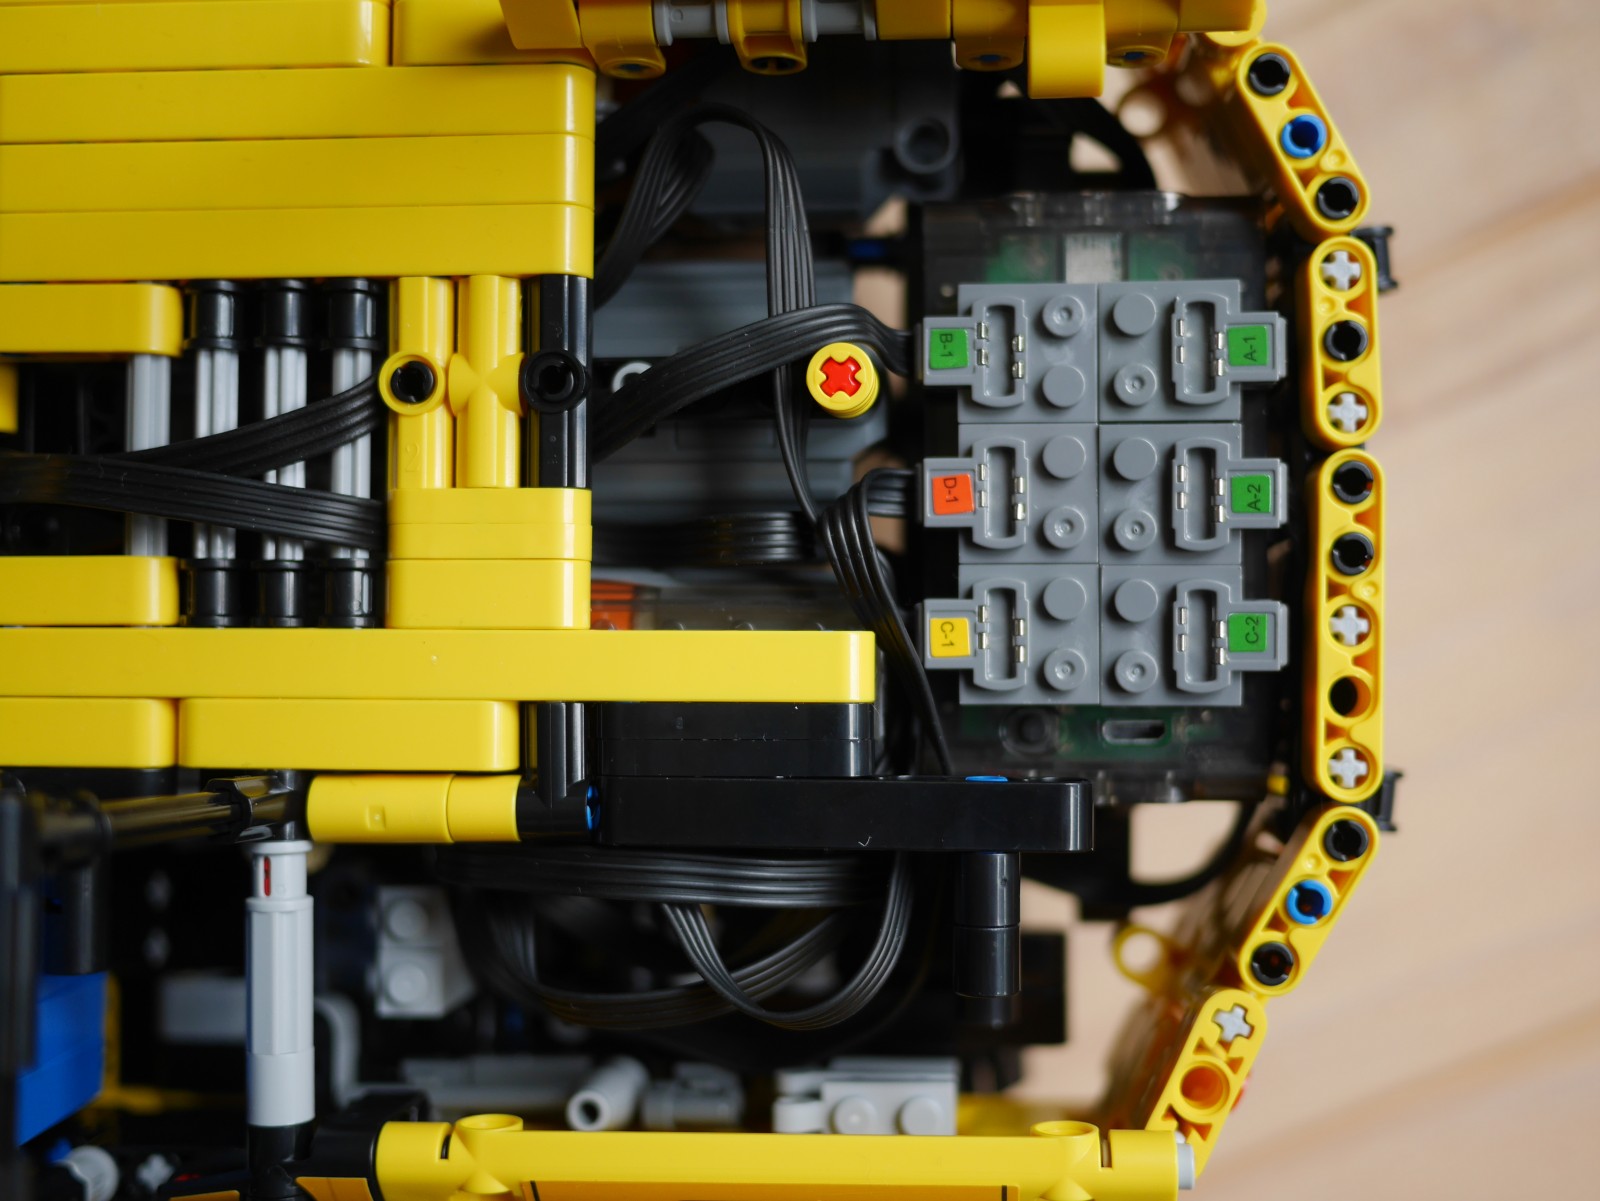
With the 17013 Crane, MouldKing officially released their new 6 channel power module and new joystick controller. Especially the latter is notable as it allows smooth and precise controls instead of the binary 0% or 100% throttle with the standard remote or the fiddly touch-pad of your phone.
As the excavator comes with exactly 6 Motors, I additionally got the new power module and used that instead of the two 4-Channels modules that come by default. This allows you to control all functions simultaneously with a single remote with joysticks. Take your time to appreciate this.
Unfortunately, there is no nice set that bundles the new power module. It is currently only included with the crane mentioned above, which is pricy and has mixed reviews. So meanwhile, you will have to get the power module separately for about 20€, because it is totally worth it.
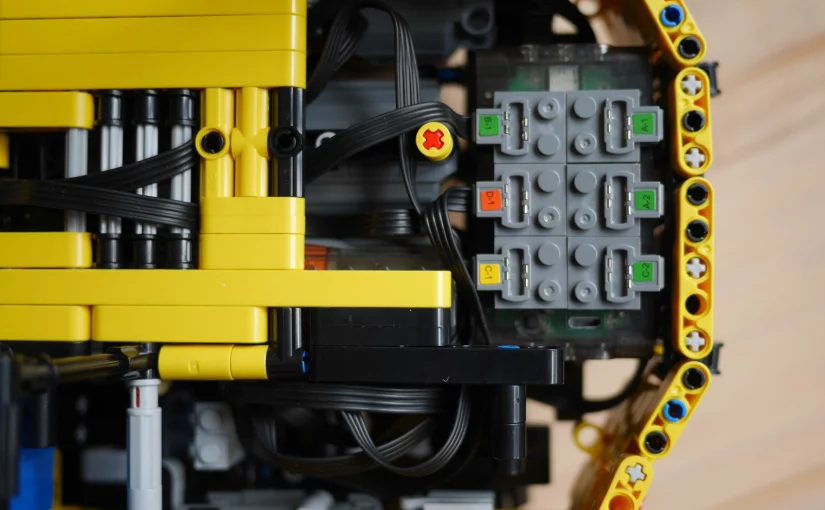
Changes for 6-Channel Battery Box
These are the minor changes you have to do to fit the slightly larger power module inside the excavator.
Modified rear assemblyMy Power Module configuration
Steps 393 – 399: Skip
Step 404: Use the 4 spare 3×1 beams instead
Step 405: Only use two Axle-Double-Pin connectors here and make them face outwards. If you have some spare 2×1 technic beams you should use those of course.
I got myself the MouldKing 13106 Forklift, which is based on the MOC 3681 by KevinMoo and wanted to share my impressions with you.
First of all, MouldKing actually improved the set by exclusively using back technic pins instead of the blue ones like in the MOC. Also they are officially cooperating with the MOC designer – so he is likely getting some share of the sales.
The set comes with “New PowerModule 4.0″, which means it supports proportional output. If you use the new joystick controller (like I do in the video) or use the app, you can have smooth controls of the motors and not just binary 0% or 100% throttle as with the standard remote.
As you can see, I actually put on some of the stickers. Some purists never do anything like this, because they argue that after some time the stickers start peeling off and look used. This is certainly a good point if you are building a sports-car – with a Forklift however, I would argue broken stickers add to the looks.
Compared to the original MOC, Mould King removed the lights, but added a pallet similar to the one found in the Lego 42079 Forklift.
Interested in getting the set? Support this Site by using the following affiliate Link:
Generally, I prefer the Mould King manual to the original by Kevin Moo as I like renderings more than photographs. However, its nice to have the original at hand if something looks fishy. While building, I noticed the following:
Step 34: Cable-management is almost completely skipped in the manual. I laid all cables through the opening behind the threads. This keeps them out of the way later. The fiddle through the cables of the motors, that you add at steps 52 & 55.
Step 100: The battery-box position is wrong. It will collide with the bar you added at step 96. To make it fit, just rotate the battery-box by 180°.
Also, the direction of motor A has to be reversed. Press and hold left-shoulder, up and down for 3 seconds for this.
Step 111: The arms that you added in steps 89/ 90 should be oriented upwards to hold the footstep.
Step 143: Use a black bush instead of the 2-pin-axle beam, so things look symmetrical. This is a leftover from the original MOC, which squashed the IR receiver in there.
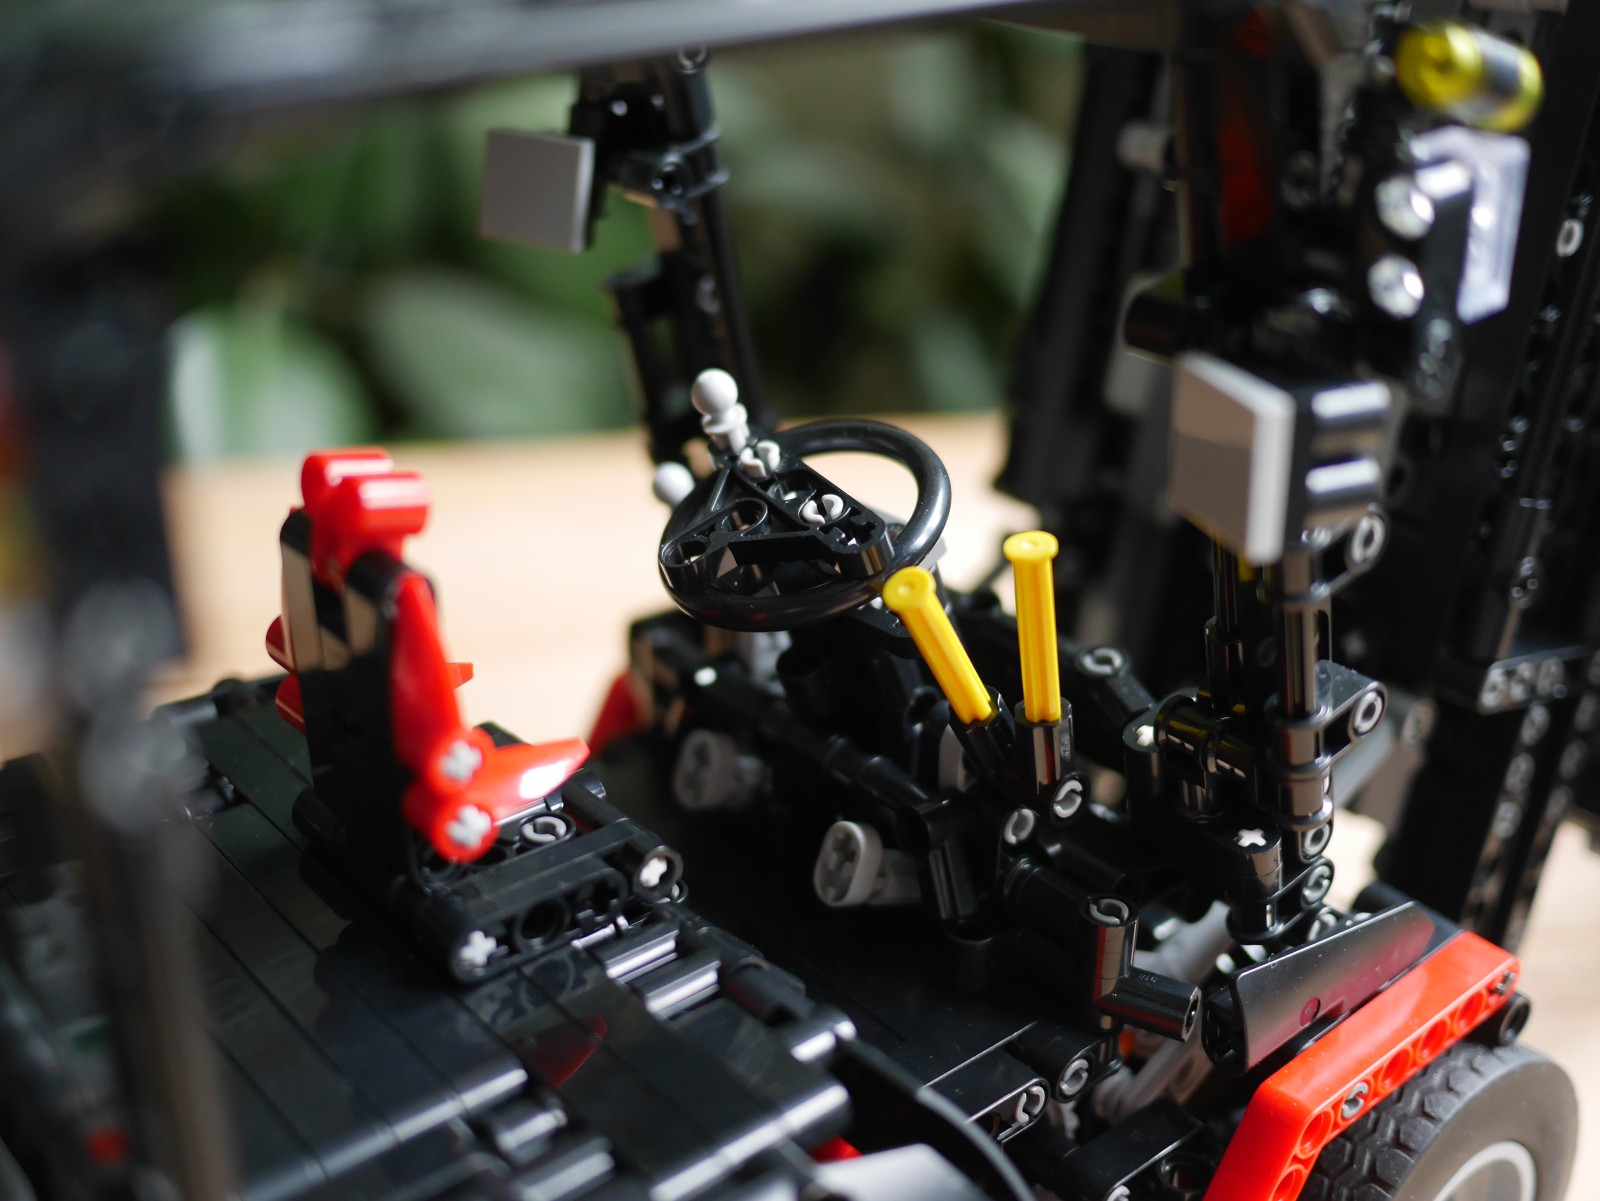
Step 156: Attach the levers to the front console at step 173 instead of attaching them to the seat here. After all they are supposed to control the fork and not the backrest.
Step 214: I suggest using gray 2-axles at step 230 instead of the suggested whites. This way the front facing axes will be all gray. For this just use white 2-axles here. Those wont be visible at all anyway.
Step 277: When adding the fork to the lift-arm, make sure that it has as much play as possible. Otherwise the fork will get stuck when moved all the way up.
Interior with fixes at step 143 & step 156
Step 278: Do not fix the threads yet. Wait until the end so you can correctly measure the lowest position of the fork (which gives you the length of the threads).
Step 286: Make sure that the 3-pin pops out towards the 8-axle. This will make joining things at step 288 much easier.