Secure Nextcloud Server

This article is about how to securely configure the machine where your Nextcloud/ Owncloud instance will be running.
Even if you set-up your connection with Owncloud in a secure way,  your data still can be compromised by exploiting security flaws in the underlying architecture.

In the following we specifically will cover the underlying software stack and brute-force password hacking attempts.

Continue reading Secure Nextcloud Server

How to manually update a deb package from source

Probably everyone has encountered a package in Ubuntu which was not the newest released version while one for some reason needed the newest one. The first step is to search for a PPA with the desired version. But what if there is no such PPA or you want to build the version yourself? This is where this guide comes in. Note however that this is not aimed at ordinary users – you need some experience with programming/ compiling to successfully build a package.

Before you start

Before you start make sure that you have source packages enabled in your software sources.
Next you obviously need the upstream source tar-ball of the new program which should look something like <packagename><version>.tar.gz.
Download this tar-ball to a new directory <somedir> and extract it there.

Updating Package info

For the following commands I assume you are in the previously created directory <somedir>.

First we need to get the old version of the source package

apt-get source <packagename>

This will download and extract the old source package into <packagename><oldversion>.

Now we need some helper scripts to perform the upgrading as well as the build-time dependencies of the package

sudo apt-get install dpkg-dev devscripts fakeroot
sudo apt-get build-dep <packagename>

Next change into the extracted sources of the old package and update the packaging

cd <packagename>-<oldversion>
uupdate -v <newversion> ../<packagename>-<newversion>.tar.gz

# change into the extracted new package
cd ../<packagename>-<newversion>

# update version info
dch -l ~ppa -D $(lsb_release -sc)

For more information see the Debian New Maintainers Guide.

Building the program

To trigger a rebuild of the program simply execute

dpkg-buildpackage

Uploading your version to a PPA

To upload a package to a PPA you first need to sign it to prove that you are the author. To do this you have to execute the following in the <packagename><newversion> directory

debuild -S

Furthermore you need the upload tool dput to actually perform the uploading

sudo apt-get install dput

Now change to <somedir> and execute

dput ppa:<your_username>/<repository> <source.changes>

You can find more information at Launchpad.

Secure Own-/ Nextcloud setup

update 24.04.2017 –  include Subject Alternative Name field
update 20.12.2017 – discuss Certbot as an alternative

While the Nextcloud Manual suggests enabling SSL, it unfortunately does not go into detail how to get a secure setup. The core problem is that the default SSL settings of Apache are not sane as in they do not enforce strong encryption. Furthermore the used default certificate will not match your server name and produce errors in the browser.

In the following a short guide how to manually set-up a secure Apache 2.4 server for Nextcloud will be presented.

Note: nowadays one can also use Certbot to automatically perform the steps below and validate your certificate so browsers accept it. However due to their certificate transparency policy, your host will be submitted to a public list. This may or may not be what you want.

Continue reading Secure Own-/ Nextcloud setup

How to root Android using Ubuntu

update 27.10.2018 – use TWRP instead of CWM (discontinued)
update 14.10.2017 – new instructions to set-up udev rules
update 26.02.2016 – instructions for Android 6 Marshmallow

The Big Picture

Android consists of three parts relevant to rooting

  1. the bootloader
  2. recovery system
  3. main system

typically only the main system is running, that is the Linux Kernel, the launcher, the phone app etc.. If we talk about rooting, that means we want to add an additional app to the main system which has access to secured parts of the system and acts as a gatekeeper for other apps that also want to get access.

The problem is the secured parts of the system are locked down – otherwise they would not be secure. This means that we can not simply install that app (e.g. an apk) from within the main system.

Therefore we have to go one level down. This is where the recovery system is. Typically you do not see it, as it is only active when the main system can not run – either because a system update is installed or because you do a factory reset.
As the recovery system can do a full system update, it means that it has also access to the secured parts of the main system – exactly what we need.
The stock recovery system obviously does not allow altering the main system – otherwise everybody could get your private data if you lose your phone.
So we need to replace it as well. But before that we have to talk about the bootloader.

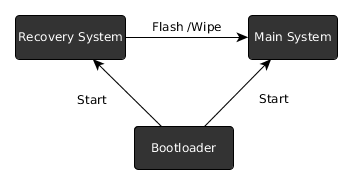
The bootloader is a tiny piece of software which decides whether to start the recovery or the main system (or another main system, like Ubuntu Phone).
In the default configuration in only starts systems that it knows and trusts. In this configuration the bootloader is called locked.
Although this prevents malicious software to change the phone and spy on us, it also prevents us from replacing the recovery system. By the way, this concept is also coming to the PC where it is called UEFI secure-boot.

Here is a graphical overview of the Android components:

android-brs

So what we need to do in order to get root access is

  1. unlock the bootloader
  2. replace the recovery system
  3. install a superuser app

Note that unlocking the bootloader also allows attackers to circumvent any of the android security features (PIN etc). It becomes possible to access all the files on the device using a different recovery system. (unless userdata is encrypted)
Therefore android will wipe all userdata when the bootloader state is changed from locked to unlocked.

So if you lose your unlocked device or it gets stolen, you better hope the thief is not tech savvy.

Preparations

First you need to install the fastboot binary to be able to perform low-level communication with the device

apt-get install android-tools-fastboot android-tools-adb android-sdk-platform-tools-common

The android-sdk-platform-tools-common package most importantly contains a whitelist (/lib/udev/rules.d/51-android.rules) with devices to which users can send commands over USB, so you do not have to run fastboot as root.

Now you have to reboot into fastboot mode. Usually there is a key combination you have to press on startup.

Remember this key combination as you will need some more times.

Samsung Devices however, like the Galaxy S3, do not support the fastboot mode – instead they have a download mode, which uses a proprietary Samsung protocol. To flash those you have to use the Heimdall tool. While this article does not cover the heimdall CLI calls, the general discussion still applies.

Unlocking the Bootloader

last warning: this will wipe all user data on the device

for google devices, like a Nexus 4 or Nexus 7 it is just do

fastboot oem unlock

if you have a Sony Xperia device, like a Xperia Z, you additionally have to request a unlock key and then do

fastboot oem unlock 0x<KEY>

where <KEY> is the key you obtained.

Using AutoRoot to install SuperSU

There are several superuser apps to choose from for Android 4 and below. However the only superuser app working on Android 5/ Lollipop and above is SuperSU by Chainfire.

As there are devices like the Nexus 5X shipping with Android 6/ Marshmallow, I will describe this method first.

Chainfire created an “installer” called AutoRoot that includes the fastboot utility and will perform the unlocking step described above. However if you have read this far, you probably also want to understand the rest of the process.

First you have to download the appropriate package for your device. There you will find a recovery image which we have start with

fastboot boot image/CF-Auto-Root-hammerhead-hammerhead-nexus5.img

the command above will not flash anything on your device, but just upload the image and immediately start it. The image contains a script to modify the main system (change startup to get around SELinux) and install the superuser app.

If everything goes well, you can now just reboot your phone and you are done.

You could lock your bootloader again now to make your device more secure. However the next Android update will remove root again and repeating the rooting procedure will wipe userdata – so you have to balance security update vs. the risk of your device being stolen. For the latter case you still have the option to enable encryption of userdata though.

Installing OTA updates

Android over the air (OTA) updates contain only the changes to the current system. In order to verify that the update succeeded Android computes a checksum of the patched system and reverts to the old state otherwise.

As SuperSU has changed the boot image to start itself, the updates obviously will fail. So to install an OTA update you will have to grab a factory image and restore the boot partition using the included boot.img

fastboot flash boot boot.img

after this you will have to patch the boot partition again using the procedure described above.

Also note that if you use apps that change the system partition (like AdAway that changes the hosts file), you will have to revert those changes as well in order for the OTA update to succeed.

Optional: Replacing the Recovery System

If you want some advanced features, like backing up all your installed apks, you can permanently replace the recovery image on your device. However this will most likely prevent you from installing OTA updates.
There are two prominent alternative recovery systems with the ability to install apps

Clock Work Mod has been discontinued, so we will use TWRP. From the Website linked above download the recovery image which fits your phone.

fastboot flash recovery <RECOVERY>.img

where <RECOVERY> is the name of the file you downloaded. For instance for a Nexus 9 and TWRP 3.2.3 it would be

fastboot flash recovery twrp-3.2.3-0-flounder.img

restoring stock recovery

If you have a Google Device, you can grab the factory images here.  There you will find a image of the stock recovery. You can restore it by

fastboot flash recovery recovery.img

Alternative superuser apps

If you run a device with Android older than 5/ Lollipop you have some alternatives to SuperSU:

I would recommend getting Superuser by CWM, as it is open source and also nag-free as there is no “pro” version of it. There is even a pull-request which might make it also work with Android 5 in the future.

To install the app we need to get this zip archive and copy it to the device. Then we need to reboot into fastboot mode and then select “Recovery Mode” to get to the recovery system. Once in Recovery mode select

install zip -> choose zip from /sdcard

then browse and select the “superuser.zip” you just copied.

Once installed select

Go Back -> reboot system now

Once the system has started you should have a “Superuser” App on your device. Congratulations, you are done.

Repairing the Philips HD4685 Kettle

The Philips HD4685 is one of the more advanced kettles, as not only automatically shuts-off when the water is boiled, but also allows setting a target temperature below 100°C. This is quite handy if you want to drink green tea, which is supposed to be boiled with only 80°C warm water. Unfortunately the extra electronics is another part which can make the Kettle fail. And this is exactly what happened to me.

Symptoms

I used the kettle for about 3 years on daily basis. One day however it stopped to make the “beep” which indicates that the water is ready when cooking at 100°C. But as this is not an essential functionality I just kept using the kettle. Unfortunately a few weeks later it did not cook at 100°C at all. Instead the kettle just turned off after reaching 80°C – even though 100°C were set.

Diagnosis

Under the hood one of the capacitors forming the capacitive power supply for the electronics started failing. Instead of supplying 0.47 μF, it merely supplied 0.1μF. So what was happening is that once more power consumer like the 100°C LED and the speaker were activated the power supply broke down and the whole circuit shut down.

So the solution is to replace the respective capacitor.

Therapy

Before you try to fix the kettle on your own, be aware that wrong assembly of the kettle can lead to a short-circuit that can cause a fire or lead to an electric shock. You should have fundamental knowledge of electrical engineering.

To access the faulty capacitor one must first disassemble almost the whole kettle:

  1. remove the screws on the bottom cover (torx 8)
  2. lever out the bottom plate with a flat screwdriver
  3. disconnect the power supply cables
  4. remove the screws on the top cover (torx 10). Then remove the top cover and the metallic ring. Also remove the handle cover.
  5. Pull out the electronics box, which is now free as you disconnected the power cables(3)
  6. unscrew and open the electronics box.
  7. replace the capacitor C1. (requires soldering) The capacitor specifications are MKP X2, 26.5 x 10 x 19 mm, 0.47 µF 275 V/AC ±10%, 22.5 mm pitch

For reassembly perform the steps in reverse order. The kettle should work now.

I would like to give credit to the according thread at elektronikwerkstatt.de, where I found the informations to create this post.

Final Words

I am not really sure if this is a case of planned obsolescence or just of insufficient testing, but I would really like philips to use higher quality capacitors and/ or rethink their power supply design. The kettle which is worth 50€ is still fully functional and just failed because of a 1€ part.

Update 12-1-2019
After 4 years, I had to open the kettle again – this time to remove some fine chalk gathered in the sealing, causing the kettle to leak. The 1€ capacitor still works though.

Flying RC helicopters in 3D

In case you are wondering what is so fascinating about flying RC helicopters – maybe you just got bored flying your own 4 channel helicopter – it is 3D flight. One might say that basically all helicopters are flying in 3D (up/ down, left/ right, forward/ backward), but 3D in this context means flying 3D pirouettes like loops and rolls which is not possible with an ordinary coaxial helicopter. See the following video to get an idea of what I am talking about

Continue reading Flying RC helicopters in 3D

Devention Theme for Deviation

In case you got confused by the title. This post is about a theme for the open source firmware Deviation to make it look like the original Walkera Devention Firmware.

Although the default theme of Deviation is more readable, you might have got used to the Devention icons, so this theme eases the transition.

Open issues:

  • the standard TX signal icons uses 8 bars, but the Devention one only displays 6. So you lose some information if you use the included “txpower.bmp”
  • The Devention icons are not quite as telling as the original ones, and Deviation unfortunately does not display any labels below the icons.

Note that this theme is based on the artwork included in the Walkera Devo 12S Firmware package. I assume the usage of this firmware is not restricted by Walkera copyright as not stated otherwise on their webpage. But obviously the CC-license of my website does not apply to this work.

Flying the Nine Eagles Solo Pro 125

If you are considering getting into 3D flybarless helicopters, one of your choices is Nine Eagles (NE) Solo Pro 125 (SP125) helicopter. As Nine Eagles is a quite prominent brand and the price of about 150€ RTF is affordable, this once is certainly worth considering. Unfortunately there is very little information on the Internet regarding reviews and flying experiences. So this is what the following text intends to change.

Continue reading Flying the Nine Eagles Solo Pro 125

Getting into RC Helicopters

Everything started when I got myself a coaxial RC helicopter for Christmas. I was playing with the idea for quite some time, and the moment seemed perfect to waste some money. Since then I have learned quite a lot about how helicopters work an by now I have moved on to a more capable helicopter. Unfortunately it is also more expensive to fly.. This post shall explain some general topics about RC helicopters which are useful if you are also considering getting a RC helicopter yourself. One can already get a small indoor RC helicopter for about 30€, but most likely you will get bored flying it after a few days. If you want to have something that lasts longer, there are some things you should consider, which we will discuss next.

Continue reading Getting into RC Helicopters