How to draw a line interpolating 2 colors with opencv

The built-in opencv line() drawing function allows to draw a variety of lines. Unfortunately it does not allow drawing a gradient line interpolating the colors at its start and end.

However implementing this on our own is quite easy:

using namespace cv;

void line2(Mat& img, const Point& start, const Point& end, 
                     const Scalar& c1,   const Scalar& c2) {
    LineIterator iter(img, start, end, LINE_8);

    for (int i = 0; i < iter.count; i++, iter++) {
       double alpha = double(i) / iter.count;
       // note: using img.at<T>(iter.pos()) is faster, but 
       // then you have to deal with mat type and channel number yourself
       img(Rect(iter.pos(), Size(1, 1))) = c1 * (1.0 - alpha) + c2 * alpha;
    }
}

Introducing Sensors Unity

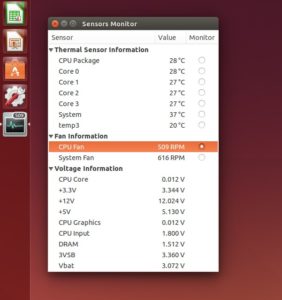
Sensors-Unity is a new lm-sensors GUI for the Unity Desktop. It allows monitoring the output of the sensors CLI utility while integrating with the Unity desktop. This means there is no GPU/ HDD support and no plotting.
If you need those you are probably better suited with psensor. However if you just need a overview of the sensor readings and if you appreciate a clean UI you should give it a shot.

It is written in Python3 / GTK3 and uses sensors.py. You can contribute code or help translating via launchpad.

Overview

In contrast to other applications the interface is designed around being a application. Instead of getting another indicator in the top-right, you get an icon in the launcher:

The user interface
The user interface

The idea is that you do not need the sensor information all the time. Instead you launch the app when you do. If you want to passively monitor some value you can minimize the app while selecting the value to display in the launcher icon.

To get the data libsensors is used which means that you need to get lm-sensors running before you will see anything.

However once the sensors command line utility works you will see the same results in Sensors-Unity as it shares the configuration in /etc/sensors3.conf.

Configuration

Unfortunately configuring lm-sensors via /etc/sensors3.conf is quite poorly documented, so lets quickly recap the usage.

  • /etc/sensors3.conf contains the configuration for all sensors known by lm-sensors
  • however every mainboard can use each chip in a slightly different way
  • therefore you can override /etc/sensors3.conf by placing your specific configuration in /etc/sensors.d/ (see this for details)
  • you can find a list of these board specific configurations in the lm-sensors repository
  • to disable a sensor use the ignore statement
    #ignore everything from this chip
    chip "acpitz-virtual-0"
       ignore temp1
       ignore temp2 
    
  • to change the label use the label statement
    chip "coretemp-*"
       label temp1 "CPU Package"
    

Sensors-Unity Specific Configuration

Sensors-Unity allows using the Pango Markup Language for sensor labels. For instance if you want “VAXG” instead of “CPU Graphics” to be displayed, you would write:

label in4 "V<sub>AXG</sub>"

In order not to interfere with other utilities and to allow per-user configuration of the labels/ sensors Sensors-Unity first tries to read ~/.config/sensors3.conf before continuing with the lm-sensors config lookup described above.

introducing sensors.py

sensors.py is a new python wrapper for libsensors of the lm-sensors project. libsensors is what you want to use to programmatically read the sensor values of your PC with Linux instead of parsing the output of the sensors utility.

sensors.py is not the first wrapper – there are two alternatives, confusingly both named PySensors.

PySensors (ctypes) follows a similar approach to sensors.py by using ctypes. However instead of exposing the C API it tries to be a object-oriented(OO) abstraction, which unfortunately lacks many features and makes the mapping to the underlying API hard. Furthermore it does not support Python3.

PySensors (extension module)  does not use ctypes and thus is more efficient, but if you write a python script probably compiling a extension module is worse than losing some performance when reading the values.
Additionally there is python3 support and also some OO abstraction. The latter is somewhere in between the C API and proper OO: sensors_get_label(chip_name, feature) is ChipName.get_label(feature) instead of feature.get_label().

So what makes sensors.py immediately different is that it does not try to do any OO abstraction but instead gives you access to the raw C API. It only adds minor pythonification: you dont need to mess with pointers, errors are converted to exceptions and strings are correctly converted from/ to utf-8 for you.

However working with the C API directly is tiresome at times – therefore there is also an optional iterator API, which is best shown by a demo:

import sensors

sensors.init()

for chip in sensors.ChipIterator("coretemp-*"):
    print(sensors.chip_snprintf_name(chip)+" ("+sensors.get_adapter_name(chip.bus)+")")
    
    for feature in sensors.FeatureIterator(chip):
        sfi = sensors.SubFeatureIterator(chip, feature)
        vals = [sensors.get_value(chip, sf.number) for sf in sfi]
        label = sensors.get_label(chip, feature)
        
        print("\t"+label+": "+str(vals))

sensors.cleanup()

result:

coretemp-isa-0000 (ISA adapter)
 Physical id 0: [38.0, 80.0, 100.0, 0.0]
 Core 0: [37.0, 80.0, 100.0, 0.0]
 Core 1: [35.0, 80.0, 100.0, 0.0]
 Core 2: [38.0, 80.0, 100.0, 0.0]
 Core 3: [36.0, 80.0, 100.0, 0.0]

for a more sophisticated example see the example.py in the repository.

Replacing your desktop laptop with a ITX workstation

If you use your laptop as a desktop replacement, you will at some point get an external display and a mouse/ keyboard for more convenient usage.
At this point the laptop becomes only a small case of non-upgradable components.

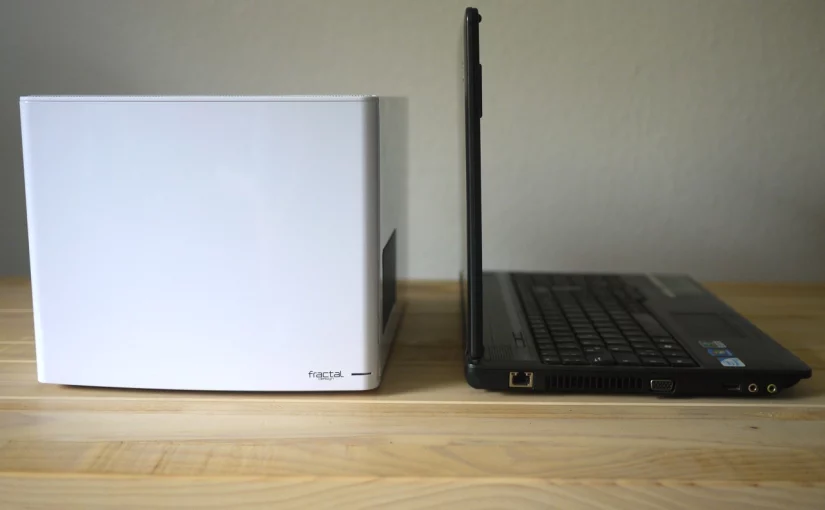
Now you could as well replace your laptop by a real case of comparable size.  This will make your PC not only easily upgradable, but allow higher-end components while being more silent at the same time.

Continue reading Replacing your desktop laptop with a ITX workstation

Streaming the Screen on Android

In this post I want to discuss way of getting the screen content of your Android device to the TV or monitor. If you wonder why one might want to do such a thing – just think about playing some Android games with a bluetooth gamepad or watching a movie where your PC is not available.

Specifically I want to introduce SlimPort. SlimPort is a feature of Nexus devices which is unfortunately not covered much in reviews.
Basically SlimPort is DisplayPort over the Micro-USB connection of your device allowing you to mirror its display.

But the future has arrived: we got Miracast!

One might wonder why one should go through the hassle of using a old-school HDMI cable.
You can get a Chromecast Stick for 35$ and nowadays it also supports Miracast so you can simply stream the images over WiFi.

Well Miracast is all nice if all you need to do is to put up some slides without carrying all possible adapters with you. But as soon as you try to stream a movie or a game you will reach its limitations.

Remember that Miracast works by grabbing the Framebuffer and compressing it with H.264. While encoding happens in hardware it still takes some time and it inevitably introduces compression artifacts. This means:

  • in games you get a noticeable lag – especially in FullHD
  • in movies you get noticeable artifacts – especially in FullHD
  • in both cases your battery will get drained for heavy WiFi and Encoder usage

Going old-school

Going with the old-school cable on the other hand you get HDMI 1.4 transfer rates for up to 1080p at 60Hz while saving the battery.

Configuring the second screen is quite straightforward in android. As Mirroring is your only option, there is actually nothing to configure. Once you connect the adapter android will set up your monitor based on its EDID information and transfer image and audio over HDMI.
In case you only want to have the image over HDMI, simply attach your speakers to the phone and android will re-route the audio.
The days where you had to manually set up everything are over.

Furthermore most adapters have an micro-USB port allowing to still charge your phone while using SlimPort.

Device Support

The downside is that most of the devices do not support SlimPort. The device list more or less boils down to

  • Google Nexus 4/ 5
  • Google Nexus 7 (2013)
  • LG G2/ G3

Samsung devices go with the alternative MHL. Comparing these two SlimPort has the bandwidth advantage of 5Gb/s vs. 3Gb/s of MHL so it does not have to compress that much. However both are clearly better than going wireless.


Secure Nextcloud Server

This article is about how to securely configure the machine where your Nextcloud/ Owncloud instance will be running.
Even if you set-up your connection with Owncloud in a secure way,  your data still can be compromised by exploiting security flaws in the underlying architecture.

In the following we specifically will cover the underlying software stack and brute-force password hacking attempts.

Continue reading Secure Nextcloud Server

How to manually update a deb package from source

Probably everyone has encountered a package in Ubuntu which was not the newest released version while one for some reason needed the newest one. The first step is to search for a PPA with the desired version. But what if there is no such PPA or you want to build the version yourself? This is where this guide comes in. Note however that this is not aimed at ordinary users – you need some experience with programming/ compiling to successfully build a package.

Before you start

Before you start make sure that you have source packages enabled in your software sources.
Next you obviously need the upstream source tar-ball of the new program which should look something like <packagename><version>.tar.gz.
Download this tar-ball to a new directory <somedir> and extract it there.

Updating Package info

For the following commands I assume you are in the previously created directory <somedir>.

First we need to get the old version of the source package

apt-get source <packagename>

This will download and extract the old source package into <packagename><oldversion>.

Now we need some helper scripts to perform the upgrading as well as the build-time dependencies of the package

sudo apt-get install dpkg-dev devscripts fakeroot
sudo apt-get build-dep <packagename>

Next change into the extracted sources of the old package and update the packaging

cd <packagename>-<oldversion>
uupdate -v <newversion> ../<packagename>-<newversion>.tar.gz

# change into the extracted new package
cd ../<packagename>-<newversion>

# update version info
dch -l ~ppa -D $(lsb_release -sc)

For more information see the Debian New Maintainers Guide.

Building the program

To trigger a rebuild of the program simply execute

dpkg-buildpackage

Uploading your version to a PPA

To upload a package to a PPA you first need to sign it to prove that you are the author. To do this you have to execute the following in the <packagename><newversion> directory

debuild -S

Furthermore you need the upload tool dput to actually perform the uploading

sudo apt-get install dput

Now change to <somedir> and execute

dput ppa:<your_username>/<repository> <source.changes>

You can find more information at Launchpad.

Secure Own-/ Nextcloud setup

update 24.04.2017 –  include Subject Alternative Name field
update 20.12.2017 – discuss Certbot as an alternative

While the Nextcloud Manual suggests enabling SSL, it unfortunately does not go into detail how to get a secure setup. The core problem is that the default SSL settings of Apache are not sane as in they do not enforce strong encryption. Furthermore the used default certificate will not match your server name and produce errors in the browser.

In the following a short guide how to manually set-up a secure Apache 2.4 server for Nextcloud will be presented.

Note: nowadays one can also use Certbot to automatically perform the steps below and validate your certificate so browsers accept it. However due to their certificate transparency policy, your host will be submitted to a public list. This may or may not be what you want.

Continue reading Secure Own-/ Nextcloud setup

How to root Android using Ubuntu

update 27.10.2018 – use TWRP instead of CWM (discontinued)
update 14.10.2017 – new instructions to set-up udev rules
update 26.02.2016 – instructions for Android 6 Marshmallow

The Big Picture

Android consists of three parts relevant to rooting

  1. the bootloader
  2. recovery system
  3. main system

typically only the main system is running, that is the Linux Kernel, the launcher, the phone app etc.. If we talk about rooting, that means we want to add an additional app to the main system which has access to secured parts of the system and acts as a gatekeeper for other apps that also want to get access.

The problem is the secured parts of the system are locked down – otherwise they would not be secure. This means that we can not simply install that app (e.g. an apk) from within the main system.

Therefore we have to go one level down. This is where the recovery system is. Typically you do not see it, as it is only active when the main system can not run – either because a system update is installed or because you do a factory reset.
As the recovery system can do a full system update, it means that it has also access to the secured parts of the main system – exactly what we need.
The stock recovery system obviously does not allow altering the main system – otherwise everybody could get your private data if you lose your phone.
So we need to replace it as well. But before that we have to talk about the bootloader.

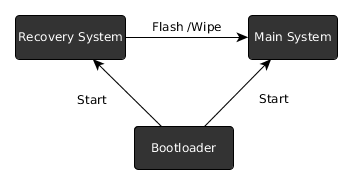
The bootloader is a tiny piece of software which decides whether to start the recovery or the main system (or another main system, like Ubuntu Phone).
In the default configuration in only starts systems that it knows and trusts. In this configuration the bootloader is called locked.
Although this prevents malicious software to change the phone and spy on us, it also prevents us from replacing the recovery system. By the way, this concept is also coming to the PC where it is called UEFI secure-boot.

Here is a graphical overview of the Android components:
android-brs

So what we need to do in order to get root access is

  1. unlock the bootloader
  2. replace the recovery system
  3. install a superuser app

Note that unlocking the bootloader also allows attackers to circumvent any of the android security features (PIN etc). It becomes possible to access all the files on the device using a different recovery system. (unless userdata is encrypted)
Therefore android will wipe all userdata when the bootloader state is changed from locked to unlocked.

So if you lose your unlocked device or it gets stolen, you better hope the thief is not tech savvy.

Preparations

First you need to install the fastboot binary to be able to perform low-level communication with the device

apt-get install android-tools-fastboot android-tools-adb android-sdk-platform-tools-common

The android-sdk-platform-tools-common package most importantly contains a whitelist (/lib/udev/rules.d/51-android.rules) with devices to which users can send commands over USB, so you do not have to run fastboot as root.

Now you have to reboot into fastboot mode. Usually there is a key combination you have to press on startup.

Remember this key combination as you will need some more times.

Samsung Devices however, like the Galaxy S3, do not support the fastboot mode – instead they have a download mode, which uses a proprietary Samsung protocol. To flash those you have to use the Heimdall tool. While this article does not cover the heimdall CLI calls, the general discussion still applies.

Unlocking the Bootloader

last warning: this will wipe all user data on the device

for google devices, like a Nexus 4 or Nexus 7 it is just do

fastboot oem unlock

if you have a Sony Xperia device, like a Xperia Z, you additionally have to request a unlock key and then do

fastboot oem unlock 0x<KEY>

where <KEY> is the key you obtained.

Using AutoRoot to install SuperSU

There are several superuser apps to choose from for Android 4 and below. However the only superuser app working on Android 5/ Lollipop and above is SuperSU by Chainfire.

As there are devices like the Nexus 5X shipping with Android 6/ Marshmallow, I will describe this method first.

Chainfire created an “installer” called AutoRoot that includes the fastboot utility and will perform the unlocking step described above. However if you have read this far, you probably also want to understand the rest of the process.

First you have to download the appropriate package for your device. There you will find a recovery image which we have start with

fastboot boot image/CF-Auto-Root-hammerhead-hammerhead-nexus5.img

the command above will not flash anything on your device, but just upload the image and immediately start it. The image contains a script to modify the main system (change startup to get around SELinux) and install the superuser app.

If everything goes well, you can now just reboot your phone and you are done.

You could lock your bootloader again now to make your device more secure. However the next Android update will remove root again and repeating the rooting procedure will wipe userdata – so you have to balance security update vs. the risk of your device being stolen. For the latter case you still have the option to enable encryption of userdata though.

Installing OTA updates

Android over the air (OTA) updates contain only the changes to the current system. In order to verify that the update succeeded Android computes a checksum of the patched system and reverts to the old state otherwise.

As SuperSU has changed the boot image to start itself, the updates obviously will fail. So to install an OTA update you will have to grab a factory image and restore the boot partition using the included boot.img

fastboot flash boot boot.img

after this you will have to patch the boot partition again using the procedure described above.

Also note that if you use apps that change the system partition (like AdAway that changes the hosts file), you will have to revert those changes as well in order for the OTA update to succeed.

Optional: Replacing the Recovery System

If you want some advanced features, like backing up all your installed apks, you can permanently replace the recovery image on your device. However this will most likely prevent you from installing OTA updates.
There are two prominent alternative recovery systems with the ability to install apps

Clock Work Mod has been discontinued, so we will use TWRP. From the Website linked above download the recovery image which fits your phone.

fastboot flash recovery <RECOVERY>.img

where <RECOVERY> is the name of the file you downloaded. For instance for a Nexus 9 and TWRP 3.2.3 it would be

fastboot flash recovery twrp-3.2.3-0-flounder.img

restoring stock recovery

If you have a Google Device, you can grab the factory images here.  There you will find a image of the stock recovery. You can restore it by

fastboot flash recovery recovery.img

Alternative superuser apps

If you run a device with Android older than 5/ Lollipop you have some alternatives to SuperSU:

I would recommend getting Superuser by CWM, as it is open source and also nag-free as there is no “pro” version of it. There is even a pull-request which might make it also work with Android 5 in the future.

To install the app we need to get this zip archive and copy it to the device. Then we need to reboot into fastboot mode and then select “Recovery Mode” to get to the recovery system. Once in Recovery mode select

install zip -> choose zip from /sdcard

then browse and select the “superuser.zip” you just copied.

Once installed select

Go Back -> reboot system now

Once the system has started you should have a “Superuser” App on your device. Congratulations, you are done.

Debugging native code with ndk-gdb using standalone CMake toolchain

I recently ran into this problem and could not find any good solution on the Internet. So next comes a small summary of the problem with hopefully enough buzzwords, so Google can lead you here.

If you want to do C++ development on Android, you need the NDK for cross compilation. It comes by default with its own build system called ndk-build, which basically is a bunch of custom makefiles. But if you are sharing code between the Android Platform and lets say plain Linux, you have likely already a build system installed. For C/C++ CMake is quite popular as it supports different platforms and compilers. Fortunately there is already a project which adds Android support to CMake. I will not cover that – instead I assume you are using it already.

Unfortunately you cant use the ndk-gdb script supplied with the NDK to debug your application as it relies on the behaviour of ndk-build. But as said earlier, ndk-build is no wizardy, but just a bunch of scripts. So it is possible to emulate the behaviour using CMake, as following:

Add the following macro to your CMakeLists.txt file

macro(ndk_gdb_debuggable TARGET_NAME)
    get_property(TARGET_LOCATION TARGET ${TARGET_NAME} PROPERTY LOCATION)
    
    # create custom target that depends on the real target so it gets executed afterwards
    add_custom_target(NDK_GDB ALL) 
    add_dependencies(NDK_GDB ${TARGET_NAME})
    
    set(GDB_SOLIB_PATH ${PROJECT_SOURCE_DIR}/obj/local/${ANDROID_NDK_ABI_NAME}/)
    
    # 1. generate essential Android Makefiles
    file(WRITE ${PROJECT_SOURCE_DIR}/jni/Android.mk "APP_ABI := ${ANDROID_NDK_ABI_NAME}\n")
    file(WRITE ${PROJECT_SOURCE_DIR}/jni/Application.mk "APP_ABI := ${ANDROID_NDK_ABI_NAME}\n")

    # 2. generate gdb.setup
    get_directory_property(PROJECT_INCLUDES DIRECTORY ${PROJECT_SOURCE_DIR} INCLUDE_DIRECTORIES)
    string(REGEX REPLACE ";" " " PROJECT_INCLUDES "${PROJECT_INCLUDES}")
    file(WRITE ${PROJECT_SOURCE_DIR}/libs/${ANDROID_NDK_ABI_NAME}/gdb.setup "set solib-search-path ${GDB_SOLIB_PATH}\n")
    file(APPEND ${PROJECT_SOURCE_DIR}/libs/${ANDROID_NDK_ABI_NAME}/gdb.setup "directory ${PROJECT_INCLUDES}\n")

    # 3. copy gdbserver executable
    file(COPY ${ANDROID_NDK}/prebuilt/android-arm/gdbserver/gdbserver DESTINATION ${PROJECT_SOURCE_DIR}/libs/${ANDROID_NDK_ABI_NAME}/)

    # 4. copy lib to obj
    add_custom_command(TARGET NDK_GDB POST_BUILD COMMAND mkdir -p ${GDB_SOLIB_PATH})
    add_custom_command(TARGET NDK_GDB POST_BUILD COMMAND cp ${TARGET_LOCATION} ${GDB_SOLIB_PATH})

    # 5. strip symbols
    add_custom_command(TARGET NDK_GDB POST_BUILD COMMAND ${CMAKE_STRIP} ${TARGET_LOCATION})
endmacro()

Then use it like

add_library(YourTarget ...)
ndk_gdb_debuggable(YourTarget)

You should now be able to use ndk-gdb with CMake, just as if you would have used ndk-build.

Note that steps 4 and 5 are optional for debugging. They just reduce the size of the library that has to be transferred to the device. If you dont care, you can just leave them out. But then the solib search path from step 2 must be set to:

file(WRITE ./libs/${ANDROID_NDK_ABI_NAME}/gdb.setup "set solib-search-path ./libs/${ANDROID_NDK_ABI_NAME}\n")

Ideally someone should integrate that in the Android toolchain linked above.

Update Merged Upstream