While libraries like tqdm are fantastic, sometimes you just need a quick and simple progress bar for a long-running loop without adding another dependency.
Here’s the complete code snippet:
# 'i' is the loop index and 'total' is the number of items
percent = (i + 1) / total
chars = int(percent * 50) # filled chars count
print(f"Task [{'':=^{chars}}>{'':.^{50-chars}}] {percent*100:.0f} %  ",
    end="\r", flush=True)
This tiny block of code produces a clean, updating progress bar right in your terminal:
The beauty of this solution lies in its simplicity and portability. It uses only built-in Python features, making it trivial to drop into any script. The core technique is also easily adaptable to other languages like C or Java using their respective formatted printing functions.
How It Works
Let’s demystify this “magic” by examining each line.
Calculate the Percentage: We compute the completion percentage using (i + 1) / total. The +1 ensures we count from 1% to 100% rather than 0% to 99%.
Visual Fill: We determine how many = characters to display by scaling the percentage to our 51-character bar width.
The Formatting Magic: This line is the heart of the operation, combining powerful f-string formatting with two special arguments for the print() function. The syntax {'':=^{chars}} is a clever trick. It tells Python to create a string of length chars and fill it with the = character. Similarly, {'':.^{50-chars}} creates the “empty” part of the bar using . characters. The > is just a character we use to show the current position. flush=True ensures immediate output for smooth animation, while end='\r' returns the cursor to the line start for seamless updates.
Having spent a significant amount of time resolving this, I’m sharing the solution here. When selecting the Wayland session on Ubuntu 24.04 with proprietary NVIDIA drivers, you might find yourself stuck with software rendering in GNOME Shell.
The root of the issue is an outdated libnvidia-egl-wayland1 package, which is version 1.1.13 in the default repositories. Upgrading it to version 1.1.17 from the graphics drivers PPA will enable proper hardware-accelerated Wayland.
A remaining caveat is that this package is still outdated for Snap applications, causing them (e.g., Firefox) to fall back to software rendering. But this can be resolved eventually.
To utilize the browser-based Via or Keychron Launcher applications on Linux, you need to adjust some permission settings. By default, your user account lacks the permissions to transmit arbitrary commands via USB. This limitation has its benefits, as Firefox also does not support WebUSB due to security concerns. However, these browser-based applications depend on this functionality.
Giving permissions
The recommended approach to grant user permissions is to use udev rules that can target specific devices. These rules are maintained in the directory /etc/udev/rules.d/. We will create a new rule for Via with the following content:
If you’re using a different keyboard, you can identify its idVendor and idProduct by executing lsusb, which will output a line such as:
Bus 001 Device 024: ID 3434:0a31 Keychron Keychron K3 Max
Although you could just omit the ATTRS filter, doing so would grant the browser access to all HID devices, which poses security risks.
To apply the new rules run:
sudo udevadm control --reload-rules && sudo udevadm trigger
You can verify that everything is working as expected by visiting chrome://device-log/ after trying to connect to the device and check for access denied message.
Keychron additions
For users of the Keychron launcher, you should also incorporate the following line:
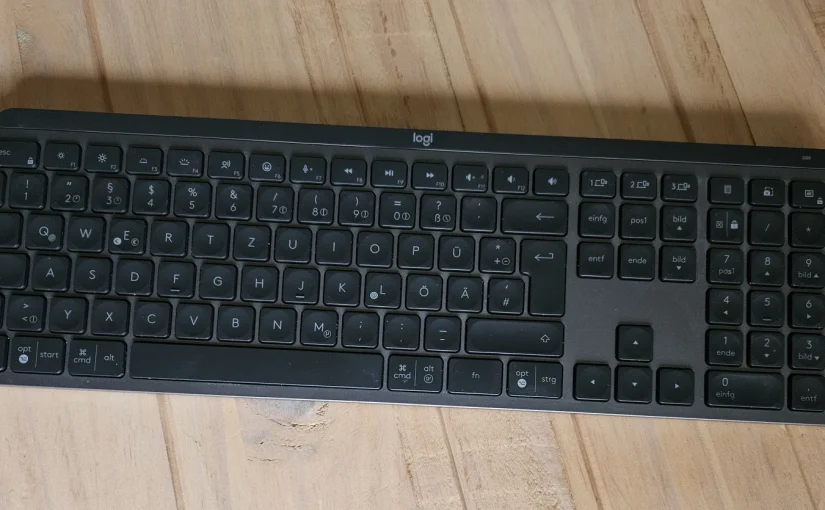
In this post, I want to share my thoughts on the Logitech MX Keys S Keyboard after using its predecessor for four years and the MX Keys S itself for two years.
The TLDR; is: If you’re a Linux user, you might want to avoid this keyboard.
Among rubber-dome keyboards, the MX Keys is one of the top options. Its low-profile design closely resembles a laptop keyboard, providing a familiar typing experience. It competes with, and perhaps even surpasses, the excellent ThinkPad keyboards—which are comparable to Apple MacBook keyboards for those more accustomed to them.
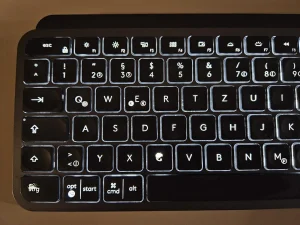
The build quality is excellent, and the keyboard has a surprising heft. It features backlit illumination with shine-through keycaps, enhancing readability in low-light conditions. However, the keycaps are made of cheap ABS plastic, which can become shiny over time and may even start to peel.
MX Keys: Keycaps worn off after excessive Ctrl+C use
To save battery life, the backlight automatically turns off after a set period. However, the keyboard includes a capacitive sensor that detects when your hands are near, allowing the backlight to turn on as soon as you hover your hands above it.
The main difference between the older “non-S” and the newer “S” variant is the use of the Bolt receiver on the latter. The Bolt receiver is based on the Bluetooth LE transmission standard and offers stronger encryption and better robustness when multiple receivers are used in the same environment when compared to the older Unifying receiver. If you plan to use the keyboard for gaming, the Bolt receiver inherits the maximal polling rate of 133 Hz from Bluetooth LE.
You might be wondering why you’d choose the Bolt receiver over a standard Bluetooth connection if they’re so similar. The main advantage is the ability to interact with your PC during boot, such as accessing the BIOS or selecting an OS in the bootloader. The bluetooth stack is part of the OS and not started at this point, while the Bolt receiver works without OS support.
At this point it sounds like the keyboard is a decent choice and it actually is, unless..
Linux issues
The most frustrating issue on Linux is that the MX Keys S prevents your machine from hibernating. While it technically allows the system to enter suspend mode, the keyboard immediately sends a wake-up signal. From my testing, this issue appears to be specific to the keyboard. I also have an M650 mouse paired to the same Bolt receiver, and when the keyboard is powered off, suspend works as expected. A workaround is to disable wakeup from Logitech Bolt via udev, as described here. However, this will also disable wakeup via the mouse as well.
Another problem is that certain keys are mapped to macros rather than key events. This is particularly true for the print screen button, which triggers the “Windows + Shift + S” sequence. Although GNOME can manage this correctly, it stops you from issuing system requests that depend on the print screen keycode. These requests are quite handy for initiating a safe reboot if your system freezes for any reason. Unfortunately, there is no effective workaround for this. While keys can be remapped in Solaar, these remappings occur in userspace and are therefore unavailable when switching to the console or if userspace becomes unresponsive. This contrasts with the “Keychron B6 Pro” Keyboard, where settings are stored directly on the keyboard and persist no matter where you use it.
3D Gaussian splatting is the emerging rendering technique that is overtaking NeRFs. Since it is centered around point primitives, it is more compatible with traditional graphics pipelines that already support point rendering.
Gaussian splats essentially enhance the concept of point rendering by converting the point primitive into a 3D ellipsoid, which is then projected into 2D during the rendering process.. This concept was initially described in 2002 [3], but the technique of extending Structure from Motion scans in this way was only detailed more recently [1].
In this post, I explore how to integrate Gaussian splats into the traditional graphics pipeline. This allows them to be used alongside triangle-based primitives and interact with them through the depth buffer for occlusion (see header image). This approach also simplifies deployment by eliminating the need for CUDA.
Storage
The original implementation uses .ply files as their checkpoint format, focusing on maintaining training-relevant data structures at the expense of storage efficiency, leading to increased file sizes.
For example, it stores the covariance as scaling and a rotation quaternion, necessitating reconstruction during rendering. A more efficient approach would be to leverage orthogonality, storing only the diagonal and upper triangular vectors, thereby eliminating reconstruction and reducing storage requirements.
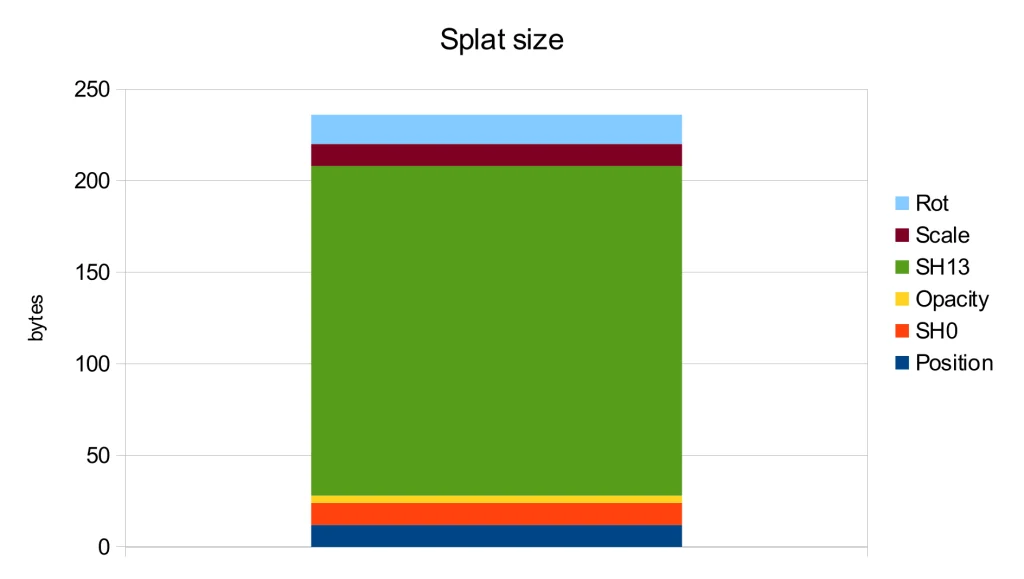
Further analysis of the storage usage for each attribute shows that the spherical harmonics of orders 1-3 are the main contributors to the file size. However, according to the ablation study in the original publication [1], these harmonics only lead to a modest PSNR improvement of 0.5.
Therefore, the most straightforward way to decrease storage is by discarding the higher-order spherical harmonics. Additionally, the level 0 spherical harmonics can be converted into a diffuse color and merged with opacity to form a single RGBA value. These simple yet effective methods were implemented in one of the early WebGL implementations, resulting in the .splat format. As an added benefit, this format can be easily interpreted by viewers unaware of Gaussian splats as a simple colored point cloud:
Results using a non Gaussian-splat aware renderer
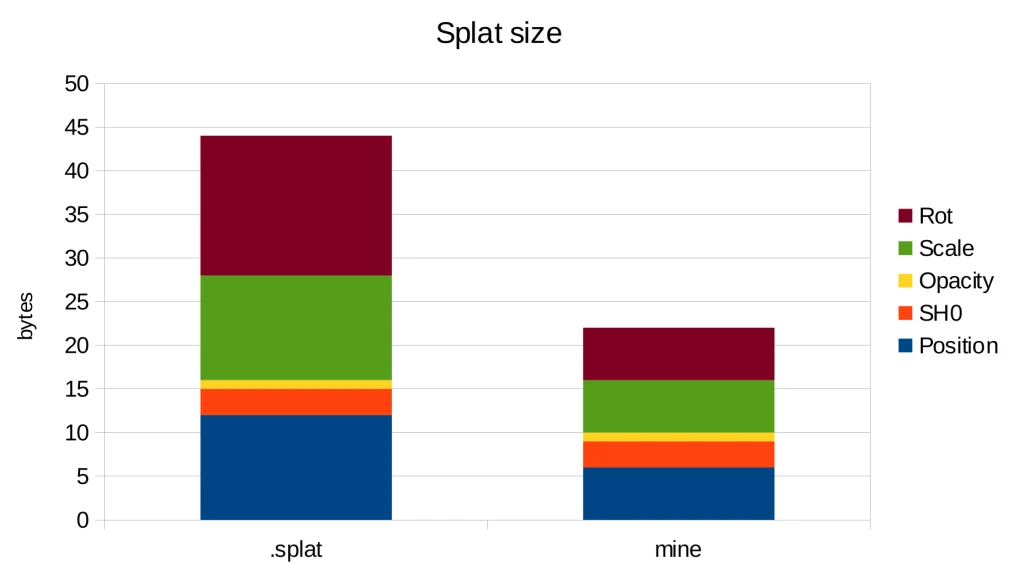
By directly storing the covariance as previously mentioned we can reduce the precision from float32 to float16, thereby halving the storage needed for that data. Furthermore, since most splats have limited spatial extents, we can also utilize float16 for position data, yielding additional storage savings.
With these changes, we achieve a storage requirement of 22 bytes per splat, in contrast to the 44 bytes needed by the .splat format and 236 bytes in the original implementation. Thus, we have attained a 10x reduction in storage compared to the original implementation simply by using more suitable data types.
Blending
The image formation model presented in the original paper [1] is similar to the NeRF rendering, as it is compared to it. This involves casting a ray and observing its intersection with the splats, which leads to front-to-back blending. This is precisely the approach taken by the provided CUDA implementation.
Blending remains a component of the fixed-function unit within the graphics pipeline, which can be set up for front-to-back blending [2] by using the factors (one_minus_dest_alpha, one) and by multiplying color and alpha in the shader as color.rgb * color.a. This results in the following equation:
However, this method requires the framebuffer alpha value to be zero before rendering the splats, which is not typically the case as any previous render pass could have written an arbitrary alpha value.
A simple solution is to switch to back-to-front sorting and use the standard alpha blending factors (src_alpha, one_minus_src_alpha) for the following blending equation:
Recently there was an large rework to the STB single-file image_resize library (STBIR) bumping it to 2.0. While the v1 was really slow and merely usable if you needed to quickly get some code running, the 2.0 rewrite claims to be more considerate of performance by using SIMD. So lets put it to a test.
As references, I chose the moderately optimized C only implementation of Ogre3D and the highly optimized SIMD implementation in OpenCV.
Below you find time to scale a 1024x1024px byte image to 512x512px. All libraries were set to linear interpolation. The time is the accumulated time for 200 runs.
RGB
RGBA
Ogre3D 14.1.2
660 ms
668 ms
STBIR 2.01
632 ms
690 ms
OpenCV 4.8
245 ms
254 ms
For the RGBA test, STIBIR was set to the STBIR_4CHANNEL pixel layout. All libraries were compiled with -O2 -msse. Additionally OpenCV could dispatch AVX2 code. Enabling AVX2 with STBIR actually decreased performance.
Note that while STBIR has no performance advantage over a C only implementation for the simple resizing case, it offers some neat features if you want to handle SRGB data or non-premultiplied alpha.
I recently needed some NAS and went with the “Synology RS1221+” barebone system. The system is competitively priced when compared to the similar “QNAP TS-873AeU-4G”.
Synology HDD
For storage, the sweet spot between price and capacity was at 18TB. Lets look at some options:
Toshiba MG09ACA 18TB
270€
Seagate Exos X X18
280€
Synology HAT5310-18T
700€
Depending on the benchmark sometimes the Toshiba comes out on top and sometimes the Seagate. Both are similarly priced, so thats fine. However, talking of the price the Synology HDD stands out by asking a 150% premium. You might now wonder whether you also get a better performance or other features in return. Well.. guess which is the only 18TB HDD that is verified by Synology for the RS1221+?
The scammy part here however is that the HAT5300 series are just rebranded Toshiba Drives with a different firmware. So the HAT5310 likely is just the MG09ACA and the main difference is the profit margin. Note that different firmware does not result in any noticeable difference in performance.
I went with the unverified Seagate drives and – as one might expect – there are zero issues with doing so.
Synology RAM
At this point you might say, well Synology just did not get to test more 18TB drives. Well.. I found the 4GB RAM rather tight and wanted to upgrade to 32GB as RAM is currently quite cheap anyway.
The options here are
Kingston KSM26SED8/16HD
50€
Synology D4ECSO-2666-16G
350€
I think there appears to be a pattern here. Again, both options have the same specs i.e. DDR4 2666, ECC SO-DIMM. Maybe Synology even rebranded the Kingston modules too, but I did not verify this.
While the DiskManager did not complain about the Seagate HDD, there is a warning when going with Kingston now. I guess this is because it matters even less.
To conclude this, I first want to emphasizes that both the Synology NAS Hardware and their DiskManager software work great with non Synology Hardware – just as one would expect of a standard x86 platform.
It is just a pity that they try to FUD you into buying their overpriced HDD and RAM. Basically this is the same game as with printer vendors predicting ravages and annihilation when using 3rd party ink.
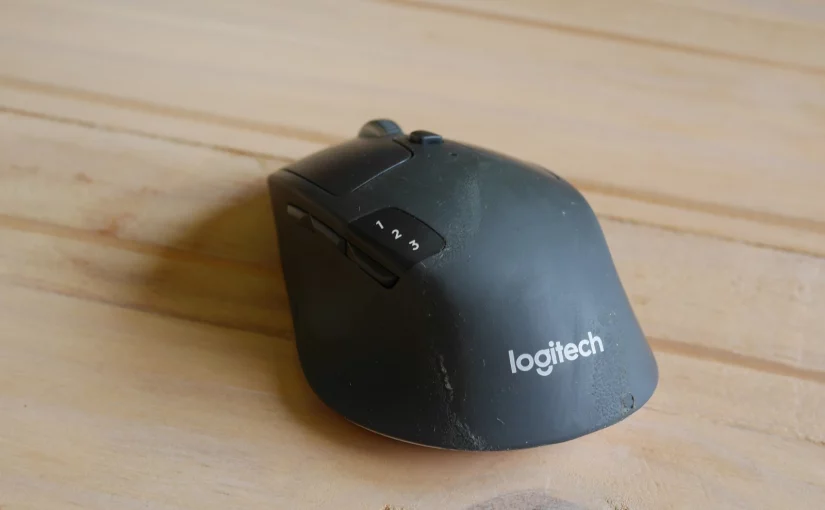
The specs are pretty common for a mouse you get today, so lets start with the special features:
There are side buttons, which I find pretty handy for navigating front/ back in the browser or a file manager
It can be paired with up to 3 devices at the same time, which makes it easy to use with your PC, Laptop and Tablet
It supports both Bluetooth LE and the Logitech Wireless Receiver
It is powered by a single, replaceable AA battery
Especially the last two points make this seem to be future-proof product that you can use for a long time.
Logitech is currently replacing their Wireless Receiver dongles by Logitech Bolt, so in the near future the Wireless Receivers will go away. But thanks to the Bluetooth support you will still be able to use the mouse without having to occupy a USB port just for using it.
Then, using standard AA batteries means that you just use some nice rechargeable ones. This means that you will never have to wait for the mouse to charge and that the mouse can out-live the battery. As you are probably aware from using your phone, rechargeable batteries wear-out over time until the device cannot be properly used any more.
So we finally got a mouse for the years to come? Well..
Built-in obsolescence
Unfortunately, Logitech made some design decision that drastically shorten the life-span of the device, even though they must have known better.
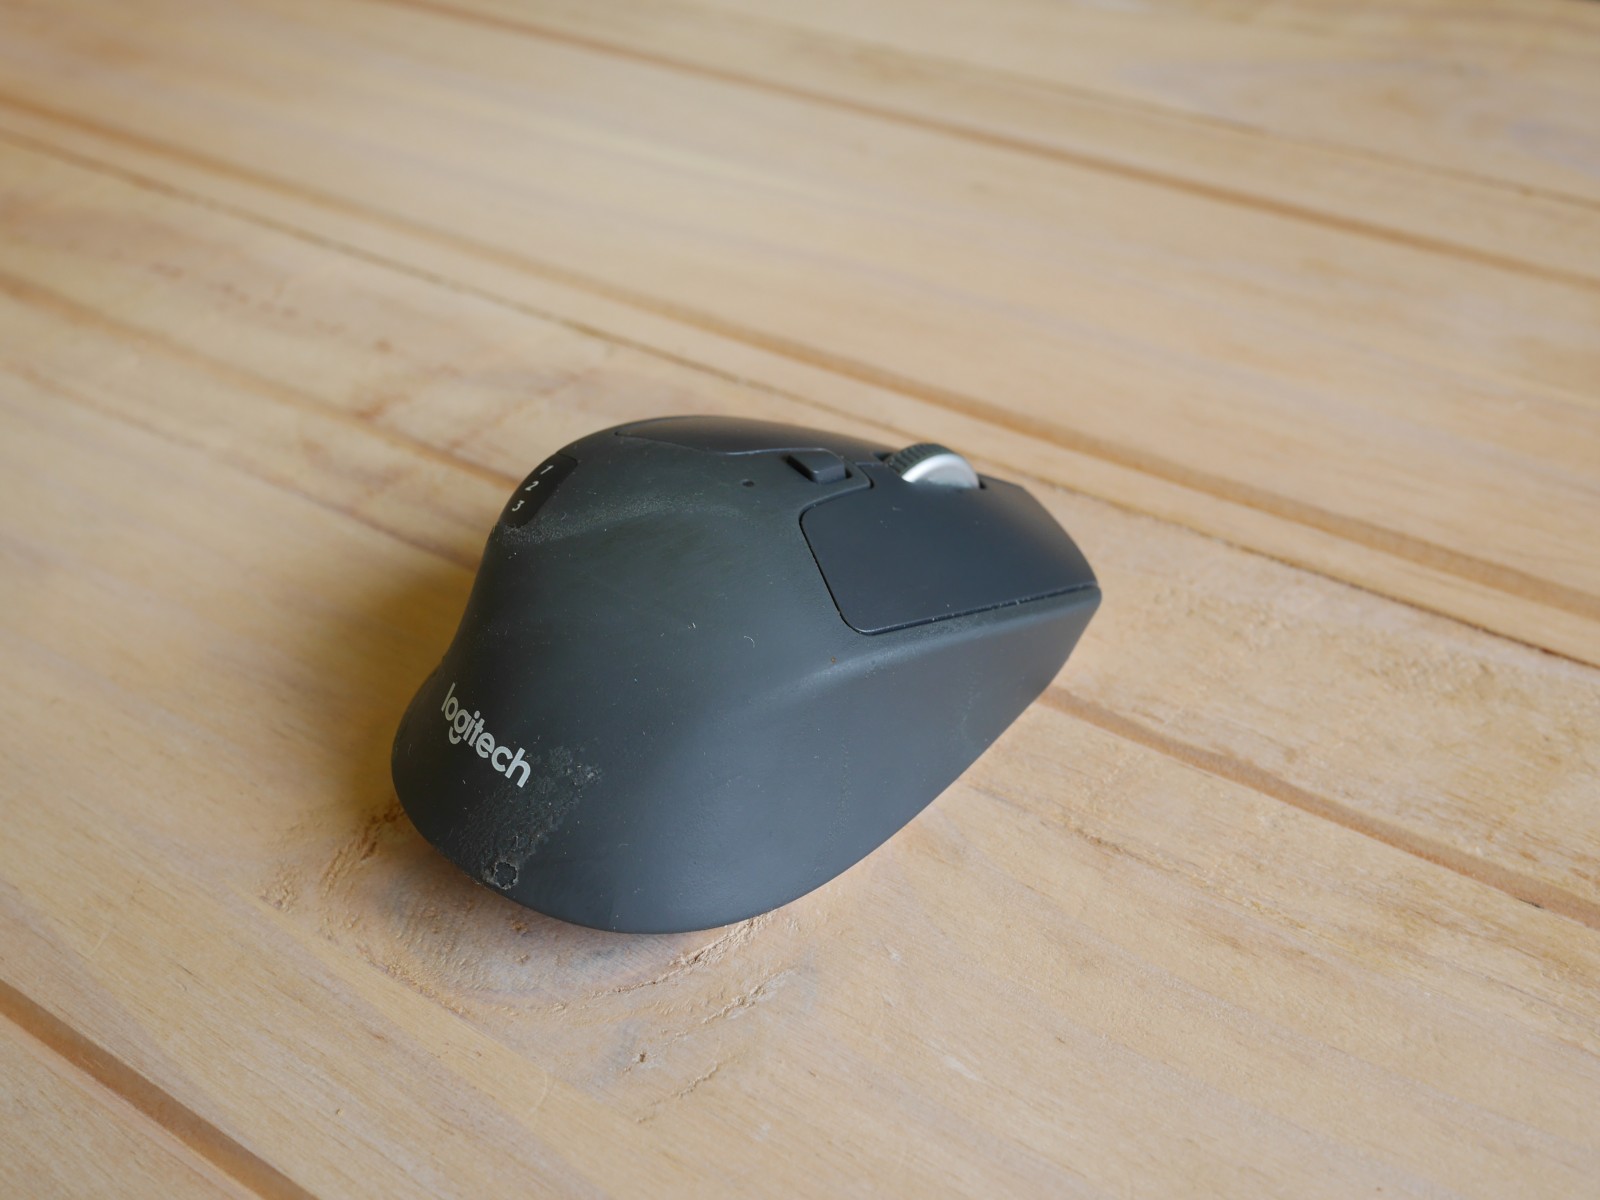
Rubber coating
The most obvious one is likely the rubber coating of the mouse.
Note how the plastic buttons look still perfectly fine in comparison
I took the images for this post after cleaning the mouse. So the dirt you see there is not the skin from my greasy hands, but rather said rubber coating disintegrating. This is caused by your sweat which is slightly acidic and thus takes hold of the rubber. There is a reason that Gamepads do not have such coating, even though having good grip is even more important there. Also, the way the coating is used here, all it does is making the mouse look greasy after some time.
Bad switches
The less obvious issue are the used switches i.e. the things that perform the clicks. Did you ever notice that after some time your mouse does incorrect double clicks or releases the click while drag and dropping on its own? Well, that means the switch starts wearing out.
The mouse uses OMRON D2FC-F-7N micro-switches in a cheap variant that is only rated for 10 million clicks (10M). While this sounds a lot, it yields to 6850 clicks/ per day for 4 years, which is not all that much if you think about playing a shooter or using photoshop. The crazy part is that going for the 20M rated variant (2x the durability) only costs 50 ct more (pack of 5 on amazon). This would make the mouse merely 1€ more expensive – probably way less even as Logitech can negotiate bulk discounts on these things. Given that the mouse is priced at 50€, I do not think we can pass this off as cost optimization. As a comparison; the similarly priced Keychron M2 Mouse uses 80M switches.
Note, that even more expensive Logitech Mice, like the MX Master have the rubber coating issue and use the same cheap 10M rated switches.
GNOME Open Desktop Ratings is the service that enables user ratings in various Linux app stores like the Snap-Store, Gnome Software and KDE Discover.
While it nowadays works for users by providing a mostly useful star rating, from a application developer perspective the story is very grim.
Basically one only gets the users view, which provides an average rating and some reviews in the current locale. This means you might see something like “2 Stars from 80 Reviews” – but the 3 reviews in your current locale are all 4-5 Star. To see something else you have to change the locale and restart the app store – which is inconvenient and confusing. As a developer, seeing the negative reviews is crucial, as people often just post bug reports there and this is the only way to find out why the app did not work for them.
Therefore I quickly hacked together a web-based browser for the ODRS service, skillfully named
This allows accessing the ODRS service from the web and shows the reviews from multiple locales at once. The idea here is that often people write reviews in english – regardless of their current locale. Currently, ODRS has no logic to detect that.
Also, if your app is packaged in different formats like snap and flatpack and deb, you can see the reviews of all variants in the overview.
Unfortunately, ODRS currently does not set the CORS header which prevents browsers from accessing it directly. The data that you see right now was scraped with python script. But once this issue is fixed, the ODRS Browser will be able to use live data.
Lets say you want to debug a python process that is either already running or crashing in native code. Pythons PDB is of no help here and you will have to use low-level GDB debugger. Fortunately, it comes with support for debugging high level python scripts.
However, while the actual python-gdb commands are nicely described here, that page lacks important details on how to get python-gdb in the first place. We are merely told that a python-gdb.py is needed.
On Ubuntu/ Debian, this file is included in the python3-dbg package:
sudo apt install python3.10-dbg
Installing that is sufficient, if you use the matching python3 package. You can go ahead and connect to some running python process via:
gdb -p <PID>
# verify that the script is loaded
(gdb) info auto-load
# get a python backtrace
(gdb) py-bt
Traceback (most recent call first):
  File "/usr/lib/python3.10/selectors.py", line 416, in select
    fd_event_list = self._selector.poll(timeout)
  File "/usr/lib/python3.10/socketserver.py", line 232, in serve_forever
...
In case Ubuntu is merely a host and you use coda, you can still use the host python-gdb.py – even if the python versions dont match. You will have to load the script manually though like: