update 27.10.2018 – use TWRP instead of CWM (discontinued)
update 14.10.2017 – new instructions to set-up udev rules
update 26.02.2016 – instructions for Android 6 Marshmallow
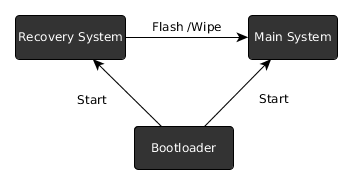
The Big Picture
Android consists of three parts relevant to rooting
- the bootloader
- recovery system
- main system
typically only the main system is running, that is the Linux Kernel, the launcher, the phone app etc.. If we talk about rooting, that means we want to add an additional app to the main system which has access to secured parts of the system and acts as a gatekeeper for other apps that also want to get access.
The problem is the secured parts of the system are locked down – otherwise they would not be secure. This means that we can not simply install that app (e.g. an apk) from within the main system.
Therefore we have to go one level down. This is where the recovery system is. Typically you do not see it, as it is only active when the main system can not run – either because a system update is installed or because you do a factory reset.
As the recovery system can do a full system update, it means that it has also access to the secured parts of the main system – exactly what we need.
The stock recovery system obviously does not allow altering the main system – otherwise everybody could get your private data if you lose your phone.
So we need to replace it as well. But before that we have to talk about the bootloader.
The bootloader is a tiny piece of software which decides whether to start the recovery or the main system (or another main system, like Ubuntu Phone).
In the default configuration in only starts systems that it knows and trusts. In this configuration the bootloader is called locked.
Although this prevents malicious software to change the phone and spy on us, it also prevents us from replacing the recovery system. By the way, this concept is also coming to the PC where it is called UEFI secure-boot.
Here is a graphical overview of the Android components:
So what we need to do in order to get root access is
- unlock the bootloader
- replace the recovery system
- install a superuser app
Note that unlocking the bootloader also allows attackers to circumvent any of the android security features (PIN etc). It becomes possible to access all the files on the device using a different recovery system. (unless userdata is encrypted)
Therefore android will wipe all userdata when the bootloader state is changed from locked to unlocked.
So if you lose your unlocked device or it gets stolen, you better hope the thief is not tech savvy.
Preparations
First you need to install the fastboot binary to be able to perform low-level communication with the device
apt-get install android-tools-fastboot android-tools-adb android-sdk-platform-tools-common
The android-sdk-platform-tools-common package most importantly contains a whitelist (/lib/udev/rules.d/51-android.rules) with devices to which users can send commands over USB, so you do not have to run fastboot as root.
Now you have to reboot into fastboot mode. Usually there is a key combination you have to press on startup.
Remember this key combination as you will need some more times.
Samsung Devices however, like the Galaxy S3, do not support the fastboot mode – instead they have a download mode, which uses a proprietary Samsung protocol. To flash those you have to use the Heimdall tool. While this article does not cover the heimdall CLI calls, the general discussion still applies.
Unlocking the Bootloader
last warning: this will wipe all user data on the device
for google devices, like a Nexus 4 or Nexus 7 it is just do
fastboot oem unlock
if you have a Sony Xperia device, like a Xperia Z, you additionally have to request a unlock key and then do
fastboot oem unlock 0x<KEY>
where <KEY> is the key you obtained.
Using AutoRoot to install SuperSU
There are several superuser apps to choose from for Android 4 and below. However the only superuser app working on Android 5/ Lollipop and above is SuperSU by Chainfire.
As there are devices like the Nexus 5X shipping with Android 6/ Marshmallow, I will describe this method first.
Chainfire created an “installer” called AutoRoot that includes the fastboot utility and will perform the unlocking step described above. However if you have read this far, you probably also want to understand the rest of the process.
First you have to download the appropriate package for your device. There you will find a recovery image which we have start with
fastboot boot image/CF-Auto-Root-hammerhead-hammerhead-nexus5.img
the command above will not flash anything on your device, but just upload the image and immediately start it. The image contains a script to modify the main system (change startup to get around SELinux) and install the superuser app.
If everything goes well, you can now just reboot your phone and you are done.
You could lock your bootloader again now to make your device more secure. However the next Android update will remove root again and repeating the rooting procedure will wipe userdata – so you have to balance security update vs. the risk of your device being stolen. For the latter case you still have the option to enable encryption of userdata though.
Installing OTA updates
Android over the air (OTA) updates contain only the changes to the current system. In order to verify that the update succeeded Android computes a checksum of the patched system and reverts to the old state otherwise.
As SuperSU has changed the boot image to start itself, the updates obviously will fail. So to install an OTA update you will have to grab a factory image and restore the boot partition using the included boot.img
fastboot flash boot boot.img
after this you will have to patch the boot partition again using the procedure described above.
Also note that if you use apps that change the system partition (like AdAway that changes the hosts file), you will have to revert those changes as well in order for the OTA update to succeed.
Optional: Replacing the Recovery System
If you want some advanced features, like backing up all your installed apks, you can permanently replace the recovery image on your device. However this will most likely prevent you from installing OTA updates.
There are two prominent alternative recovery systems with the ability to install apps
- Team Win Recovery Project
- Clock Work Mod
Clock Work Mod has been discontinued, so we will use TWRP. From the Website linked above download the recovery image which fits your phone.
fastboot flash recovery <RECOVERY>.img
where <RECOVERY> is the name of the file you downloaded. For instance for a Nexus 9 and TWRP 3.2.3 it would be
fastboot flash recovery twrp-3.2.3-0-flounder.img
restoring stock recovery
If you have a Google Device, you can grab the factory images here. There you will find a image of the stock recovery. You can restore it by
fastboot flash recovery recovery.img
Alternative superuser apps
If you run a device with Android older than 5/ Lollipop you have some alternatives to SuperSU:
I would recommend getting Superuser by CWM, as it is open source and also nag-free as there is no “pro” version of it. There is even a pull-request which might make it also work with Android 5 in the future.
To install the app we need to get this zip archive and copy it to the device. Then we need to reboot into fastboot mode and then select “Recovery Mode” to get to the recovery system. Once in Recovery mode select
install zip -> choose zip from /sdcard
then browse and select the “superuser.zip” you just copied.
Once installed select
Go Back -> reboot system now
Once the system has started you should have a “Superuser” App on your device. Congratulations, you are done.
I have to do some rooting every now and then and always forget how the process works and end up googling somewhere.
This description is the first one I’ve seen that actually explains what the process does rather than just lists a sequence of actions; I might actually remember it this time around. Best explanation I’ve seen up to now, anywhere on the net. Dziękuję bardzo!
You have to add the apt-source before you can install android-tools-fastboot: http://www.ubuntuupdates.org/ppa/webupd8?dist=precise
sudo add-apt-repository ppa:nilarimogard/webupd8
sudo apt-get update
sudo apt-get install android-tools-fastboot
this is only necessary for precise – starting from quantal fastboot is in the offical archives..
I’m using Ubuntu Trusty with a Nexus 10 (manta).
I’ve unlocked the bootloader (fastboot oem unlock) OK.
I’ve replaced the recovery system with CWM’s Touch version (fastboot flash recovery Downloads/recovery-clockwork-touch-6.0.4.7-manta.img).
I haven’t installed the superuser app as it was already installed.
When I try reboot into fastboot mode, there is no reboot option and only the Device Information shows: I’ve tried clicking Start and everywhere else & nothing happens. I’ve trie a normal reboot (by holding down just the power button) & it showed Google followed by 4 coloured circles but nothing else happens. Any suggestions?
in the fastboot mode you do not have touch yet, so you have to navigate using the volume buttons for up/ down and the power button for enter.
First time I used the Touch version; second time I used the non-touch version and it was OK
I’ve just reflashed a stock image for manta 4.4.2 (bootloader-manta-mantamf01) and still same result.
I’ve just unbricked my Nexus 10 by following:
http://www.android.gs/how-to-unbrick-google-nexus-10/
However, both verions of Root Checker (from Free Android Tools & Joeykrim) still say that the Nexus does not have root access.
if you do a factory reset like described in the link you will lose any root app. This is because installing the root means modifying the root filesystem which gets replaced during factory reset. This is also true for a system upgrade (like from android 4.3 to 4.4).
I should have said that after doing the unbrick, that I successfully followed your instructions (I think that I caused the brick originally by not doing the Flash Stock Recovery successfully as I didn’t realise that the recovery.img file needs to be extracted from one of the extracted files). I’ve also tried instructions at:
http://www.modaco.com/topic/359282-superboot-nexus-10-root-solution/
with equal lack of success re Root Checker.
this is strange. Did the “Installing the superuser app” step work for you? i.e. do you see the superuser app and can start it?
On starting superuser app, it says that Superuser binary must be updated. I click ‘Recovery Install’ button (other button is Cancel). It then says ‘error installing Superuser’, ‘send log to developer’ but ther are no logs!
installing the superuser binary via “recovery install” will only work with CWM Recovery. So if you already reverted to stock recovery, you probably need to switch back and forth one more time.
I started again. All went well including the Optional Flash Stock Recovery. However, when trying to reinstall cmw’s superuser: I rebooted into fastboot mode (with usb not connected to my PC) and then selected (I.e. got it highlighted & then pressed power switch) “Recovery Mode” to get to the recovery system but I then get an Android yellow picture with ‘No command’ underneath. So I have no option to select install zip.
thats the problem: you should only flash Stock Recovery when you have verified that superuser is running. That means prior to flashing to stock you need to install the superuser app via zip and start it at least once so it can install the sudo binary.
I just noticed that Superuser app is still present on phone. Both Root Checker apps say that phone is rooted. I’m sure that I did Stock Recovery. And I’ve just done Stock Recovery again to make sure & Superuser app is still present. So it looks like everything is now OK
no way to do it for zopo device like zop950
I would have been nice to know that after unlocking the recovery system all date in the device is ERASED.
Now it is too late for me, but maybe not for others.
“Therefore android will wipe all userdata when the bootloader is unlocked”
it would have been nice if you had read it.
Well isnt it obvious an operation like this will erase stuff, plus it does say on the walkthrough
Why would it be obvious?
i feel like a dumb dumb… maybe its been a long night full of failures.
im on linux mint, i have a htc incredible. i have installed fastboot
now what lol, fastboot oem unlock 0x0bb4 ….
so i power up the device with volum-up-key to see the bootloader ***locked*** and linux is still waiting…
how do i unlock the bootloader. . .
note that the instructions in the post were only for Google Nexus devices. I have no experience with HTC devices. However you might take a look at: http://www.htcdev.com/bootloader
very revealing
i followed your guide and all worked fine until i had to replace the recovery filesystem cause i can’t find cwm for my xperia SP and i don’t know how to proceed
”Next you have to allow non-root users to execute commands over USB, so you do not have to run fastboot as root. For this create the file
/etc/udev/rules.d/51-android.rules
with the following content”
sorry but where do i put this file? or is this suppose to be run from the terminal? if so im still confused
/etc/udev/rules.d/51-android.rules is a file path. The file you need to create is 51-android.rules and it needs to go into the /etc/udev/rules.d/ directory. To do this, run “sudo gedit /etc/udev/rules.d/51-android.rules” This will open GEdit, where you can paste the content, then save
IMO due to the recent upgrade by Google of KitKat downloaded & installed to my Nexus 10, it’s lost rooting. Is there a way of restoring rooting without losing my apps / data?
android only deletes the user partiton if you unlock the bootloader. So if you just reflash the recovery and re-install the su-app, your user-partition will stay as is.
Exactly my doubt, thank you for giving this hint
Most of the tutorials just lists down the steps…but this one clearly says what’s happening underneath. This should be exactly how things are to be explained.
I have rooted my Galaxy Tabpro 10.1 by going through the instroduction inside your article. Thank you so much.
I am through with the steps to unlock the bootloader on my Sony Xperia E1 D2105.
However, in both the links given for recovery filesystems, none provide an image for my handset.
Could you refer me to some other site where I can find it?
goodevening and really thanks for the best guide in the web..just a question.. what about doing backup of TA partition (xperia Z).. as you know it’s important to save it instead of loosing bravia engine and drm keys. thank you in advance
When I run the command: fastboot oem unlock 0x
I get: FAILED (remote command: not allowed)
I am thinking its a permission issue, but not sure. I have tried on both linux and windows… Has anyone run into this problem? The device is an Xperia ZL
yeah me to facing the same problem
I have tried this on my THL phone so many times and always fail when I try and unlock the bootloader. I am getting:-
$ fastboot oem unlock
…
(bootloader) Start unlock flow
FAILED (remote:
Unlock failed – Err:0x7000
)
finished. total time: 9.687s
What does this mean??
Did you get it working
No, ended up having to use that dodgy looking app that’s floating around on a new Windoze box I had to build myself for work. The phone is really close to going in the bin now though, it’s the biggest waste of money in ages. Being plastic the whole thing flexes which has caused the screen to crack but this is the least troublesome problem. The battery is absolutely useless and now only lasts a couple of hours at most; The phone randomly restarts (always has from new, it was an issue I had hoped would go away with a new rom but alas no; The phone almost always dies completely after about a minute and a half of any phone call, very embarrasing when I’m talking to clients; The phone always dies and cannot be powered back up without a charge after a few seconds of opening anything that uses wifi. Overall, its a massive steaming pos.
very good and detailed article..
Thanks for explaining what is underneath. My phone is Kyocera Hydro Icon with Android 4.4.2, how can it enter fastboot mode? I heard its bootloader is locked, can your method unlock it? Thanks.
I have this honor( huawei ) device I’m trying to run “fastboot oem unlock” but it does not seem to work any help would be much appreciated.
connect your phone with the cable while it works , then run the command “adb reboot bootloader”
then run your command after the bootloader opens
thanks for the tutorial but my question is , can i skip the “AutoRoot” part and boot into system then install supersu from the store or the apk file ?
the explanation in the beginning is brilliant! thanks!!
Hello,
Thanks for this wide and deep explanation. Unfortunately i ended up here after i have made a mistake while flashing my phone.
I have a BQ Aquaris E5 Ubuntu Edition (i had) and after using the tutorial here: http://a25.co/ubuntu-phone-how-to-install-android/ I accidentally installed the BQ E4.5 scatter file using MTK tools. I realized too late.
Now, my phone thinks its an E4.5 even tho it has the body of a E5.
The screen is pale white and I cannot see anything, however, the system is working as i can do screenshots and see where i am in the menu. Problem is the touchscreen doesn’t work propperly and i cannot restart to fastboot mode to work something from there.
Also I am not sure that will work as the screen doesn’t show anything (maybe in fastboot?)
My question is if i can install the correct version of Android over this mess?
I use a PC and also an Ubuntu computer so any explanation would be great.
Thank you!
Mike
Hello, i know this is kinda old, but how can i root a lenovo b6000-f in linux
think every kind of SU app should be supported to manage root in kitkat and 5.1 LP by now
to get the id Vendor type lsusb -v and search
Would this work on a Wiko Sunny2 ?
I’ve never done a root so far,
so any advice would be great.
Thnx
Yes AND IN 2025 ppl. Yep