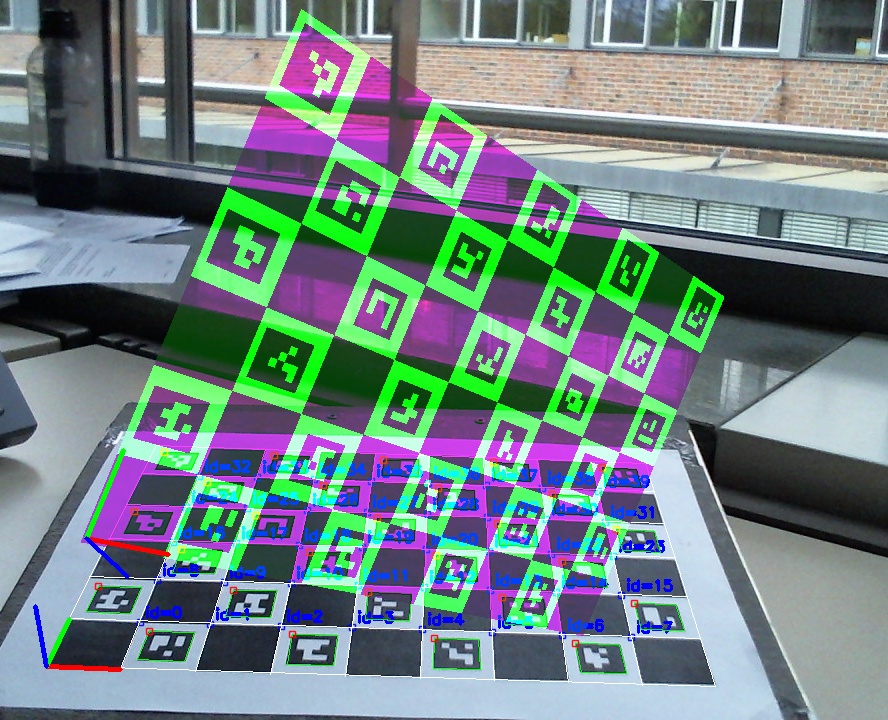
This means that calibration is no longer restricted to a Linux PC – you can also calibrate cameras attached to Windows/ OSX and even mobile phones. Furthermore you will not have to calibrate at all if your device is already known to the service. The underlying algorithm ensures that the obtained calibrations are reliable and thus can be shared between devices of the same series.
Aggregating calibrations while providing on-the-fly calibrations for unknown devices form the calibDB web-service.
In the future we will make our REST API public so you can transparently retrieve calibrations for use with your computer vision algorithms. This will make them accessible to a variety of devices – without you having to worry about the calibration data.
When using Nextcloud it makes some sense to host it yourself at home to get the maximum benefit of having your own cloud.
If you would use a virtual private server or shared hosting, your data would still be exposed to a third party and the storage would be limited as you would have to rent it.
When setting up a server at home one is tempted to use a Raspberry Pi or similar ARM based device. Those are quite cheap and only consume little power. Especially the latter property is important as the machine will run 24/7.
I was as well tempted and started my self-hosting experience with an ARM based boards, so here are my experiences.
Do not use a Raspberry Pi for hosting
Actually this is true for any ARM based board. As for the Pi itself, only the most recent Pi 4B has a decent enough CPU and enough RAM to handle multiple PHP request (WebCAL, Contacts, WebDAV) from different clients without slowdown. Also only with the Pi 4B you can properly attach storage over USB3.0 – previously your transfer rates would be limited by the USB2.0 bus.
One might argue that other ARM based computers are better suited. Indeed you could get the decently equipped Odroid U3, long before the Pi 4B was available. However, non-pi boards have their own set of problems. Typically, they are based on an Smartphone design (e.g. the Odroid U3 essentialy is a Galaxy Note 2).
This makes them plagued by the Android update issues, as these boards require a custom kernel, that includes some of the board specific patches which means you cannot just grab an Ubuntu ARM build. Instead you have to wait for a special image from the vendor – and just as with Android, at some point, there will be no more updates.
Furthermore ARM boards are actually not that cheap. While the Pi board itself is indeed not expensive at ~60€, you have to add power-supply housing and storage.
Intel NUC devices are a great choice
While everyone was looking at cheap and efficient ARM based boards, Intel has released some great NUC competitors. Those went largely unnoticed as typically only the high-end NUCs get news coverage. It is more impressive to report how much power one can cram into a small form-factor.
However one can obviously also put only little power in there. More precisely, Intels tablet celeron chips that range around 4-6W TDP and thus compete with ARM boards power-wise. (Still they are an order of magnitude faster then a Raspberry Pi)
Device
Power (Idle)
Power (load)
Odroid U3
3.7 W
9 W
GB-BPCE-3350C
4.5 W
9.6 W
Here, you get the advantages of the mature x86 platform, namely interchangeable RAM, interchangeable WiFi modules, SATA & m2 SSD ports and notably upstream Linux compatibilty (and Windows for that matter).
As you might have guessed by the hardware choice above, I made the switch already some time ago. On the one hand you only get reports for the by now outdated N3350 CPU – but on on the other hand it makes this a long term evaluation.
Regarding the specific NUC model, I went with the Gigabyte GB-BPCE-3350C, which are less expensive (currently priced around 90€) than the Intel models.
Consequently the C probably stands for “cheap” as it lacks a second SO-DIMM slot and a SD-card reader. However it is fan-less and thus perfectly fine for hosting.
So after 2 Years of usage and a successful upgrade between two Ubuntu LTS releases, I can report that switching to the x86 platform was worth it.
If anything I would probably choose a NUC model that also supports M.2/ M-Key in addition to SATA to build a software RAID-1.
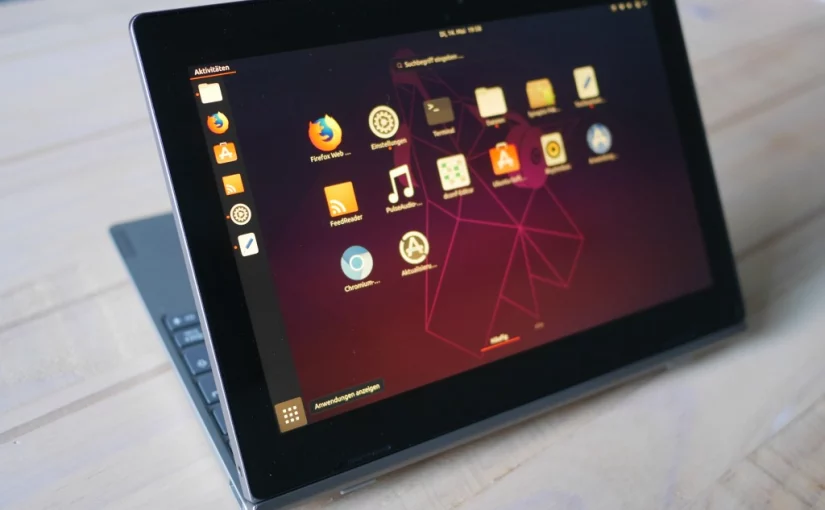
The Lenovo D330 2-in-1 convertible (or netbook as we used to say) is a quite interesting device. It is based on Intels current low-power core platform, Gemini Lake (GLK), and thus offers great battery-life and a fan-less design.
This similar to what you would from an ARM based tablet. However being x86 based and Windows focused we can expect to get Ubuntu Linux running – without requiring any out-of-tree drivers or custom kernels that never get updated as we are used-to from the ARM world. This post will be about my experiences on doing so.
For this I will use the most recent Ubuntu 19.04 release as it contains fractional scaling support, which is essential for a 10″ 1920x1200px device. Also the orientation sensor (mostly) works out of the box, when compared to the 18.04 LTS release.
In case you want to employ Blender for Computer Vision like e.g. for generating synthetic data, you will need to map the parameters of a calibrated camera to Blender as well as mapping the blender camera parameters to the ones of a calibrated camera.
But if we look at the Blender Camera, we find lots non-standard and duplicate parameters with random or without any units, like
unitless shift_x
duplicate angle, angle_x, angle_y, lens
Doing someresearch on their meaning and fixing various bugs in the proposed conversion formula, I could however come up with the following python code to do the conversion from blender to OpenCV
# get the relevant data
cam = bpy.data.objects["cameraName"].data
scene = bpy.context.scene
# assume image is not scaled
assert scene.render.resolution_percentage == 100
# assume angles describe the horizontal field of view
assert cam.sensor_fit != 'VERTICAL'

f_in_mm = cam.lens
sensor_width_in_mm = cam.sensor_width

w = scene.render.resolution_x
h = scene.render.resolution_y

pixel_aspect = scene.render.pixel_aspect_y / scene.render.pixel_aspect_x

f_x = f_in_mm / sensor_width_in_mm * w
f_y = f_x * pixel_aspect

# yes, shift_x is inverted. WTF blender?
c_x = w * (0.5 - cam.shift_x)
# and shift_y is still a percentage of width..
c_y = h * 0.5 + w * cam.shift_y

K = [[f_x, 0, c_x],
     [0, f_y, c_y],
     [0,   0,   1]]
So to summarize the above code
Note that f_x/ f_y encodes the pixel aspect ratio and not the image aspect ratio w/ h.
Blender enforces identical sensor and image aspect ratio. Therefore we do not have to consider it explicitly. Non square pixels are instead handled via pixel_aspect_x/ pixel_aspect_y.
We left out the skew factor s (non rectangular pixels) because neither OpenCV nor Blender support it.
Blender allows us to scale the output, resulting in a different resolution, but this can be easily handled post-projection. So we explicitly do not handle that.
Blender has the peculiarity of converting the focal length to either horizontal or vertical field of view (sensor_fit). Going the vertical branch is left as an exercise to the reader.
The reverse transform can now be derived trivially as
One major grief for me when surfing on Android are ads. They not only increase page size and loading time, but also take away precious screen estate.
Unfortunately the native Android browser, which nowadays is Chrome, does not support extensions and hence there is no ad-blocker.
Therefore I was quite optimistic when Google announced they will be enforcing the betterads standards with Chrome – aka ad-blocking light.
However after having used Chrome only showing “betterads”, I must say that they are far away from what is tolerable to me. I am more in line with the Acceptable Ads criteria. (My site also keeps to them – if you choose to disable ad-blocking here)
As someone who has to pay for hosting I fully understand that Ads are part of the game – but lets face it; as long as annoying ads get you more money, there will be annoying ads. Ad-blockers are a very effective way to let money speak here..
So I needed an adblock-capable browser on Android. Fortunately Mozilla greatly improved Firefox performance with their Quantum incentive. Or maybe modern Smartphones just got a lot faster. Anyway.. a recent Firefox virtually performs the same as Chrome on Android and thus is a viable alternative.
As of recently there is also Microsoft Edge for Android, but actually it does not gain an edge over anything. So lets stick with open source software.
With switching to Firefox on Android one should switch to Firefox on Desktop as well, so you get sync across devices.
On Linux
Unfortunately Firefox has bad default settings on Linux. For one – unlike Chrome – it does not use client side decorations by default, and thus wastes space in the title bar. But this is easy to fix.
Then it still uses the slow software rendering path. To make it use the GPU, visit about:config and set the following properties to true
layers.acceleration.force-enabled enable OpenGL based compositing which for smooth scrolling. (enabled by default on OSX, Windows)
layers.omtp.enabled (OMTP) further improve performance when scrolling. (enabled by default on OSX, Windows)
gfx.webrender.all enable the new Servo based compositing which for smooth scrolling. (enabled by default on OSX, Windows)
Note that, there is also gfx.webrender.all to enable the new Servo based compositor which is significantly faster (250%). However, it also does have significant issues with Nvidia proprietary drivers, so better leave it off for now.
Additionally, if you use a touch-pad or touch-screen, you should add the following environment variable:
echo "export MOZ_USE_XINPUT2=1" >> ~/.profile
this will make Firefox correctly handle touch events instead of translating them to mouse wheel scrolling. This way you get pixel perfect scrolling on touch-pads and it is a prerequisite for drag to scroll on touch-screens.
On Android
On Android Firefox generally has sane defaults. The only setting missing here to bring it on par with Chrome are the Encrypted Media Extensions. For this again visit about:config and create the following property and set it to true
media.eme.enabled
Still you will need some time to adapt to Firefox; e.g. there is no pull to refresh. However there are other bonus points besides adblocking; for me the synchronized tabs sidebar (on desktop) has proven to be an invaluable usability improvement.
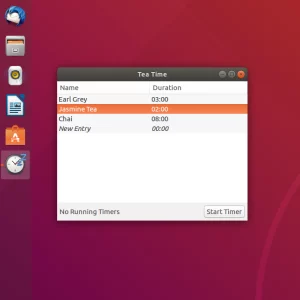
I updated my two little Apps; Teatime and Sensors Unity to integrate with Ubuntu 18.04 and consequently with Gnome 3.
Tea Time
Sensors Unity
For this I ported them to the GtkApplication API which makes sure they integrate into Unity7 as well as Gnome Shell. Additionally it ensures that only one instance of the App is active at the same time.
As Dash-to-Dock implements the Unity7 D-Bus API and snaps are available everywhere this drastically widens the target audience.
To make the projects themselves more accessible, I also moved development from launchpad to github where you can now easily create pull-requests and report issues.
I recently migrated a server to a new VHost that was supposed to improve the performance – however after the upgrade the performance actually was worse.
Looking at the system load I discovered that the load average was at about 3.5 – with only 2 cores available this corresponds to server overload by almost 2x.
Further looking at the logs revealed that this unfortunately was not due to the users taking interest in the site, but due to various bots hammering on the server. Actual users would be probably drawn away by the awful page load times at this point.
Asking the bots to leave
To improve page loading times, I configured my robots.txt as following
User-agent: *
Disallow: /
This effectively tells all bots to skip my site. You should not do this as you will not be discoverable at e.g. Google.
But here I just wanted to allow my existing users to use the site. Unfortunately the situation only slightly improve; the system load was still over 2.
From the logs I could tell that all bots were actually gone, except for
SemrushBot by semrush.com
MJ12Bot by majestic.com
DotBot by Moz.com
But those were enough to keep the site (PHP+MySQL) overloaded.
The above bots crawl the web for their respective SEO analytics company which sell this information to webmasters. This means that unless you are already a customer of these companies, you do not benefit from having your site crawled.
In fact, if you are interested in SEO analytics for your website, you should probably look elsewhere. In the next paragraph we will block these bots and I am by far not the first one recommending this.
Making the bots leave
As the bots do not respect the robots.txt, you will have to forcefully block them. Instead of the actual webpages, we will give them a 410/ 403 which prevents them touching any PHP/ MySQL resources.
On nginx, add this to your server section:
if ($http_user_agent ~* (SemrushBot|MJ12Bot|DotBot)) {
     return 410;
}
For Apache2.4+ do:
BrowserMatchNoCase SemrushBot bad_bot
BrowserMatchNoCase MJ12Bot bad_bot
BrowserMatchNoCase DotBot bad_bot
Order Deny,Allow
Deny from env=bad_bot
For additional fun you could also given them a 307 (redirect) to their own websites here.
Recently I have been look on the Ogre Matrix class which has a fairly un-optimized, but straightforward implementation, that you can see here.
I was wondering how it compares.
Of course somebody had a similar question in mind before. Martin Foot that is. While the discussion still applies today, I felt like the results could have changed since 2012 as libraries and compilers have moved on.
So I forked his code to update the libs to the latest versions and came up with the following results:
Library
add (x86_64, SSSE3)
mult (x86_64, SSSE3)
add (armeabi-v7a, NEON)
mult (armeabi-v7a, NEON)
Eigen3
17 ms
53 ms
173 ms
399 ms
GLM
50 ms
186 ms
232 ms
399 ms
Ogre
50 ms
184 ms
232 ms
399 ms
CML1
116 ms
348 ms
178 ms
489 ms
The used compiler was gcc with optimization level -O2.
As we can see Eigen3 just downgrades the rest on x86_64 – probably due its explicit vectorization. Notably, CLM1 is having some issues and even falls behind the naive implementations.
On ARM the results are more tight. With Eigen3 and CLM1 being about 25% faster at addition. However CML1 again has some issues with the mult test.
We end up with Eigen3 being the overall winner and GLM being second (Ogre does not count as it is not a Math library).
Also you should migrate away from CLM1 as the development focus shifted to CLM2 and the issues found above are probably not going to be resolved.
there are many articles on the internet telling you to switch from Apache & mod_php to nginx to get better performance.
However the main reason for performance improvement is not nginx itself but rather the way it integrates PHP.
Different ways to integrate PHP
Apache traditionally used mod_php to embed the PHP interpreter inside Apache HTTP request handler. This way it can directly interpret PHP scripts whereas with CGI it would have to start a new PHP interpreter process first – per request.
The drawback however is that the PHP interpreter is embedded in all request handlers – even those that just serve static files. This obviously blows up memory consumption which in turn can lower performance.
Nginx on the other hand uses the FCGI approach where a pool of PHP processes is started along the webserver using the FCGI process manager, FPM. The webserver then delegates individual requests using the FCGI protocol as needed. This avoids the PHP interpreter startup costs as well as starting it without a need and is the reason nginx is faster then mod_php.
However since Apache 2.4 one can also use FCGI to integrate PHP and get virtually the same characteristics like nginx. Sticking with Apache saves you migrating all the .htaccess rules and means an easier setup for many webapps.
Furthermore since Apache 2.4.10 one can use mod_proxy_fcgi for a reverse-proxy configuration which further reduces the occupied PHP workers in the FPM pool for better performance.
Configuration on Ubuntu 22.04
Switching to FCGI on Ubuntu 22.04 is quite easy. The needed module are installed by default since Ubunto 16.04 and just need to be enabled:
this connects Apache in reverse proxy mode to the PHP-FPM pool using unix domain sockets for optimal performance. See the Apache Wiki for details.
Note that php-fpm by default only creates 5 PHP worker processes, which in turn limits the maximal simultaneous connections. You might want to raise this by adapting pm.max_children in /etc/php/8.1/fpm/pool.d/www.conf.
Typically you set this to RAM size / avg. process size. You can find out the latter via:
Recently the Meson Build System gained somemomentum. It is time to stop that. Not that Meson is a bad piece of software – on the contrary, it is quite well designed. Still it makes building C/C++ applications worse, by (quoting xkcd) basically creating this:
It sets out to create a cross-platform, more readable and faster alternative to autotools. But there is already CMake that solves this.
You might say that CMake is ugly, but note that the CMake 2.x you might have tried is not the same CMake 3.x that is available today. Many patterns have improved and are now both more logical and more readable.
Nowadays the difference between Meson and CMake is just a matter of syntactic preference. The Meson authors seem to agree here.
The actual criterion for selecting a build system however should be tooling support and community spread. CMake easily wins here:
After the introduction of the server mode it got native support by QtCreator, CLion, Android Studio (NDK) and even Microsofts Visual Studio. Native means that you do not have to generate any intermediate project files, but the CMakeLists.txt is used directly by the IDE.
On the community spread side we got e.g. KDE, OpenCV, zlib, libpng, freetype and as of recently Boost. These projects using CMake not only guarantees that you can easily use them, but that you can also include them in your build via add_subdirectory such that they become part of your project. This is especially useful if you are cross-compiling – for instance to a Raspberry Pi.
On the other hand, reinventing a wheel that is tailored to the needs of a specific community (Gnome), means that it will fall behind and eventually die. This is what is currently happening to the Vala language that had a similar birth to Meson.
The meson devs might object that Meson generates build files that run faster on a Raspberry Pi. However if your cross compiling is working you do not need that. And honestly, that particular improvement could have been also achieved by providing a patch to the CMake Ninja generator..
Addendum 15-06-2018 A new guide for CMake called CGold can be found here, which is of comparable quality to the Meson docs.
Addendum 4-1-2018 Some comments (rightfully) note that Meson has generally a better documentation and avoids some of its pitfalls. However this is mostly due to Meson not being around long enough such that the way you do things in Meson changed. Neither did it see such a widespread use like CMake yet. (think of corner-cases)
But even if you argue that this is precisely the point why you should use Meson, I would argue that improving the existing documentation in CMake and adding more educational warnings is easier then writing something from scratch.
Addendum 29-02-2019 Part of the perceived superiority of Meson, was that it just was not in use for long enough to notice its flaws – contrary to long lasting legacy of CMake. With its adaptation, things like only one global namespace start to get attention – things that are already solved in CMake..