I got myself the MouldKing 13106 Forklift, which is based on the MOC 3681 by KevinMoo and wanted to share my impressions with you.
First of all, MouldKing actually improved the set by exclusively using back technic pins instead of the blue ones like in the MOC. Also they are officially cooperating with the MOC designer – so he is likely getting some share of the sales.
The set comes with “New PowerModule 4.0″, which means it supports proportional output. If you use the new joystick controller (like I do in the video) or use the app, you can have smooth controls of the motors and not just binary 0% or 100% throttle as with the standard remote.
As you can see, I actually put on some of the stickers. Some purists never do anything like this, because they argue that after some time the stickers start peeling off and look used. This is certainly a good point if you are building a sports-car – with a Forklift however, I would argue broken stickers add to the looks.
Compared to the original MOC, Mould King removed the lights, but added a pallet similar to the one found in the Lego 42079 Forklift.
Interested in getting the set? Support this Site by using the following affiliate Link:
Generally, I prefer the Mould King manual to the original by Kevin Moo as I like renderings more than photographs. However, its nice to have the original at hand if something looks fishy. While building, I noticed the following:
Step 34: Cable-management is almost completely skipped in the manual. I laid all cables through the opening behind the threads. This keeps them out of the way later. The fiddle through the cables of the motors, that you add at steps 52 & 55.
Step 100: The battery-box position is wrong. It will collide with the bar you added at step 96. To make it fit, just rotate the battery-box by 180°.
Also, the direction of motor A has to be reversed. Press and hold left-shoulder, up and down for 3 seconds for this.
Step 111: The arms that you added in steps 89/ 90 should be oriented upwards to hold the footstep.
Step 143: Use a black bush instead of the 2-pin-axle beam, so things look symmetrical. This is a leftover from the original MOC, which squashed the IR receiver in there.
Step 156: Attach the levers to the front console at step 173 instead of attaching them to the seat here. After all they are supposed to control the fork and not the backrest.
Step 214: I suggest using gray 2-axles at step 230 instead of the suggested whites. This way the front facing axes will be all gray. For this just use white 2-axles here. Those wont be visible at all anyway.
Step 277: When adding the fork to the lift-arm, make sure that it has as much play as possible. Otherwise the fork will get stuck when moved all the way up.
Interior with fixes at step 143 & step 156
Step 278: Do not fix the threads yet. Wait until the end so you can correctly measure the lowest position of the fork (which gives you the length of the threads).
Step 286: Make sure that the 3-pin pops out towards the 8-axle. This will make joining things at step 288 much easier.
Lets say, you want to reduce the water carbonate hardness because you got a shiny coffee machine and descaling that is a time-consuming mess.
If you dont happen to run a coffee-shop, using a water-jug is totally sufficient for this. Unfortunately, while the jug itself is quite cheap, the filters you need will cost you an arm and a leg – similar to how the printer-ink business works.
The setup
Here, we want to look at the different filter options and compare their performance. The contenders are
As said initially, the primary goal of using these filters is to reduce the water carbonate – any other changes, like pH mythology, will not be considered.
Also, you are not using the filter only once, so I repeat the measuring over the course of 37 days. Why 37? Well, most filters are specified for 30 days of usage – but I want to see how much cushion we got there.
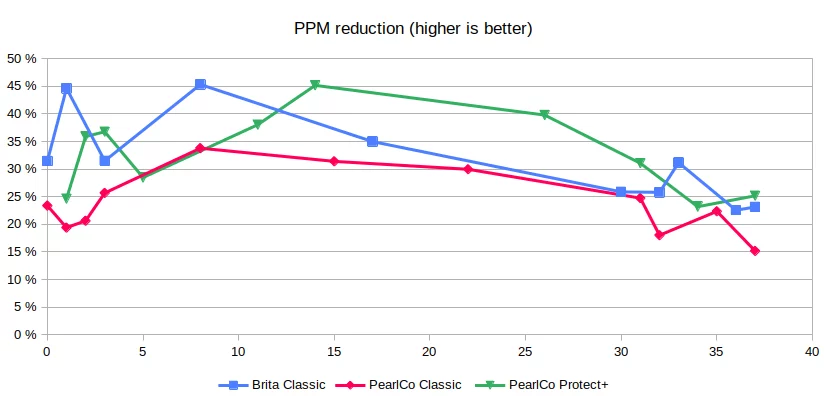
So – without further ado – the results:
Results
Name
Ø PPM reduction
Ø absolute PPM
Brita Classic
31%
206
PearlCo Classic
24%
218
PearlCo Protect+
32%
191
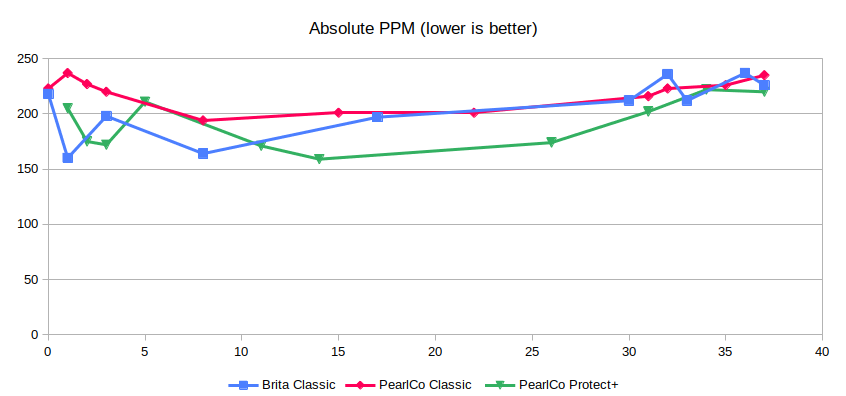
As motivated above, the difference in absolute PPM can be explained by environmental variation – after all the measurements took place over the course of more than 3 months.
However, we see that the pricing difference is indeed reflected by filtering performance. By paying ~20% more, you get a ~30% higher PPM reduction.
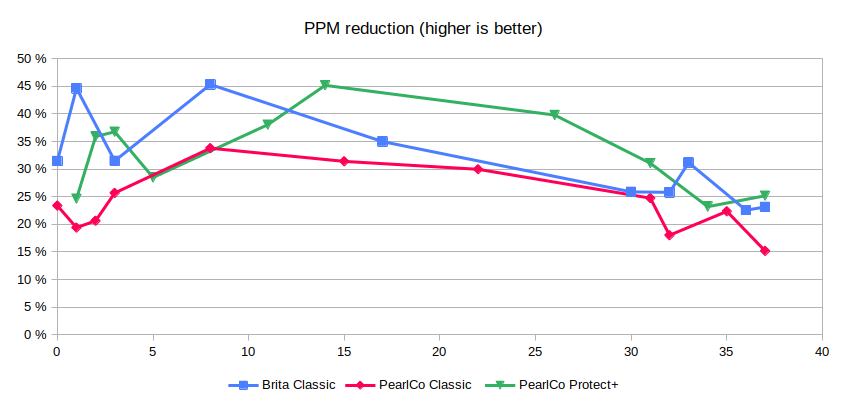
The only thing missing, is the time-series to see beyond 30 days:
As you can see, the filtering performance is continuously declining after a peak at about 10-15 days of use.
This question often pops up, when you need a random direction vector to place things in 3D or you want to do a particle simulation.
We recall that a 3D unit-sphere (and hence a direction) is parametrized only by two variables; elevation \theta \in [0; \pi] and azimuth \varphi \in [0; 2\,\pi] which can be converted to Cartesian coordinates as
\begin{aligned} x &= \sin\theta \, \cos\varphi \\ y &= \sin\theta \, \sin\varphi \\ z &= \cos\theta \end{aligned}
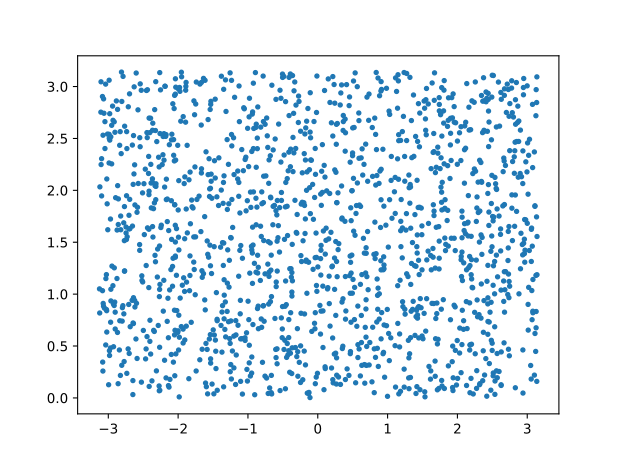
If one takes the easy way and uniformly samples this parametrization in numpy like
One (i.e. you as you are reading this) ends with something like this:
uniform: spherical coordinatesbiased: 3D projection to Cartesian coordinates
While the 2D surface of polar coordinates uniformly sampled (left), we observe a bias of sampling density towards the poles when projecting to the Cartesian coordinates (right). The issue is that the cos mapping of the elevation has an uneven step size in Cartesian space, as you can easily verify: cos^{'}(x) = sin(x).
The solution is to simply sample the elevation in the Cartesian space instead of the spherical space – i.e. sampling z \in [-1; 1]. From that we can get back to our elevation as \theta = \arccos z:
z = 1 - np.random.rand() * 2 # convert rand() range 0..1 to -1..1
theta = np.arccos(z)
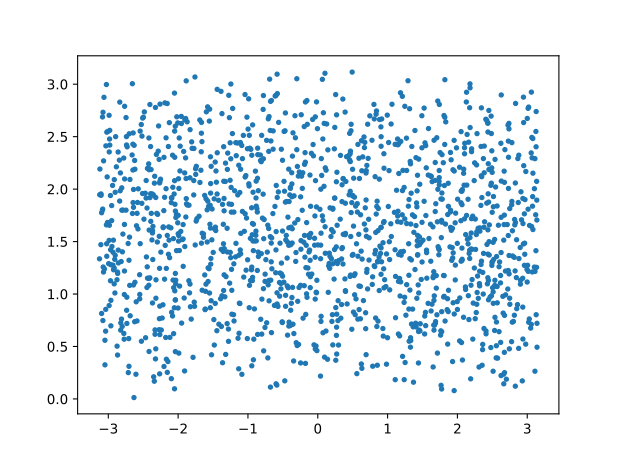
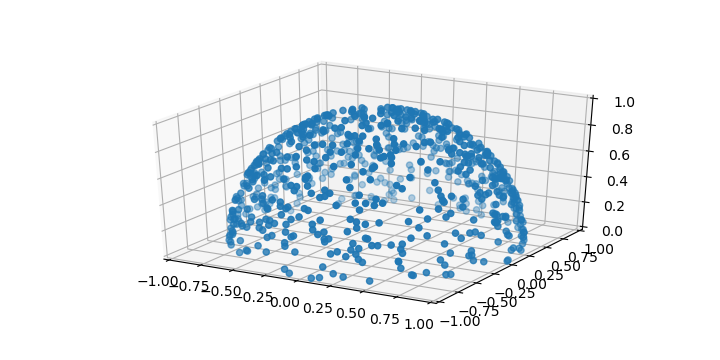
As desired, this compensates the spherical coordinates such that we end up with uniform sampling in the Cartesian space:
compensated spherical coordinatesuniform: 3D Cartesian coordinates
Custom opening angle
If you want to further restrict the opening angle instead of sampling the full sphere you can also easily extend the above. Here, you must re-map the cos values from [1; -1] to [0; 2] as
cart_range = -np.cos(angle) + 1 # maximal range in cartesian coords
z = 1 - np.random.rand() * cart_range
theta = np.arccos(z)
Optimized computation
If you do not actually need the parameters \theta, \varphi, you can spare some trigonometric functions by using \sin \theta = \sqrt { 1 - z^2} as
With Google cutting its unlimited storage and ending the Play Music service, I decided to use my own Nextcloud more seriously. In part because Google forced all its competitors out of the market, but mostly because I want to be independent of any cloudy services.
The main drawback of my existing Nextcloud setup, that I have written about here, was missing redundancy; the nice thing about putting your stuff in the cloud is that you do not notice if one of the storage devices fails – Google will take care of providing you with a backup copy of your data.
Unfortunately, the Intel NUC based build I used, while offering great power efficiency did not support adding a second HDD to create a fail-safe RAID1 setup. Therefore I had to upgrade.
As I still wanted to keep things power-efficient in a small form-factor, my choice fell on the ASRock DeskMini series. Here, I went with the AMD Variant (A300) in order to avoid paying the toll of spectre mitigations with Intel (resulting in just 80% of baseline performance).
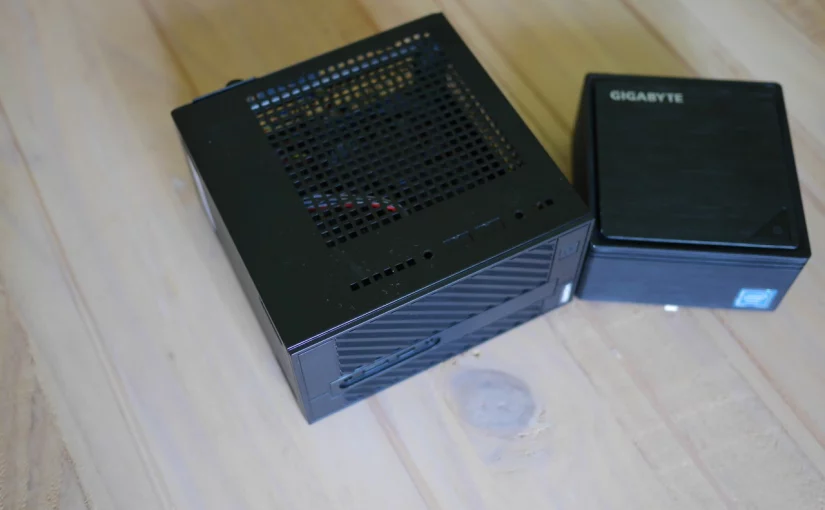
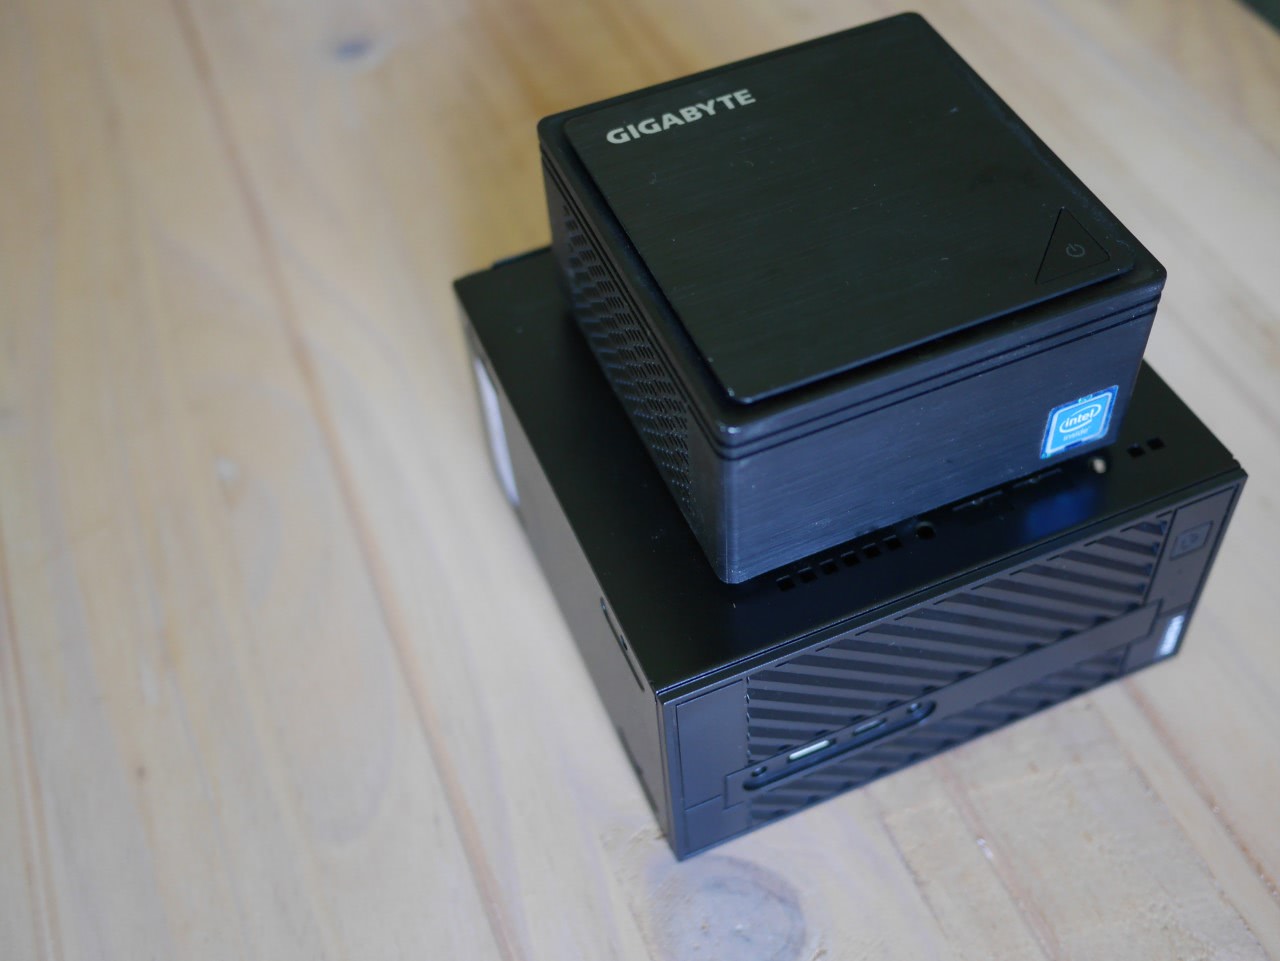
backside of the A300 mainboardSize comparison between the A300 and a Gigabyte BRIX
The photos above show you the size difference, which is considerable – yet necessary to cram two 2.5″ SATA drives next to each other. Here, keep in mind that while the NUC devices have their CPU soldered on, we are getting the standardized STX form-factor with the A300, which means you can replace and upgrade the mainboard and the CPU as you wish, while with a NUC you are basically stuck with what you bought initially.
The full config of the build is as follows and totals at about 270€
ASRock DeskMini A300
AMD Athlon 3000G
8GB Crucial DDR4-2666 RAM
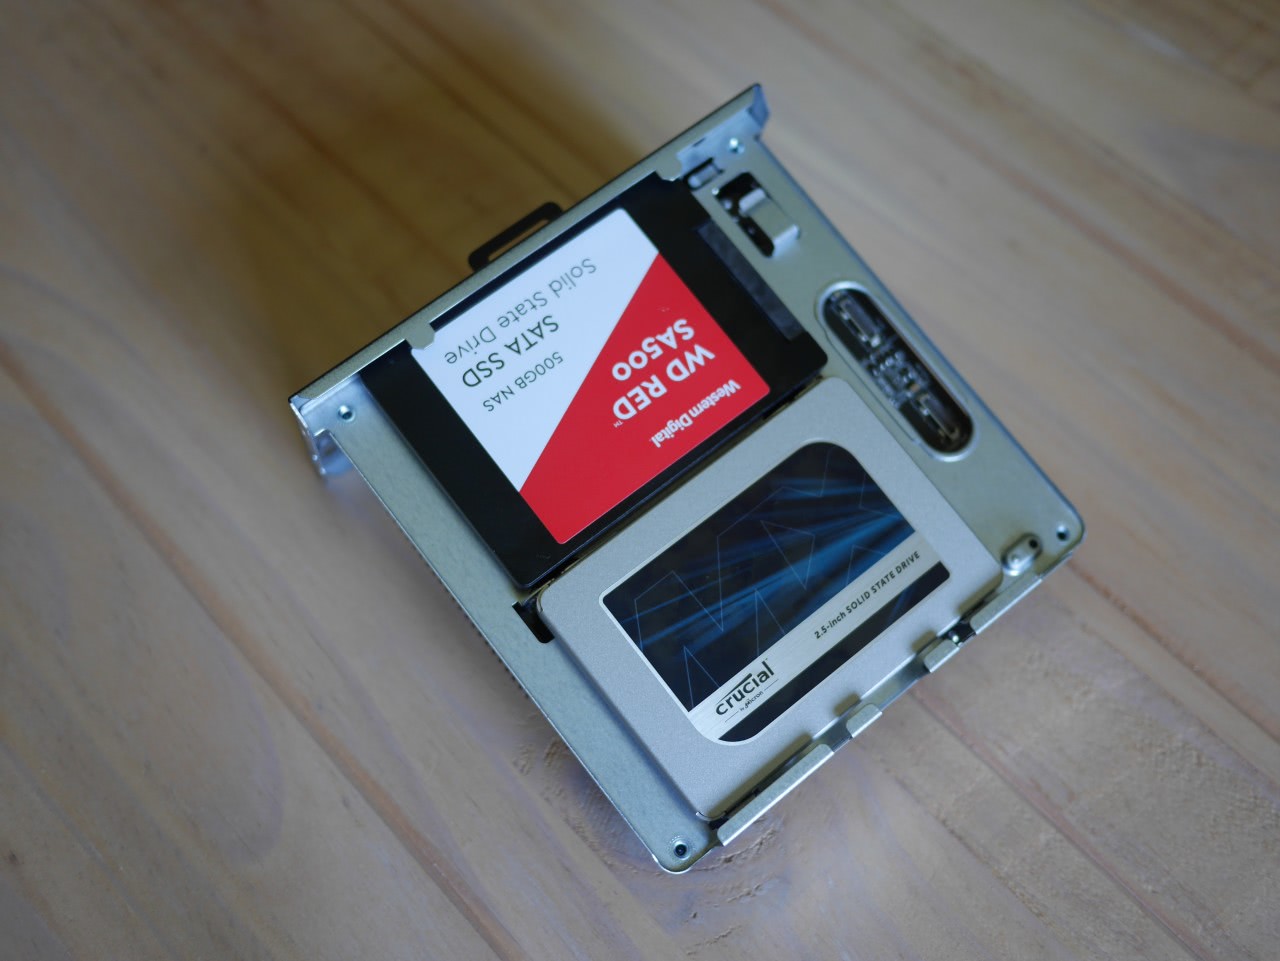
WD Red SA500 NAS 500GB
Crucial MX500 500GB
Note, that I deliberately chose SSDs from different vendors to reduce the risk of simultaneous failure. Also, while the 3000G is not the fastest AMD CPU, it is sufficient to host nextcloud and is still a nice upgrade from the Intel Celeron I used previously. Furthermore, its 35W TDP nicely fits the constrained cooling options. Note, that you can limit for Ryzen 3/5 CPUs to 35W in the BIOS as well, so there is not need to get their GE variants. However, for a private server you probably do not need that CPU power anyway, so just go with the Athlon 3000G for half the price.
Unfortunately, the A300 system is not designed for passive cooling and comes with a quite annoying CPU fan. To me the fan coming with the Athlon 3000G was less annoying, so I used that instead. Anyway, you should set the fan RPM to 0% below 50° C in the BIOS, which results in 800 RPM and is unhearable while keeping the CPU reasonably cool.
Power Consumption
As the machine will run 24/7, power consumption is an important factor.
The 35W TDP gives us a upper limit of what the system will consume on persistent load – however the more interesting measure is the idle consuption as thats the state the system will be most of the time.
While you can obviously push the system towards 35W by with multiple simultaneous users, the 7.3 W idle consumption is quite nice. Keep in mind, that the A300 was measured with two SATA drives operating as RAID1. If you only use one you can subtract 1W – at which point it is only 1.5 W away from the considerably weaker NUC system.
You might now wonder, whether the load or the idle measure is closer to the typical consumption. For this I measured the consumption for 30 days, which totaled at 5.23 kWh – or 7.2 Watts.
Currently, the average price for 1 kWh is 0.32€, so the running the server costs about 1.67€/ Month. For comparison, Google One with 200 GB will set you off 2.99 €/ Month.
Power optimizations
To reach that 7.3 W idle, you need to tune some settings though. The most important one and luckily the easiest to fix is using a recent kernel. If you are on Ubuntu 18.04, update to 20.04 or install the hwe kernel (5.4.0) – it saves you 4 Watts (11.3 to 7.3).
For saving about 0.5 watts, you can downgrade the network interface from 1Gbit to 100Mbit by executing
ethtool -s enp2s0 speed 100 duplex full autoneg on
Additionally, you can use Intels powertop to tune your system settings for power saving as
Xiaomi has recently released the new Mi Band 5. Since I have owned the each band starting with the Mi Band 2, I think it is time to look back and see where the Mi Band has gone in the recent years.
Actually, the Mi Band story started ahead of the Apple Watch in 2014 with the Mi Band 1, which was a pure fitness-tracking device without a display and even without a heart-beat sensor. This made the device not very appealing to me – even thought it already offered sleep monitoring.
It also already had that interchangeable wrist-bands that allow you to customize the look to your liking. The Mi Band 2 you see in the images uses a custom steel wrist-band as the original one broke after some years of usage.
Below you see a comparison of the Mi Bands, regarding the features that are most significant from my perspective
Mi Band 2
Released 2016
Clock
Heartbeat
Notifications
Mi Band 3
Released 2018
Clock
Heartbeat
Notifications
Timer
Weather
Workouts
Mi Band 4
Released 2019
Clock
Heartbeat
Notifications
Timer
Weather
Workouts
Music control
Mi Band 5
Released 2020
Clock
Heartbeat
Notifications
Timer
Weather
Workouts
Music control
Cam shutter
The first thing to note is probably that Xiaomi accelerated the release cycle from 2 years between the Bands 1, 2 and 3 to 1 year between Band 4 and 5. We will come back to this when talking about the Mi Band 5.
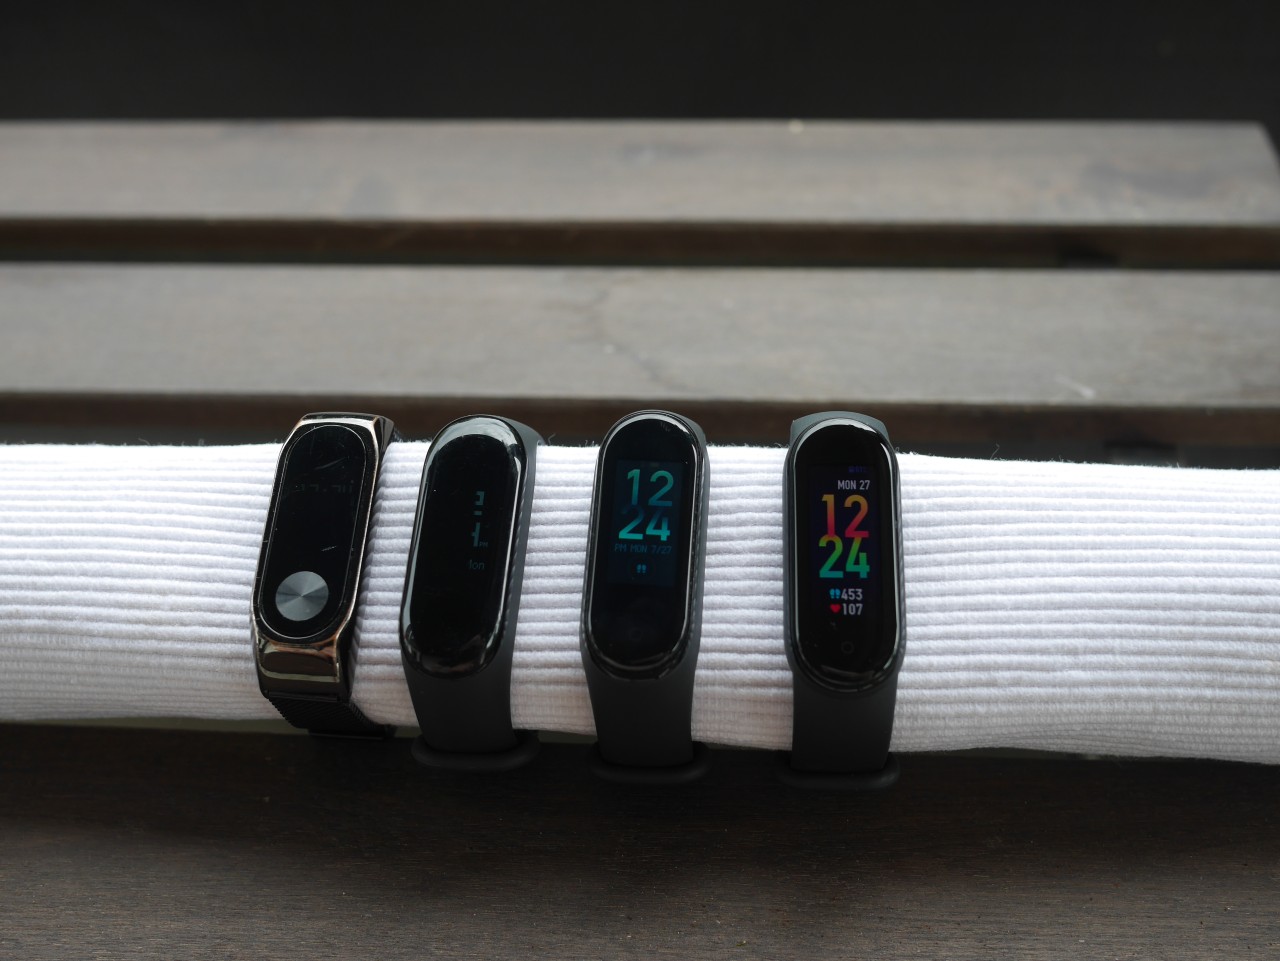
Screen legibility comparison
Lets start the comparison with the screen, which is the most obvious part and the one you will probably interact with the most.
Here, the most significant property is neither size nor resolution, but rather legibility in sunlight. For comparison, I set up a little benchmark as follows:
set the Bands to maximal brightness (as applicable)
legibility in direct sunlight on a bright sunny day as a worst-case
legibility in shade/ with overcast condition as a more common scenario
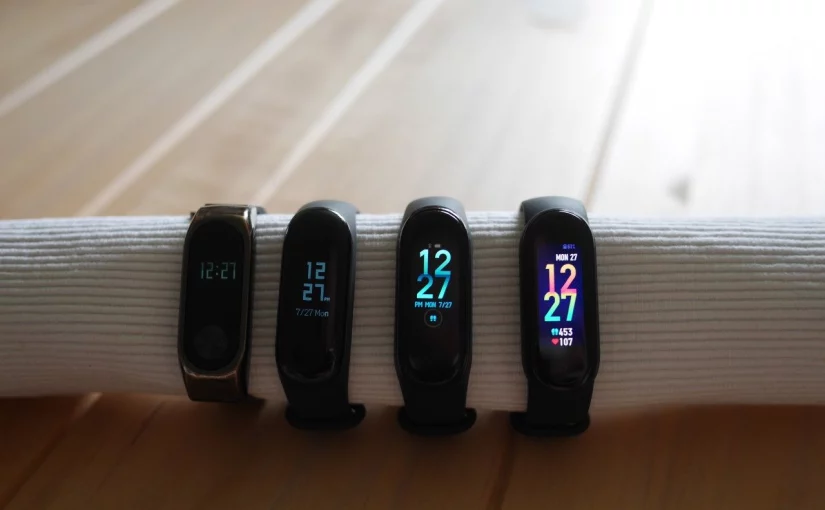
You can find the results below. Also see the banner image for how the screens look indoors.
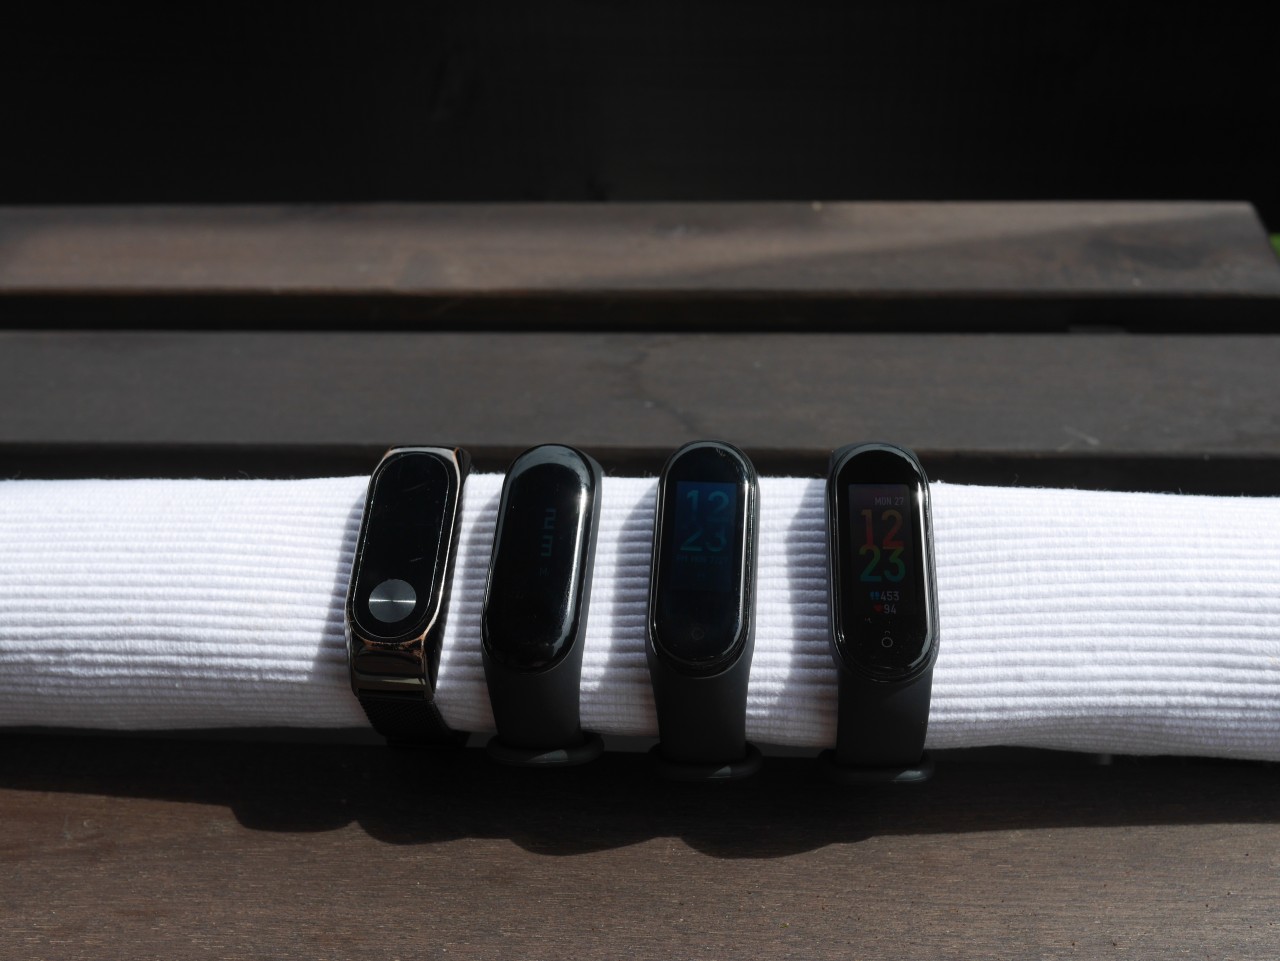
bright sunlightshade/ overcast
First I should note that the camera does not do justice to the Mi Band 2 & 3 as their displays are scanline-based and the fast shutter can not capture the whole screen being lit at once. Therefore you only see the top part of the Mi Band 2 and the right part of the Mi Band 3 on the overcast picture.
Nevertheless, one actually cannot read the Mi Band 2 in direct sunlight and only can barely read it in the shade. The other Bands are well readable in the shade. However, I would say that only the MiBand 5 is well readable in direct sunlight.
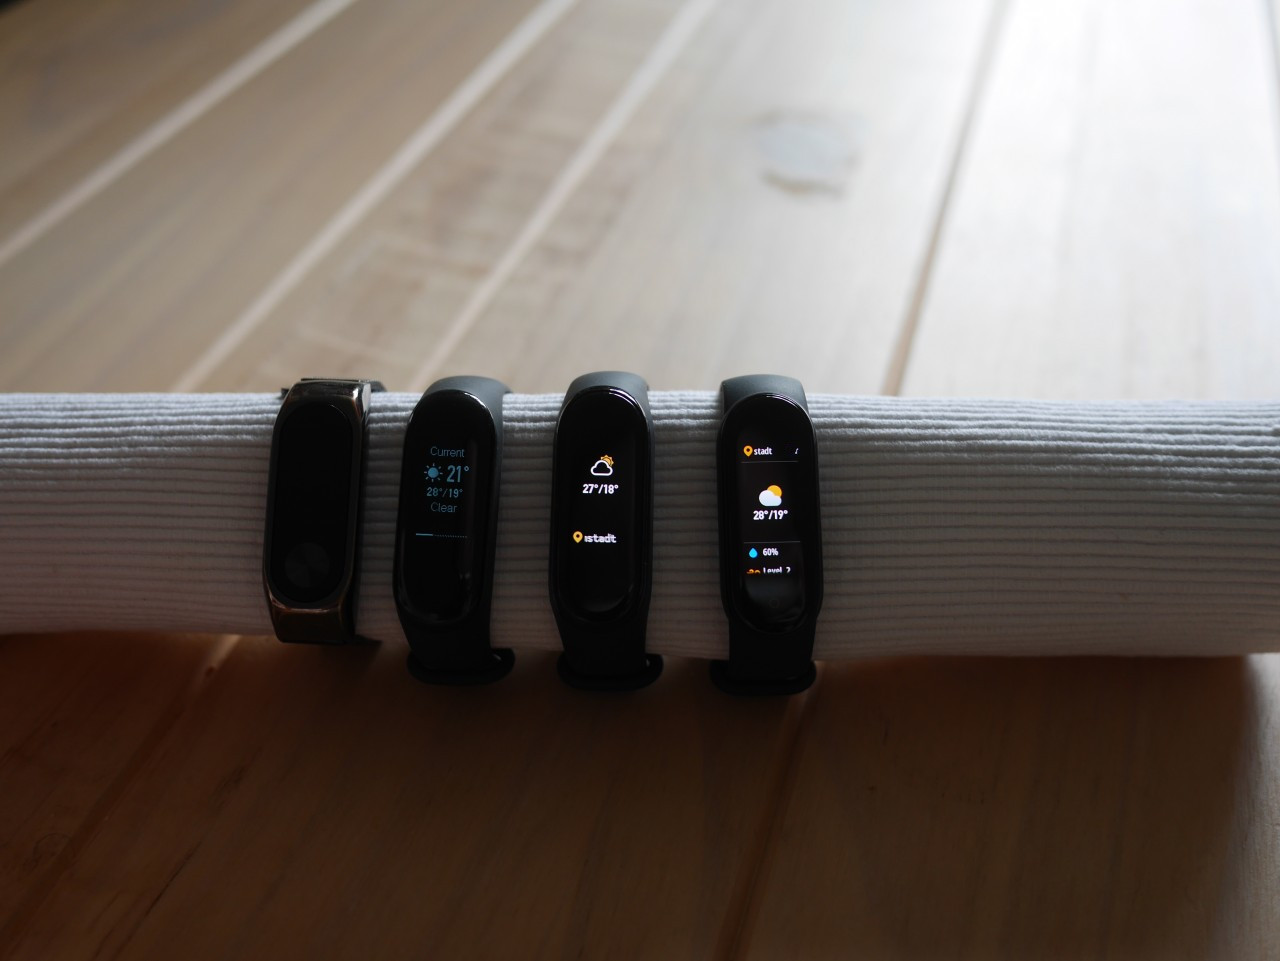
Next, we will look at how the information is presented. The screen size continuously increased from 0.78″ on the Mi Band 3 to 0.95″ on the Mi Band 4 (+22%) to 1.1″ on the Mi Band 5 (+16%). As you can read the time on all of them, we will look at an app to find out whether it makes any difference in practice. Here, I picked the weather app as it is probably useful to the majority of the readers.
The info displayed on the weather screen
Looking at the Mi Band 4, it did not really take advantage of the larger screen-estate and shows virtually the same information as the Mi Band 3 – only adding the location info. The Mi Band 5 on the other hand uses the extra space to show the rain probability. It generally displays more info like the wind strength and the current UV level – however you have scroll down for them. The Mi Band 2 does not support weather and is thus turned off.
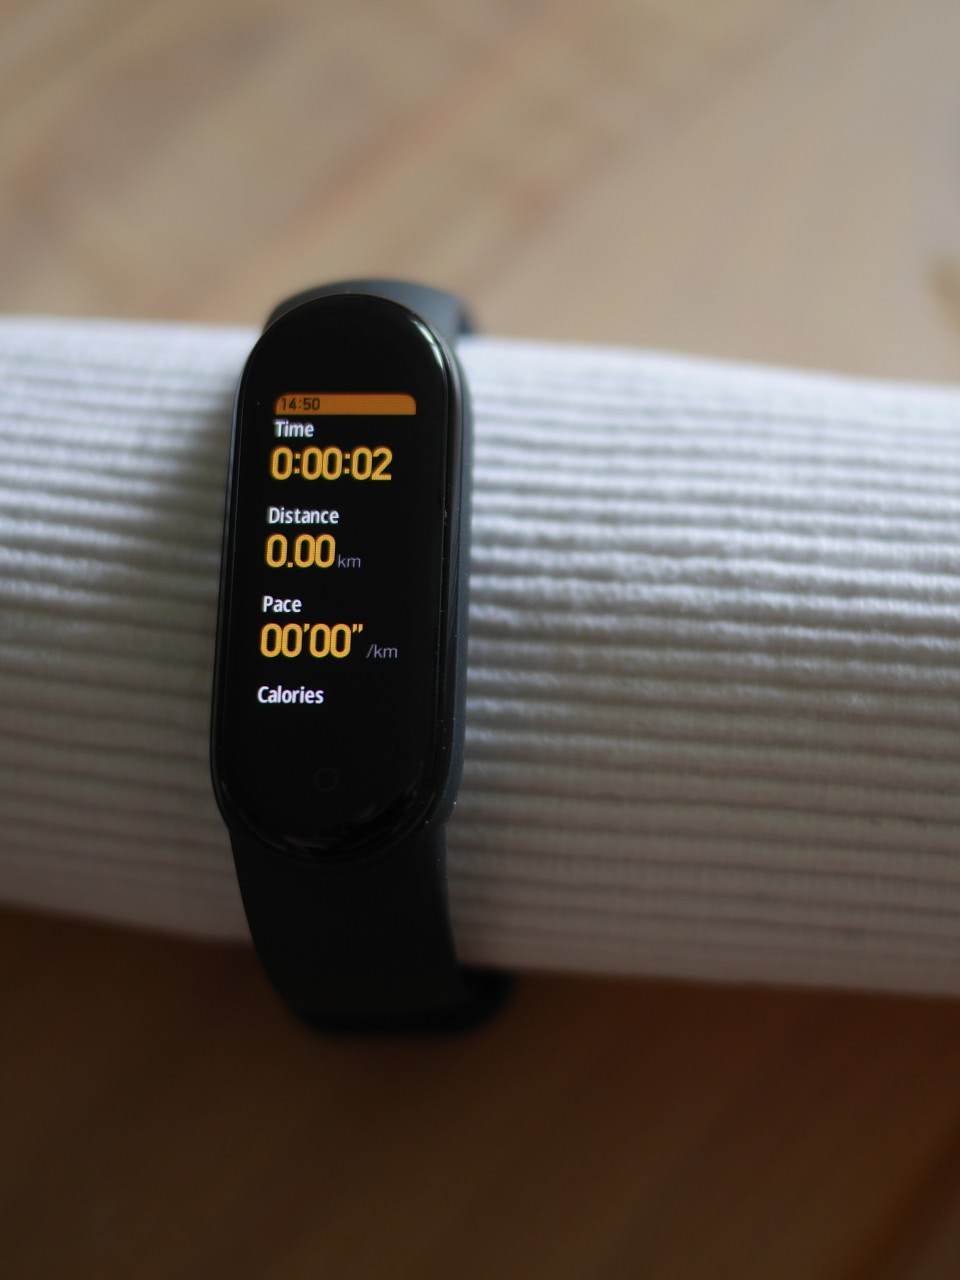
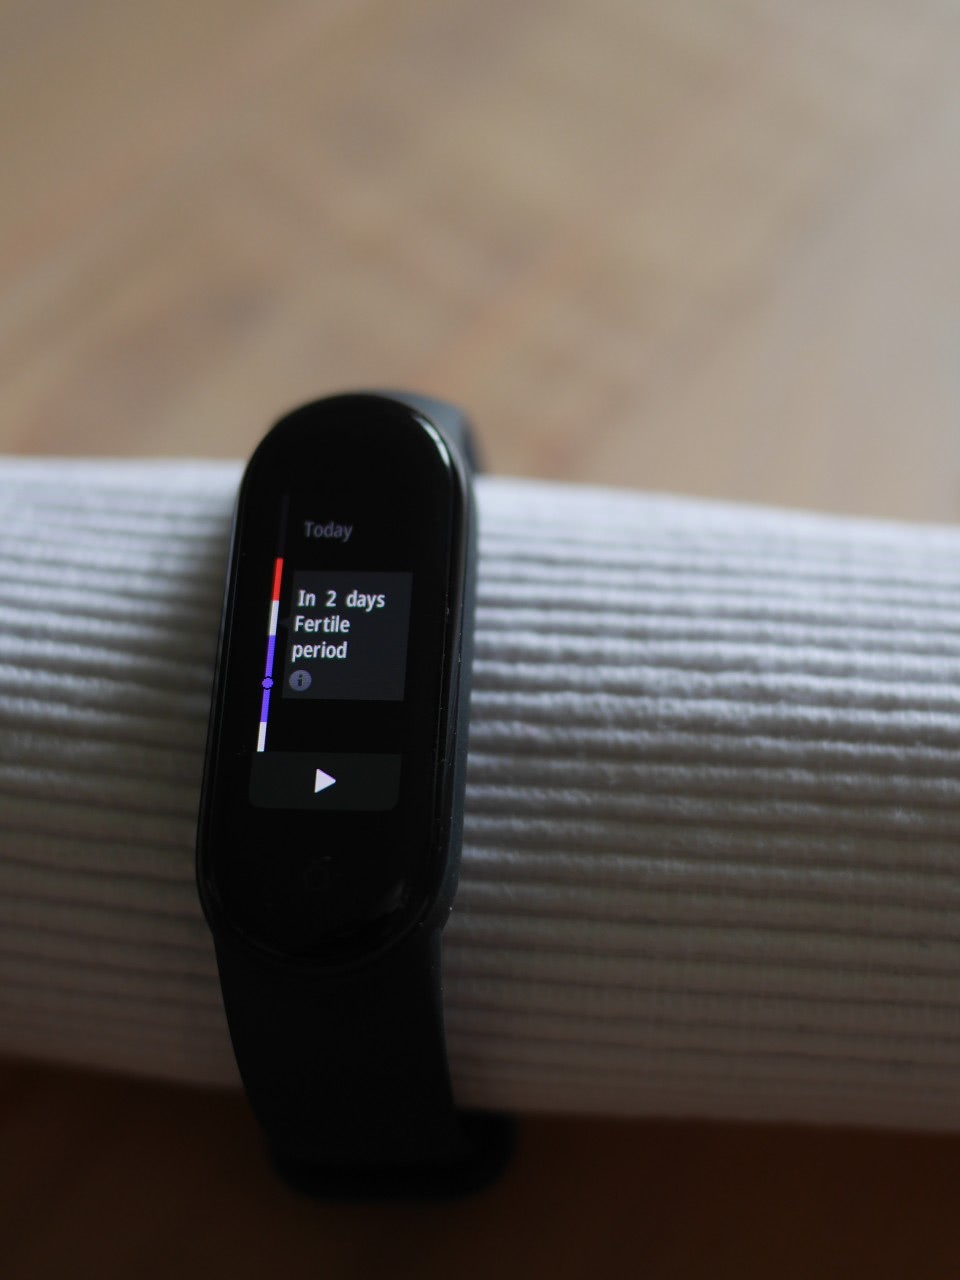
Apps/ on band Screens
Lets also briefly look at the other apps. The images were captured on the Mi Band 5 – however unless otherwise stated the look exactly the same on the Mi Band 4.
The music control appOutdoor running workout appConfigurable watch face (Mi Band 5 only)Cycles app (Mi Band 5 only)
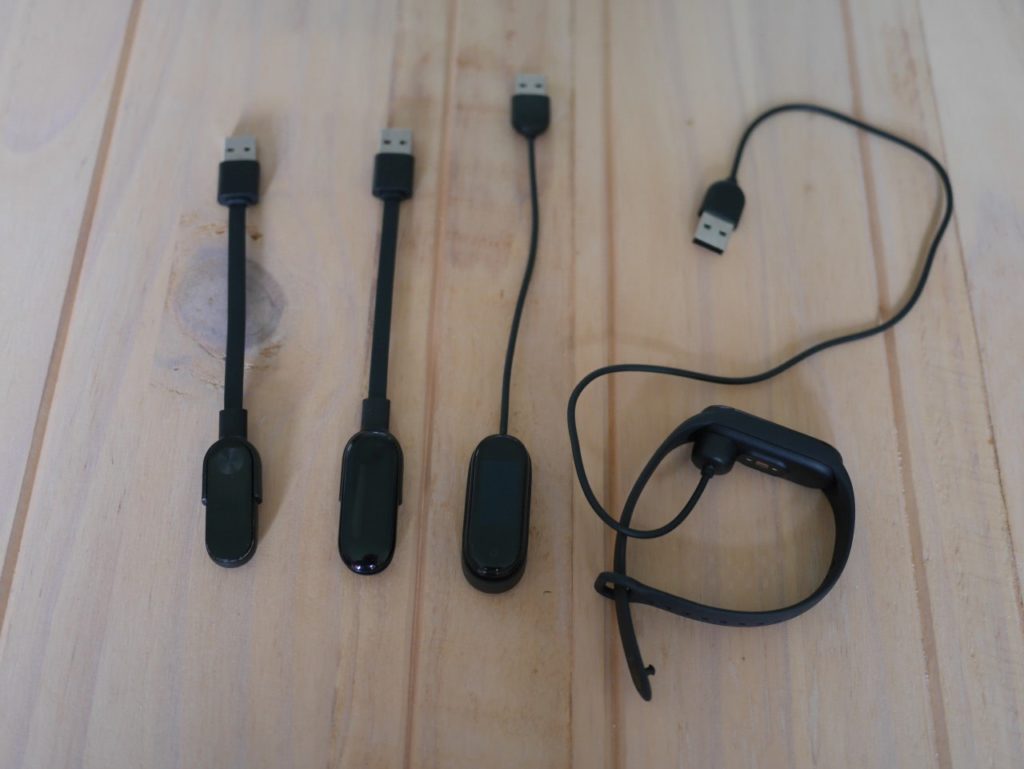
Charging
The Mi Band 5 is the first band, with a magnetically attachable charger – hence you do not have to take the band out for charging. This convenience comes at the price of a reduced battery-life from about 20 days with the Mi Band 4 to only 14 days with the Mi Band 5.
As for compatibility, you can charge the Mi Band 2 with the Mi Band 3 charger – the other way round is not possible as the Mi Band 3 is too large for the older charger.
Even though, the Mi Band 4 & 5 have their charging pins at the same location, the chargers are not compatible as the Mi Band 4 lacks the magnetic hold and the Mi Band 5 is too large for the old charger.
The Mi-Fit app
For the Mi Band the accompanying app is quite important as it is the only way to view your sleep data and to monitor your weekly/ monthly stats.
First, lets take a look how you can customize the different Bands from the app. Here, we should note that all bands are still supported by the app.
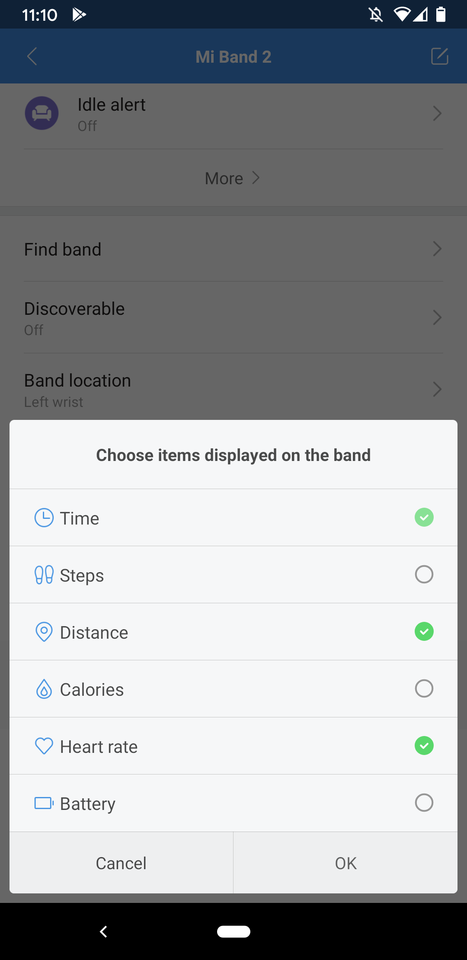
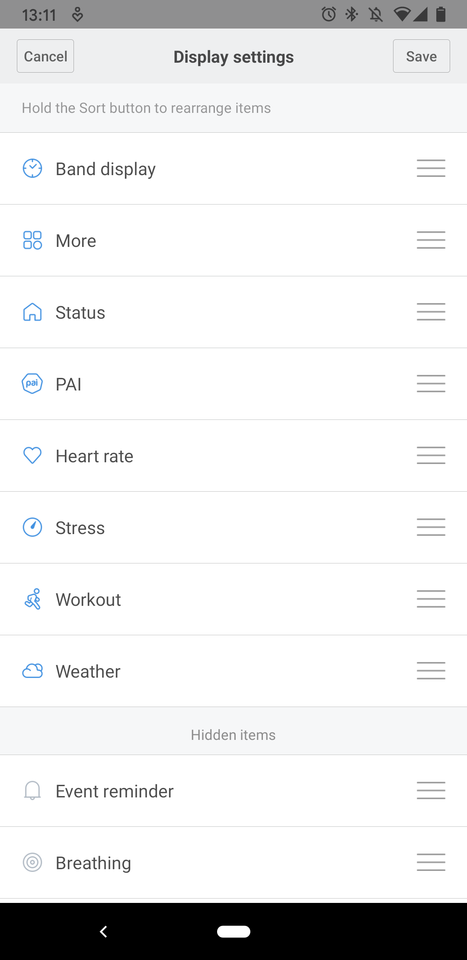
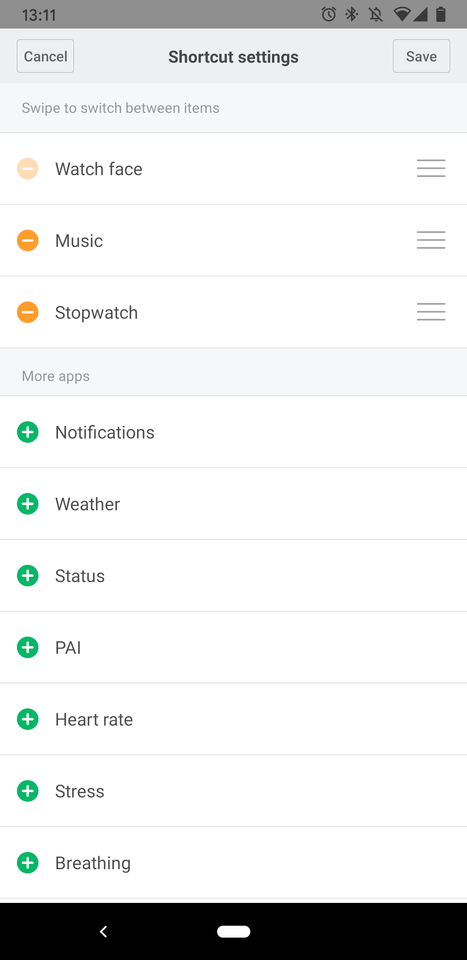
On the Mi Band 2 only the core options were availableThe screens on Mi Band 3 and newer are more customizableWith the Mi Band 5, you can also select the side screens
With the Mi Band, there is only a predefined set of screens/ apps out of which you can pick the ones you want. This is probably the largest difference to a real smart-watch, where you can install additional apps from a store.
With the Mi Band 2, the whole set fits on half a screen and you can only enable/ disable the items. With the other Bands you can additionally re-order the items, which is quite useful as it allows to choose which item appears first when you swipe up or down on the home screen.
On the Mi Band 5, you can additionally configure which app appears when you swipe left/ and right. This is hard-coded to Music Control (and Ali Pay on the CN version) with the Mi Band 4.
So the basic things work. Lets look at some peculiarities of Mi Fit next.
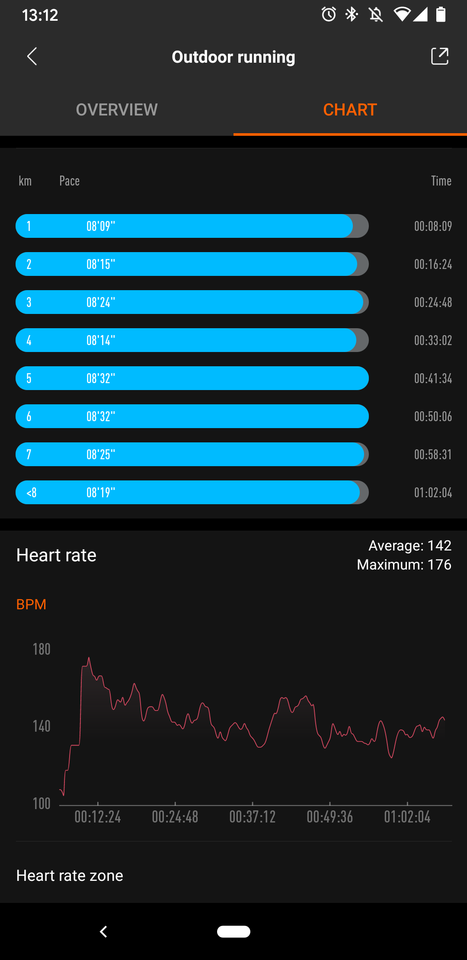
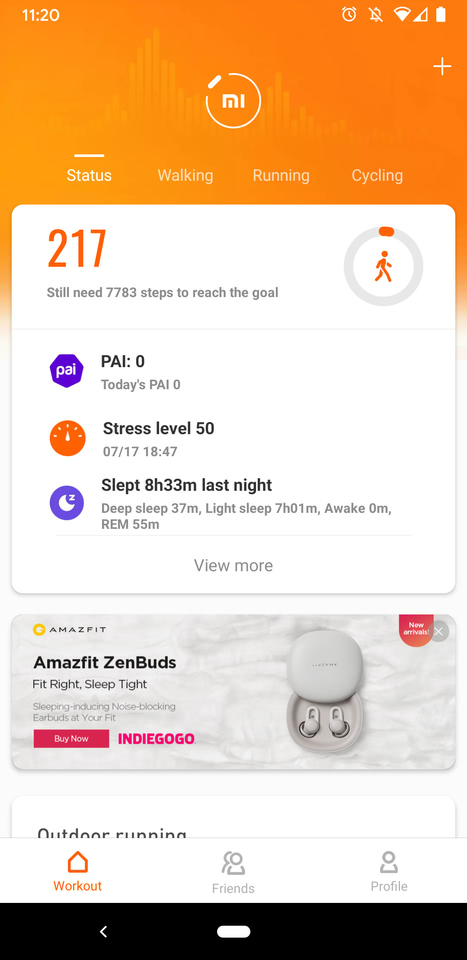
The sports stats are quite useful – if only the measurement was correctBe prepared for in-app ads for Xiaomi products
First you see the workout view for outdoor running, which displays some useful stats like your pace per km and the continuously measured heart-beat rate over time.
What you do not immediately see is that the app only counted ~7.3 km, while my running distance is actually 10 km, which I have verified on google-maps. One might now think that this is due to imprecise measuring of the band – however on the activity overview, where the daily steps are counted, the running activity is correctly accounted as 10.1 km – which is impressively accurate, given that it only counted the steps.
So the error is only present in the workout app, which is still quite annoying as it also provides the live view during a run.
If someone from Xiaomi is reading this: the error factor of ~0.73 is suspiciously close to the km to miles conversion factor of 0.625. The error is present with both the Mi Band 4 and Mi Band 5, so I guess it is actually in the App, where I already reported it several times. If you want happy customers, you better fix this. Many other reviews actually blame this on the band!
Addendum: with the firmware update to v1.0.1.32, the band now measures ~9km which reduces the error factor to 0.9. We are getting there.
So having talked about the bad, lets continue with the ugly. The second screenshot shows you an in-app ad for some obscure Xiaomi product on the home-screen. These do not show up too often and currently only advertise their own products. However, this is definitely the wrong path you are on.
Ultimately, this leaves me with mixed feelings about Mi Fit. In the Mi Band 2 days it started as a slim and functional app. However, at some point they decided to re-write it with the cards-look and animations. This rewrite moved core views one level down in the menu hierarchy and the added animations actually make the app feel sluggish.
Now, with each Band generation new features appear and are integrated in some sub-menu of the app. For instance, you get weather-alerts nowadays. However, they are not controlled in the general Band notification settings, but rather in the weather menu. Therefore, I doubt I would discover them as easily if I would not have watched the app grow.
The good news is that due to the popularity of the Mi Band, there are several alternative apps to try, which I probably will do next.
Mi Band history
In the following, I give a quick outline of how the Mi Band evolved. If you only came here for the Mi Band 5 review, skip forward to the Mi Band 4 section.
The Mi Band 2 was released 2016, about a year after the first Apple Watch launched, which brought the wearable category to the mainstream. At a price of less then 20€ the Mi Band offered most interesting wearable features to me, like heart-beat measurement, sleep monitoring, forwarding of smartphone notifications and ultimately, simply being a wristwatch.
Also it was an ideal way to try this new wearable thing without spending 350€, that Apple called out.
To my surprise the step-based distance estimation was already accurate back then – except for the actual workout mode, that is – as explained in the Mi Fit section.
Mi Band 3
The larger and brighter screen is the obvious advance of the Mi Band 3. However, the significant part is that it also became a touch-screen – whereas the Mi Band 2 only had the single touch-button. This allowed you swiping forth and back of the screens instead of just cycling through them and it also made virtual buttons possible. These are necessary for starting the stopwatch and timer, which are probably the most important additions for me with the Mi Band 3.
You could also start a selection workouts directly from the watch, instead of going though the app. However, this only included a treadmill mode, while I am interested in outdoor running – so I continued using the activity view for that.
More importantly, it added the weather app. If find this to be surprisingly useful. As with the time – even though you find the same info on your phone – having it at hand is better.
Mi Band 4
Again, the colored screen is the most obvious advance. It does not improve usability in any way though. It displays the same data as the monochrome screen of the Mi Band 3, which is probably more power-efficient. It adds a lot of bling though and is brighter and thus better legible in sunlight.
Speaking of bling, you can install third-party watch-faces now and there is a heap of faces to chose from. Take a look here to get an impression.
Turning to something useful, the touch sensor was noticeably improved. With the Mi Band 3 your swipes were sometimes confused with taps, which does not happen with the Mi Band 4 anymore.
The workout app, now finally included outdoor running, which is still broken though (see Mi App section). This makes the music control app the most important addition for me. At least on android, it works with any music player and allows skipping forward/ back and adjusting volume. This is quite useful when you play music from your phone at a party or for controlling your Bluetooth headphones.
One can use the same wrist-bands as for the Mi Band 3. This made upgrading for me back then a no-brainer, but is also a strong reason to choose the Mi Band v4 over v5, today.
Mi Band 5
This time, there are no obvious advances and the update is rather evolutionary. It does not mean it is insignificant though as it improves the usability on many levels. If you are new to the Mi Bands, you should pick this one.
The most important one is probably the new magnetic charger. Previously you had to take the “watch” out of the wrist-band to charge, whereas you can simply attach the magnetic charger now.
Next, the screen is slightly brighter which makes a difference in direct sunlight though (see screen comparison section) and also boasts more information.
Finally, the software was also noticeably improved. The band displays generally became more configurable. E.g. the custom left/ right swipes which now give you 4 quick access screens instead of 2. Then, the built-in watch-faces now allow customizing the additional info they display. And it continues with the small things like the configurable alerts in the workouts (although the workout app itself still needs to be fixed). Also, the selection of predefined watch-faces is vastly better then with the Mi Band 4. On the latter you have a hard time finding a watch-face that is simple and does not feature some animated comic figure screaming at you. These changes could be provided as an update to the Mi Band 4 as well, but are – at the time of writing – exclusive to the Mi Band 5.
Disclaimer
The Mi Band 5 was provided to me free of charge by banggood.com. So if you liked this review and want to support me consider buying using the following affiliate links:
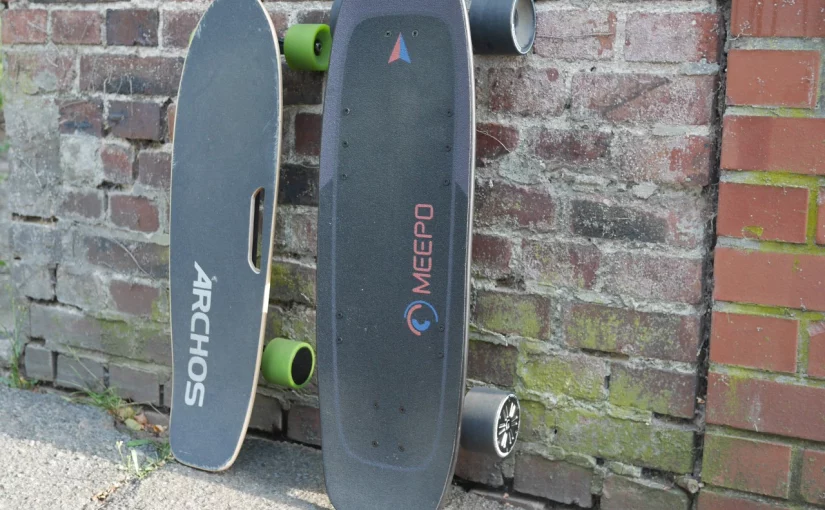
Having never skateboarded before, I saw the Archos SK8 electric skateboard for about 80€ at a sale and thought why not give it a try. This got me into this whole electric skateboarding thing.
Now that I have some more time at home during the summer, I upgraded to the Meepo Mini 2 and after having driven with it more than 100km, I thought I write down my experiences with the two boards and why I should have gotten the Meepo board from the start.
The competitors
The Meepo Mini 2 and the Archos SK8 are not really competing here, which should be clear looking at their price difference. But for completeness, also take a look at the specs of these two boards:
Meepo Mini 2
Archos SK8
Max. speed
46 km/h
15 km/h
Max. range
18 km
7 km
Max. Weight
136 kg
80 kg
Motor
2 x 540 W
1 x 150 W
Battery
144 Wh
50.4 Wh
Weight
7.4 kg
3.9 kg
Specs comparison
Actually, you can swap the Archos SK8 by any of the unbranded “cheap” Chinese boards that share the same design as the ones sold by Oppikle and Hiriyt.
Here, you might wonder how many Watts you actually need. For this I direct you to the Wikpedia article on bicycle performance that contains some sample calculations (and the formulae) which should roughly hold for electric skateboards as well.
Similarities
Before we dig into the differences, lets first note the similarities aka. the choices I made when picking these specific boards in the first place:
First, both boards are hub-motor driven. I made this choice on purpose, as electric skateboards are not road-legal where I live and hub motors are barely noticeable to the non-practiced eye. This reduces my risk of getting fined for riding one. However, I would probably generally recommend hub-motors over belt-driven motors nowadays as they require less maintenance (no moving parts), while offering a larger range and allowing pushing the board (belt driven block due to the gear ratio). The latter is especially nice, when you have run out of battery or if you do not want to draw any attention. When electric skateboards were first introduced by boosted, hub-motors were vastly inferior power-wise but that has changed now.
Next, both boards are of so-called “cruiser-style”. This is a size in between a regular skateboard and a long-board. They share a stiff deck and a kicktail with the former, while the use the wheels of the latter. At this point I should note that I mainly use the boards for leisure instead of a daily commute. This means that I value versatility of the board over comfort of ride. Here, having a kicktail is a must and rules out long-boards. It allows doing sharp turn, “wheelies” and you are more agile with the short board. However, you do notice the quality of the pavement very clearly in your feet and being out of the skating age my ankle did hurt the first couple of rides before it got used to it. So if you want to commute large distances, you should probably get a long-board with a flexi-deck that can cushion away most of the bumps.
Differences
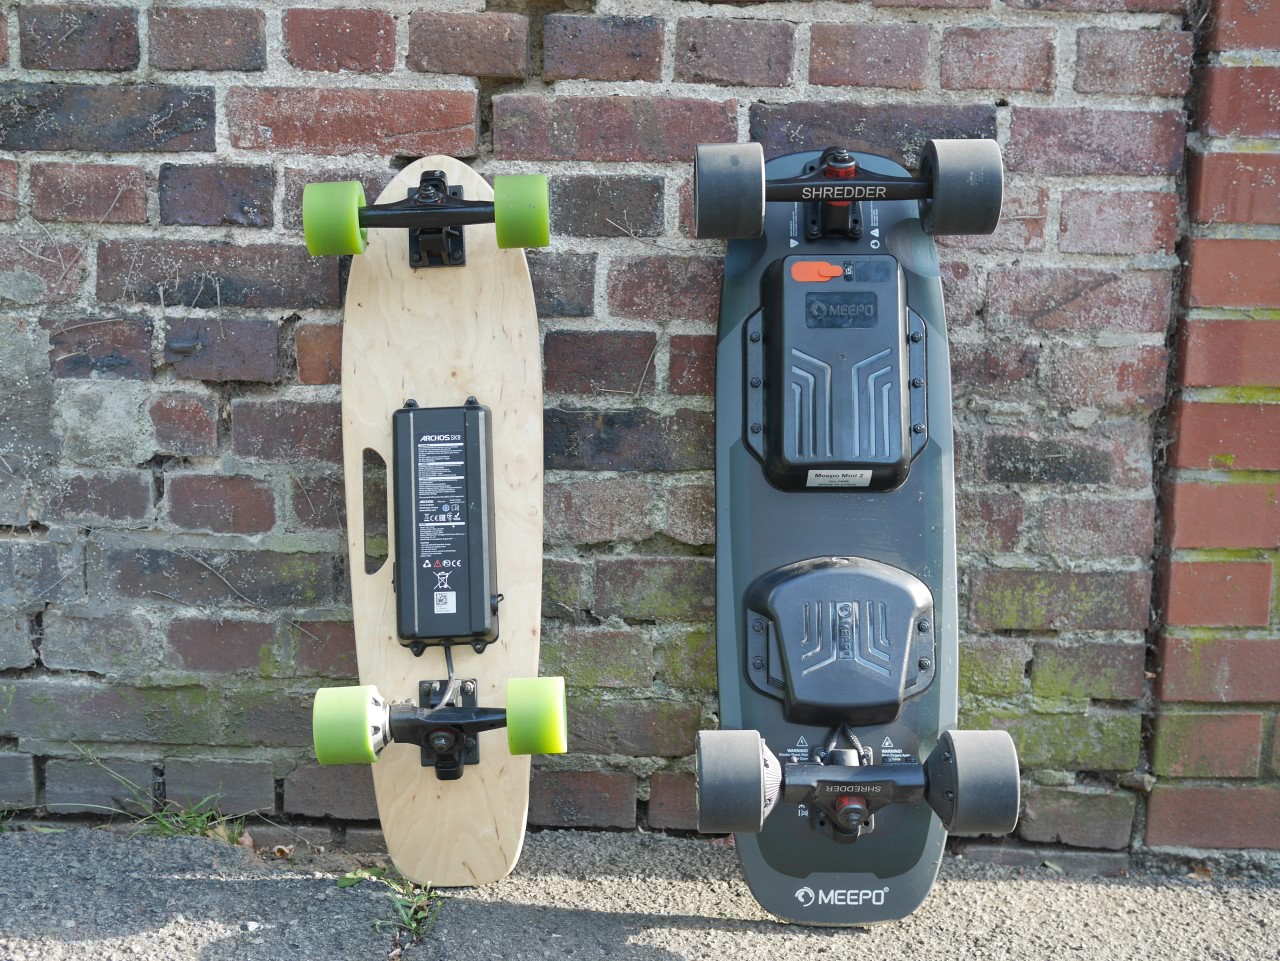
Both boards are of similar length, however the Meepo Mini 2 is considerable wider and heavier. It also has a larger wheel-base.
This results in a better grip and you also feel much more stable on the board. Flipping the board around, you see that the SK8 only uses a single-hub motor while the Mini 2 has two and each of them offers more than 3x the power.
If you do not expect the power or if you enable the pro-mode without being one, the Mini 2 can easily throw you off the board when accelerating or breaking. You can tame it though by using the beginner riding mode if you need to learn how to skate first. You can set the modes for acceleration and breaking separately and I would recommend always using at least the pro mode for breaking and learning to deal with it. In case of an emergency you want to be able to stop in time.
Turning to the SK8, the acceleration is.. meh and so are the breaks – in both of the two riding-modes. The difference between them is merely that the top speed is capped at 10km/h in the low-mode. But I must say that if you are a beginner this is sufficent; if you do not know how to ride being able to get going and to break are your two primary concerns and the SK8 does deliver here. The main drawback of the Archos SK8 is its tiny battery.
Aside: Li-Ion batteries
At this point we should probably briefly discuss Li-Ion battery technology. Mainly, the following two properties:
As you discharge the battery its Voltage drops, which is related to power (the Watts number) as P = V \cdot I, where I is the current in amps. So the more you discharge the battery, the fewer Watts you get out of your motors.
A full discharge (down to 0%) of the battery severely reduces its live-span. For maximal durability, you should always keep its charge between 40%-80%. Typically, the displayed range is clipped by the controller to help here.
So where does this leave us with the SK8? I did about 7 rides, fully-discharging the board (you do not want to stop after 10min, right?). And now the second riding-mode is essentially gone: when I try to accelerate the motors draw so much current, that the voltage drops below a critical level and the board turns off. Depending on what state the controller was in, I have to pair the remote again afterwards. But it also shows in the first mode: while the board initially could get me up a slight slope, it now immediately starts beeping due to critical voltage – again the motors need more voltage then the already worn down battery can give.
Remotes & charging indicators
Having covered the drive train, lets turn to the remotes. Both Archos and Meepo use a similar pistol-grip like design, where you control the motors with the thumb switch.
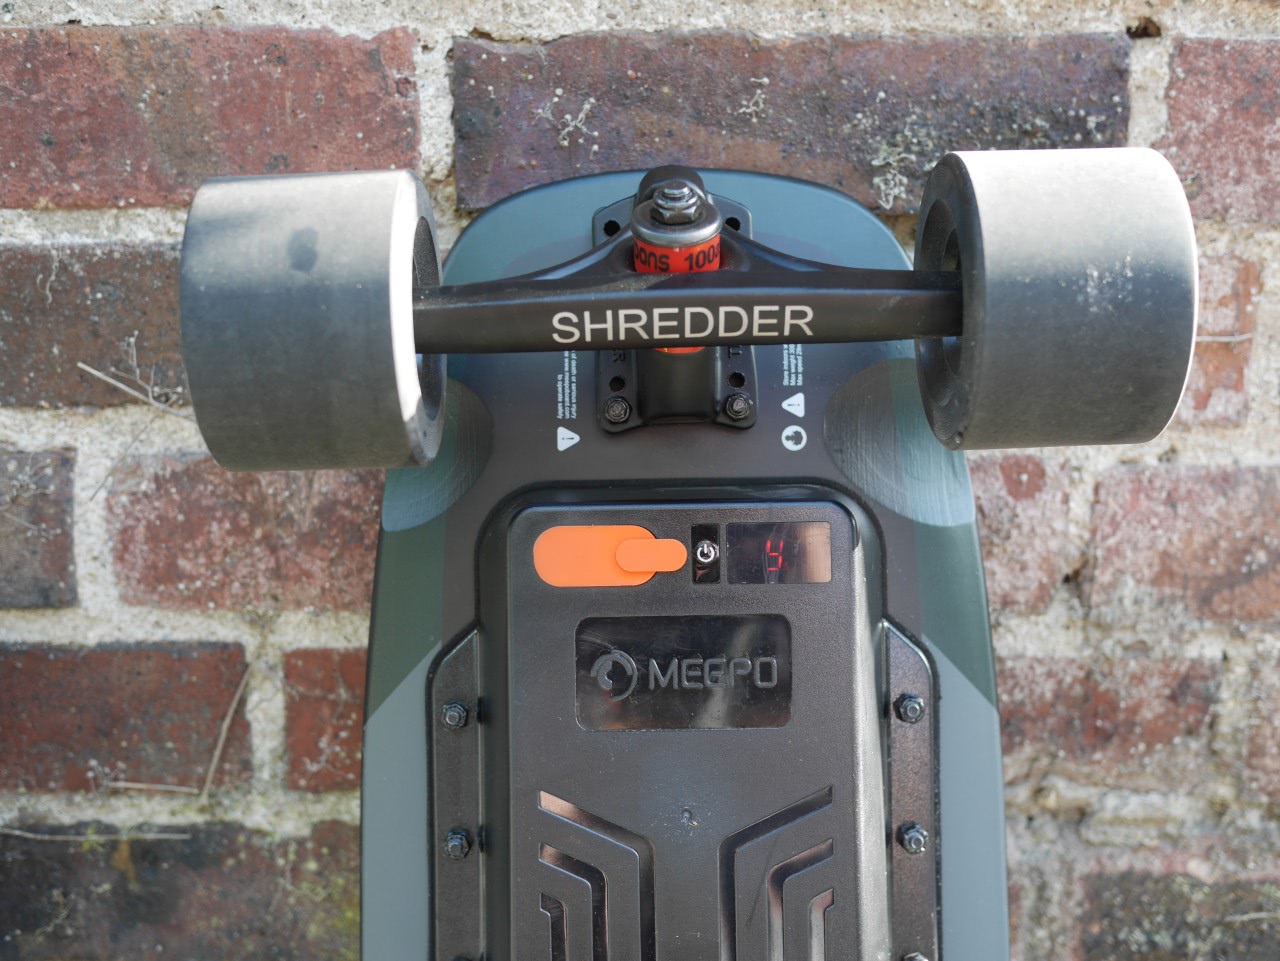
As one would expect, the Meepo remote is more sophisticated and offers detailed telemetry data on a nicely readable LCD display. There you find your current speed, drive mode and board charging level as well as the max. speed of the current ride.
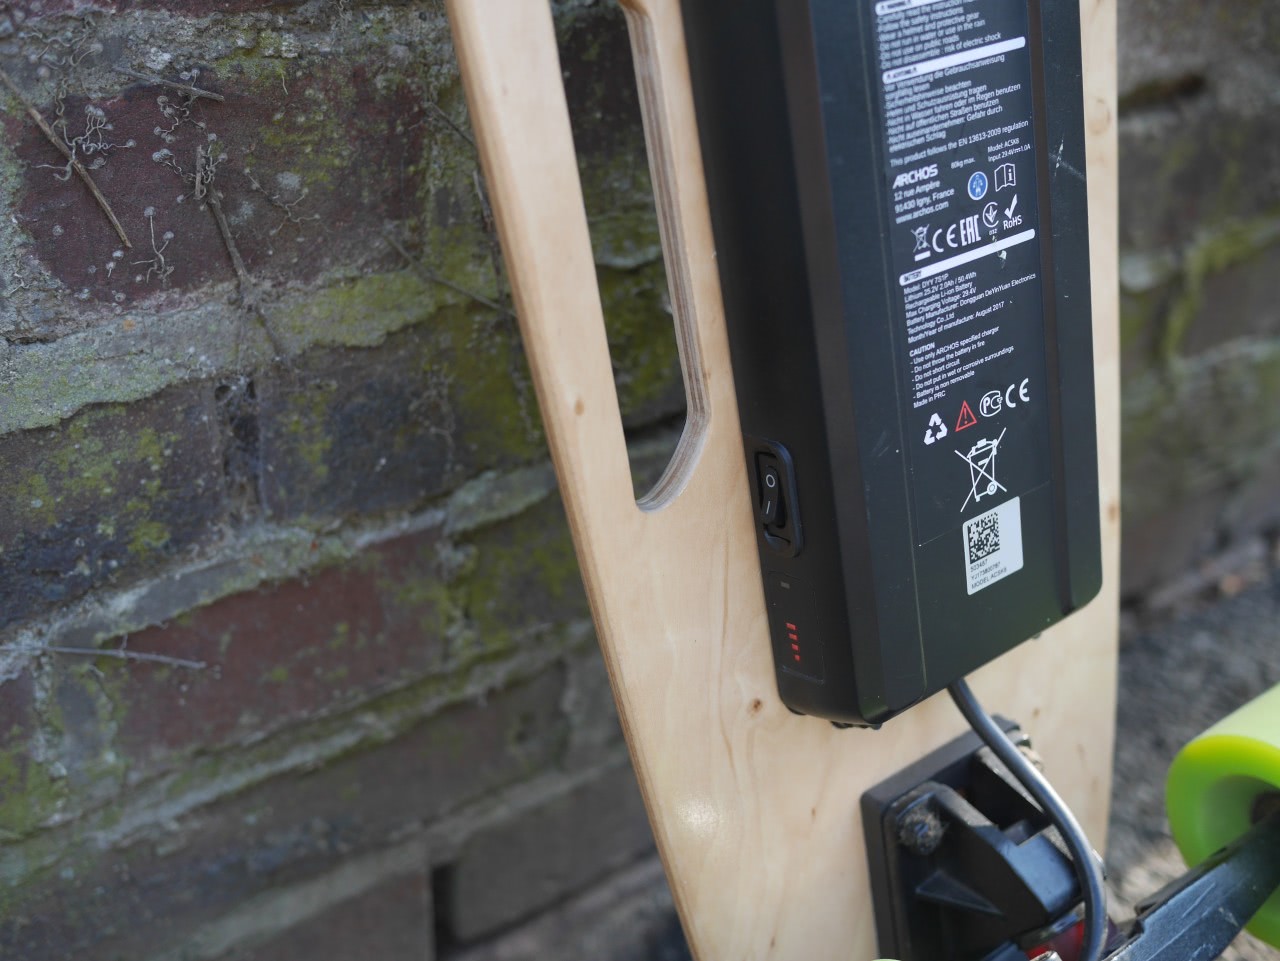
On the Archos remote you only find 4 LEDs. Those are used quite well though: when you turn on the remote, they show the remote charging level. As soon as the board is connected, they indicate the board charging level, which is actually the most important information you need while riding.
Similarly to the remotes, there are only 4 LEDs on the Archos Battery for the charging level, while you find a numeric LED-display on the Meepo board.
An actually noticeable feature on the Meepo Mini 2 is push-to-start; that is, you only have to push the board to turn it on – no need to bend down for flipping a switch.
Verdict
So why do I say you should go straight with the Meepo Mini 2 even as a beginner? On paper the Archos SK8 has everything it takes to be a nice beginner board. It is really the battery that kills it. With only 5-10 rides it is simply not worth the money, no matter how cheap it is. Looking at the price difference between the Meepo Mini 2 and the ER version that solely differ in the battery, you grasp that the battery is the crucial part in an electric skateboard. And the Archos SK8 is cheap, precisely because of the bad battery.
With the Meepo Mini 2 on the other hand you get a board that can “grow with you”: as you get more confident you can bump up the riding mode to get more power. Even if you decide that skateboarding is not for you, you can sell the Mini 2 as it will retain lots of its value – in contrast to just producing electric waste with the Archos SK8.
Riding the Meepo Mini 2
The Meepo Mini 2 is specified to go up to 46 km/h. Whether you can go that fast depends on your weight, the wind and the slope (see the Wikipedia link, mentioned above). In case you are fat and/ or there are lots of slopes where you live, you might also consider the ER version of the Mini 2, which comes with doubled battery capacity. As mentioned above this not only means that you can get further, but also that you have more power in the mid-range.
How fast can you go?
Having only previous experience on a Snowboard, I am a rather cautious rider. So far my max. speed (according to the remote) was 30 km/ h which I did uphill – in hope that stopping is easier that way. Going downhill (only using the motors for breaking), I feel comfortable until around 22 km/ h. I typically ride for about 30-45 min and the lowest the battery got was 40%, which means it should last for quite some time. Note, that I do not go straight uphill for 30min and that I usually push to get rolling, as this is where most energy is used.
A suitable helmet
When lifting the board, the remote showed that the ESC only limits the speed at 50 km/h. When riding a skateboard at anything above 10 km/h without a cushion-zone and no nothing, I would highly recommend you to at least wear a helmet. However, you should consider that a “normal” skate helmet is only specified (EN1078) up to 19.5 km/h impact speed – if you ride faster it does not guarantee protection.
Fortunately, one does not have to resort to heavy motorcycle helmets (ECE2205) as there is a specification (ASTM F1952) for downhill bike helmets, which was designed with speed in mind. It is specified for an impact speed of 22.3 km/h and typically the helmets provide full-face protection. Recently, even variants for downhill longboarding started to pop-up, which should be even a better fit style-wise.
Addendum: replaced NTA8776 by ASTM F1952 in the last paragraph
Due to the current circumstances, I had to record the lectures on augmented reality, which I am typically holding live. This was much more work than anticipated.. On the other hand, this means that I can make them available via Youtube now.
So, if you ever wanted to learn about the basic algorithms behind Augmented Reality, now is your chance.
The lecture is structured in two parts
Camera Calibration, and
Object Pose Estimation.
You can click on the TOC links below to directly jump to a specific topic.
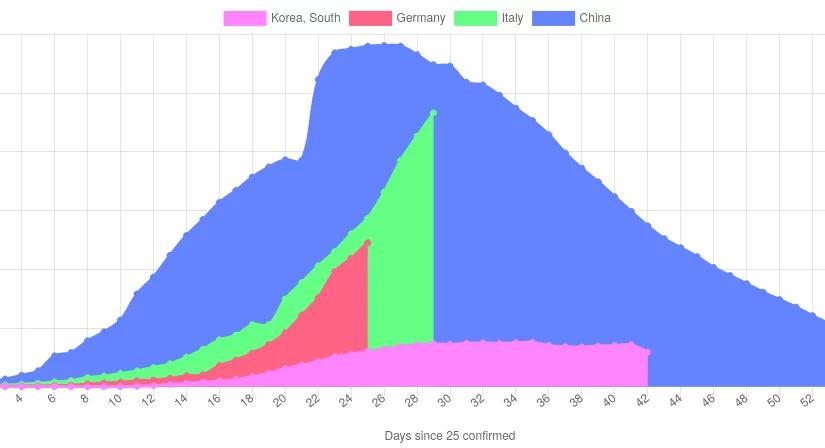
I am quite frustrated with corona graphs in the news, since most reporters seem to have skipped math classes back then. For instance, just plotting the number of confirmed infections at the respective dates does not tell you anything due to the different time point of outbreak. So lets see whether I can do better:
Typically you would need to feed it into OpenGL to get an image out of it. However, there are occasions when setting up OpenGL would be too much hassle or when you deliberately want to render on the CPU.
In this case we can use the OpenCV to do the rendering in two function calls as:
See the documentation of cv2.projectPoints for the meaning of the parameters.
Note how we only project each vertex once and only apply the mesh topology afterwards. Here, we just use the numpy advanced indexing as pts2d[indices] to perform the expansion.
This is pretty fast too. The code above only takes about 9ms on my machine.
In case you want filled polygons, this is pretty easy as well
for face in indices:
    cv2.fillConvexPoly(img, pts2d[face], (64, 64, 192))
Filled polygon rendering
However, as we need to a python loop in this case and also have quite some overdraw, it is considerable slower at 20ms.
Of course you can also combine both to get an image like in the post title.
From here on you can continue to go crazy and compute face normals to do culling and shading.
But you can only get that far without a depth buffer
So after having made fun of people for “wearing toothbrushes”, I finally came to buy such headphones for myself.
Having used non-true wireless Bluetooth headphones before I was curious what the usability advantage would feel like.
Here I went for the Xiaomi AirDots Pro 2 aka True Wireless Earphones 2S which I could grab for 399 Yuan which is about 51€, which seems like the right price-point for this kind of accessory.
Keep in mind that the built-in battery only survives so many charging cycles and once it dies you can throw them away.
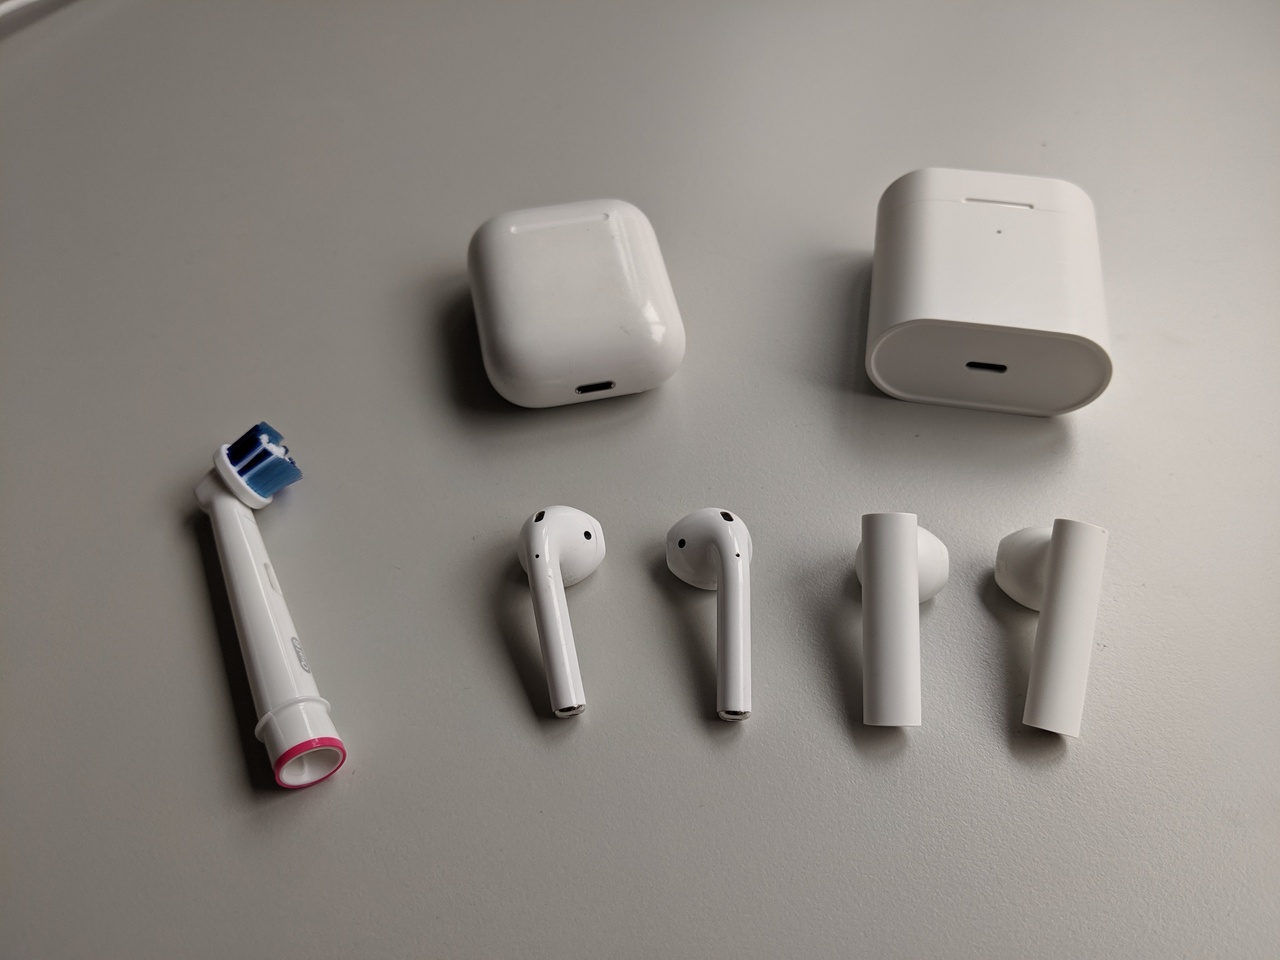
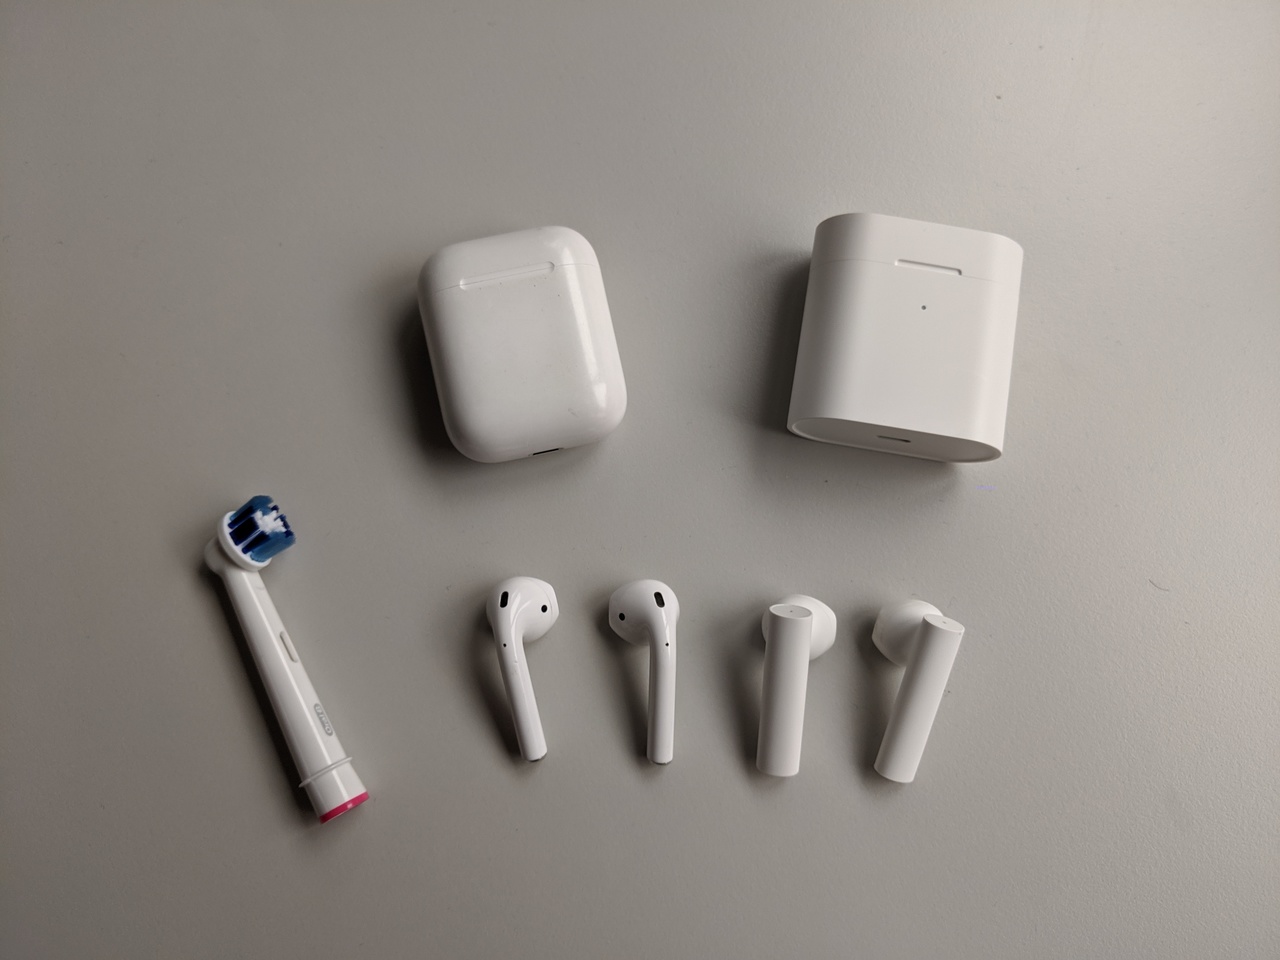
The Airdots (right) compared to the Airpods (middle) and the Oral-B Precision Clean
The initial feeling of using true wireless headphones is surprisingly relieving – there is simply no cord to untangle or to be aware of while wearing. This is especially true during phone calls, where one needs to keep the microphone aligned.
The downside is that the headphones are too small to accommodate any buttons for volume and playback control.
The Air 2 kind of make up for it by automatically connecting to your phone once you put them on and by automatically pausing the music when you put one out of the ear. This is achieved by a built-in brightness sensor.
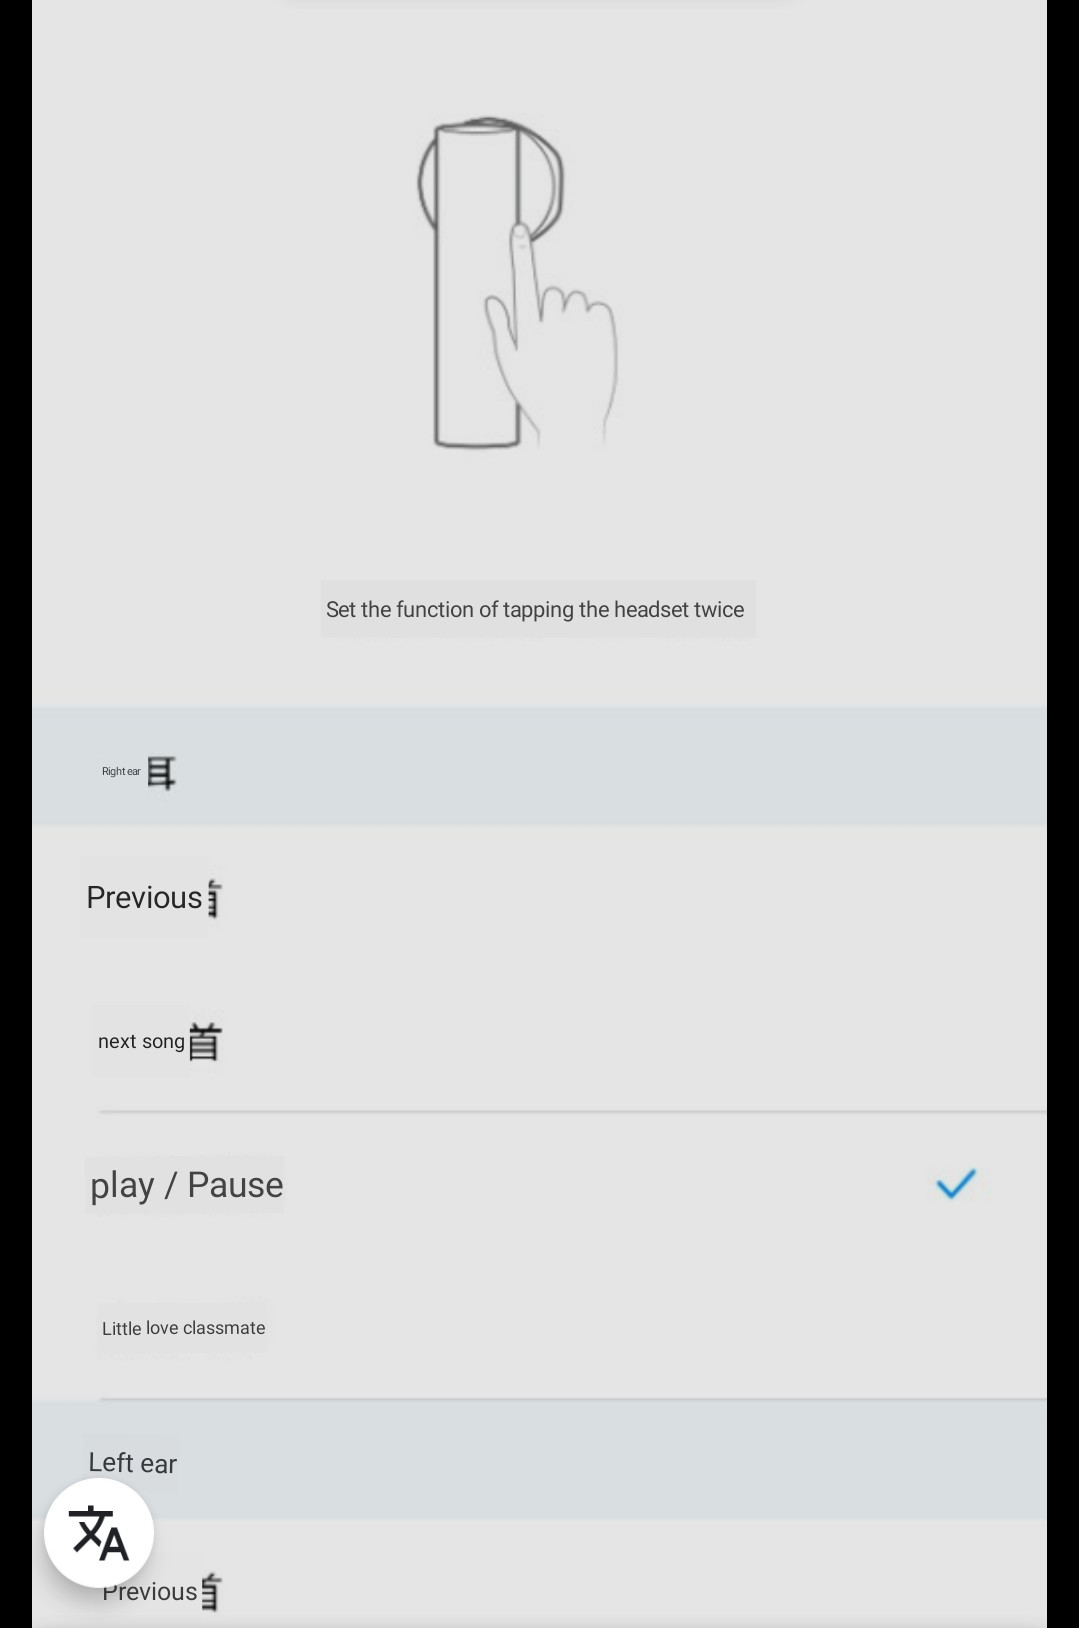
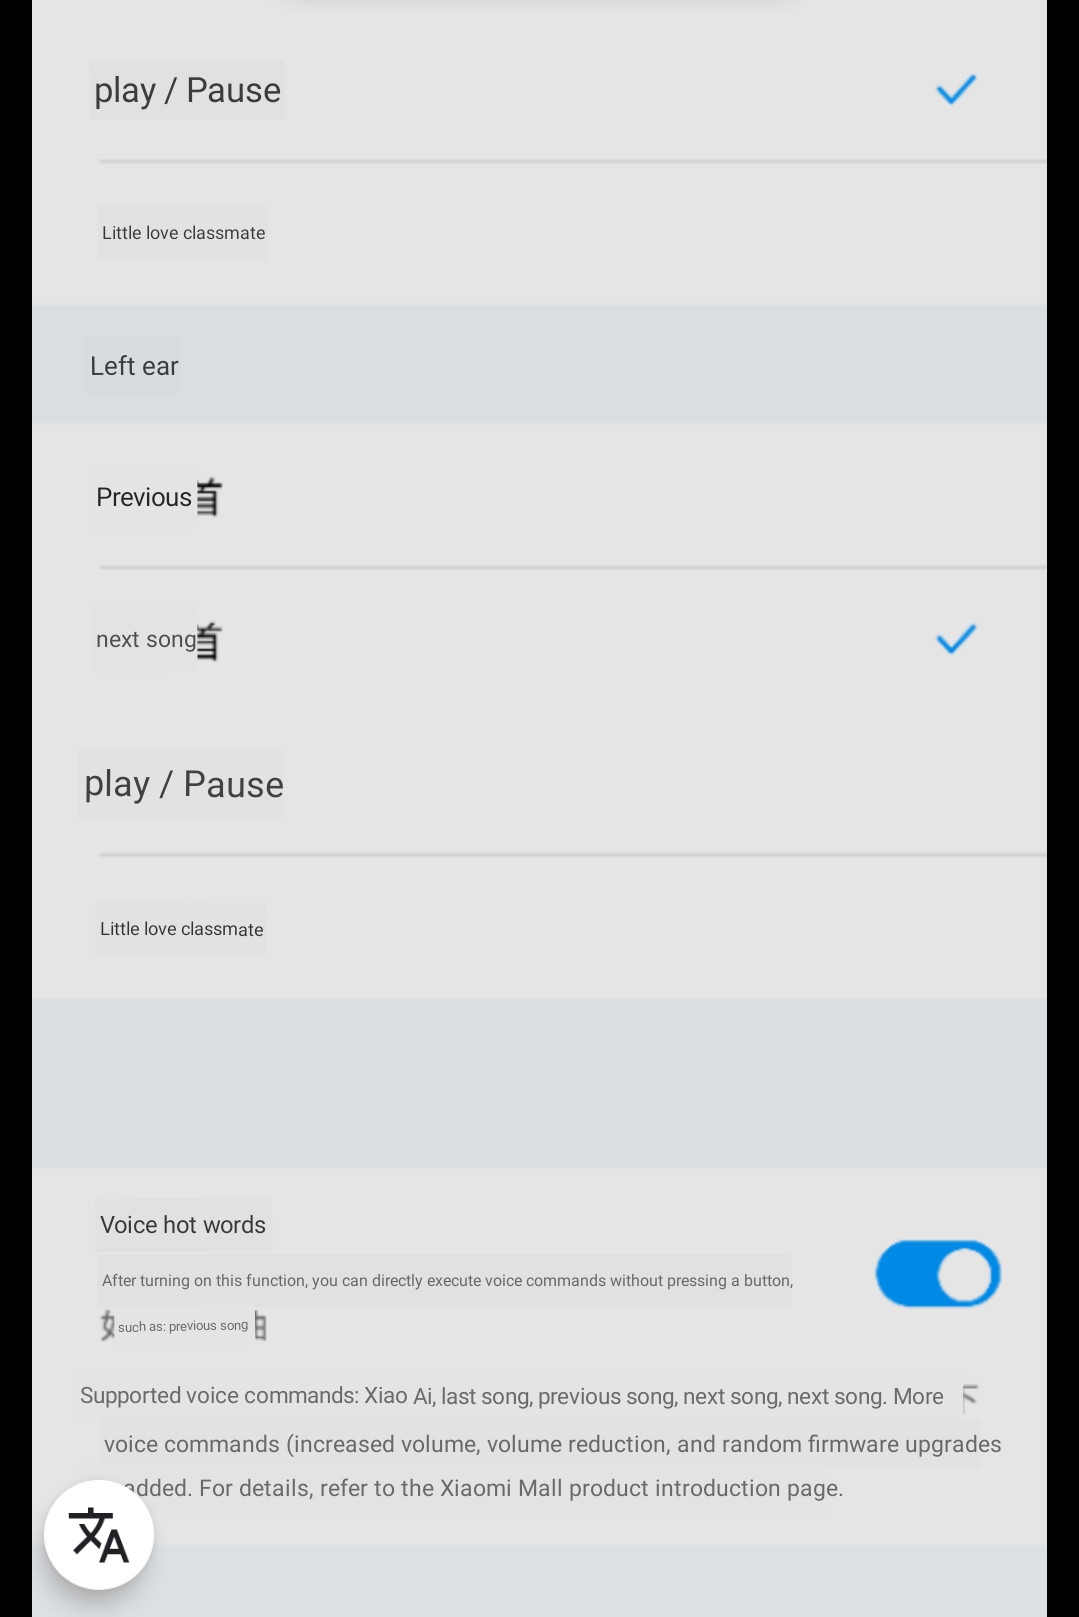
Furthermore you have double-tap actions, which default to play/ pause on the right headphone and launching the voice assistant (e.g. Google Assistant) on the left headphone.
The battery life is stated with 4 hours per-charge with 2 extra charges in the case. I could confirm those on a long distance flight.
Compared to the Airpods 2
Looking at the feature-list above or simply at the images, the similarity to the Apple Airpods is apparent.
Out of curiosity I borrowed some from friend for comparison. The most important point is probably sound quality. Here we found the two virtually in-distinguishable. But keep in mind that we only did a quick test and did not use them extensively.
The second point is likely the form. Here, both earphones have the same ear-part and only differ by the shaft. So if one fits your ear, so should the other.
The shaft however is considerably wider on the Airdots. This is less apparent when viewed from the side as the thickness is similar.
For me, the more important difference is being able to control the headphones from my Android smartphone. This is currently not possible with the Airpods, while there is some way for the Airdots;
Companion app & Software integration
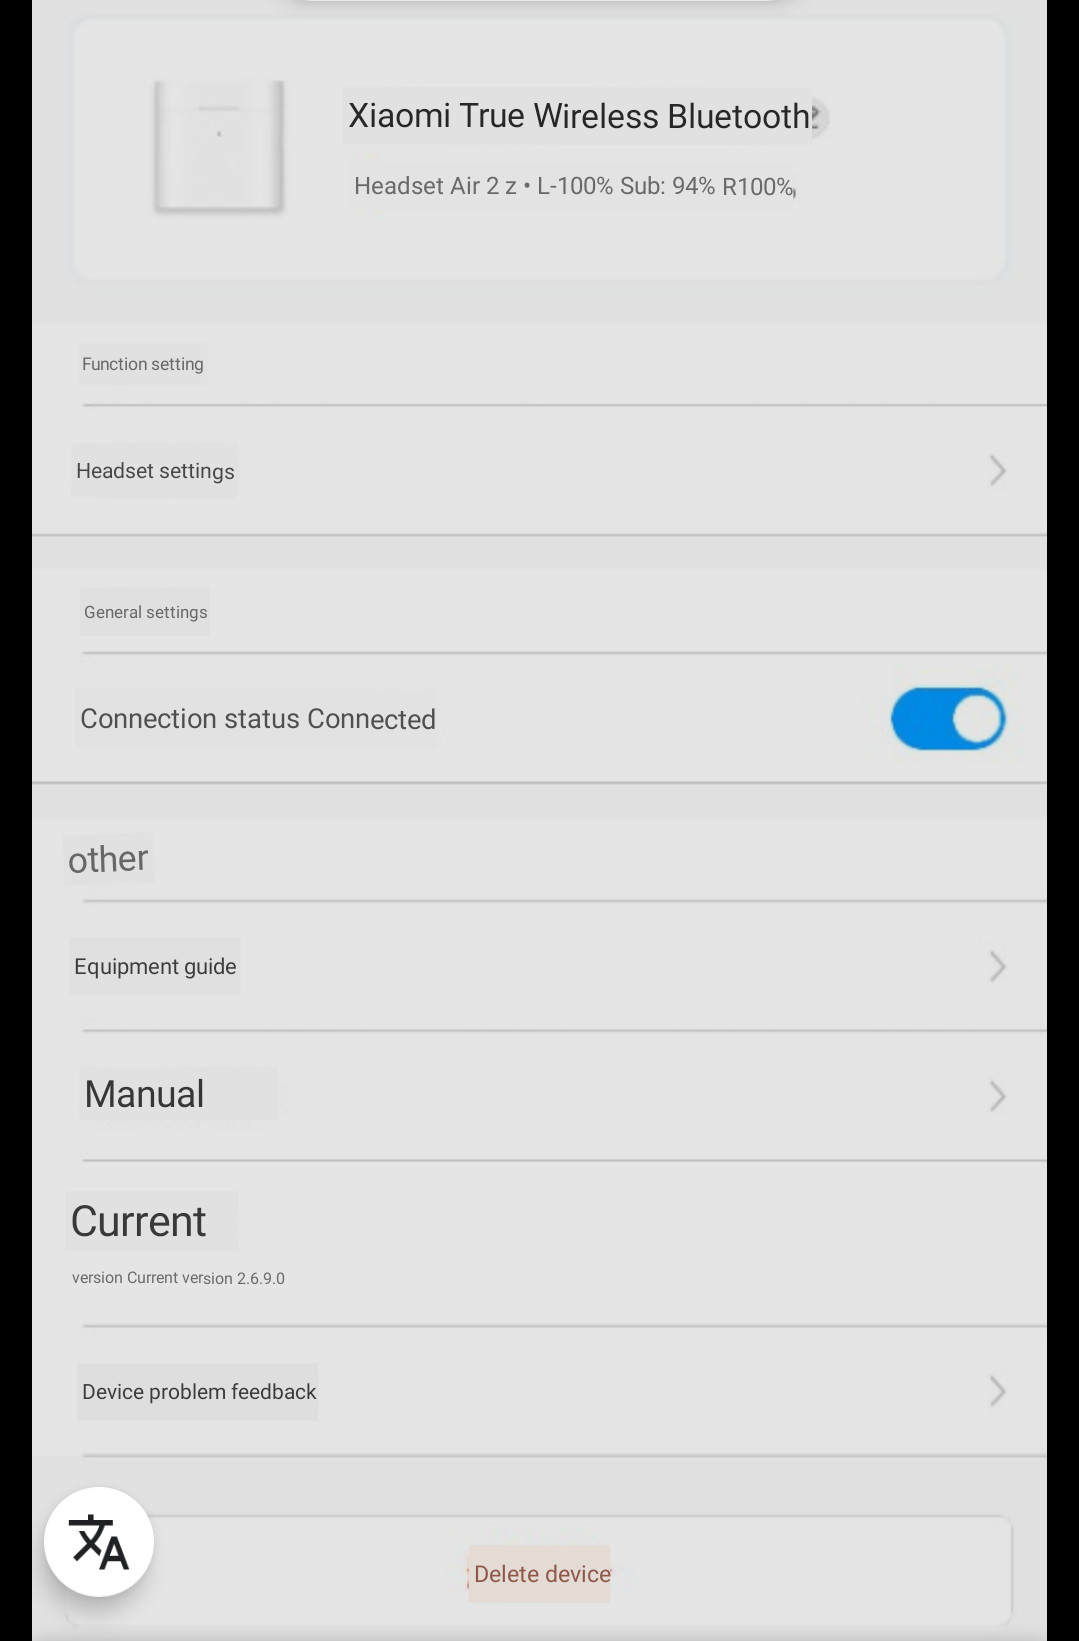
To control the earphones, you have to sideload the Xiao Ai Lite App. The main purpose of it is to provide the Xiaomi voice assistant and the Air2 options likely just ended up there instead of Xiaomi Home as they offer an always-on assistant integration just like the Airpods.
It handles firmware updates and allows you to configure the douple-tap action per earphone as well as displaying the charging status of the earphones and the case. By default android will only display the charging status of the least charged earphone.
Furthermore, you can use the fast-paring if the app is running. Here, it is sufficient to hold the earphone case close to the phone and just open it. The app will ask for confirmation. This is only slightly more convenient then holding the pairing button and using the normal bluetooth pairing procedure.
The downside is that the app is currently only available in Chinese and consequently the voice assistant only works with Chinese.
I tried out some voice commands via google translate and everything works as it should. However if you are not fluent in chinese it is far from practical. Most people should disable the assistant in the settings to avoid accidentally triggering it.
A serious advantage of Xiomi/ Huawei phones is the availability of the LHDC Bluetooth Codec which offers a superior bandwidth and latency. While I am fine with the bandwidth provided by AAC when listening to music, there is still a noticeable and annoying delay when watching videos and playing games.
Noise Shielding
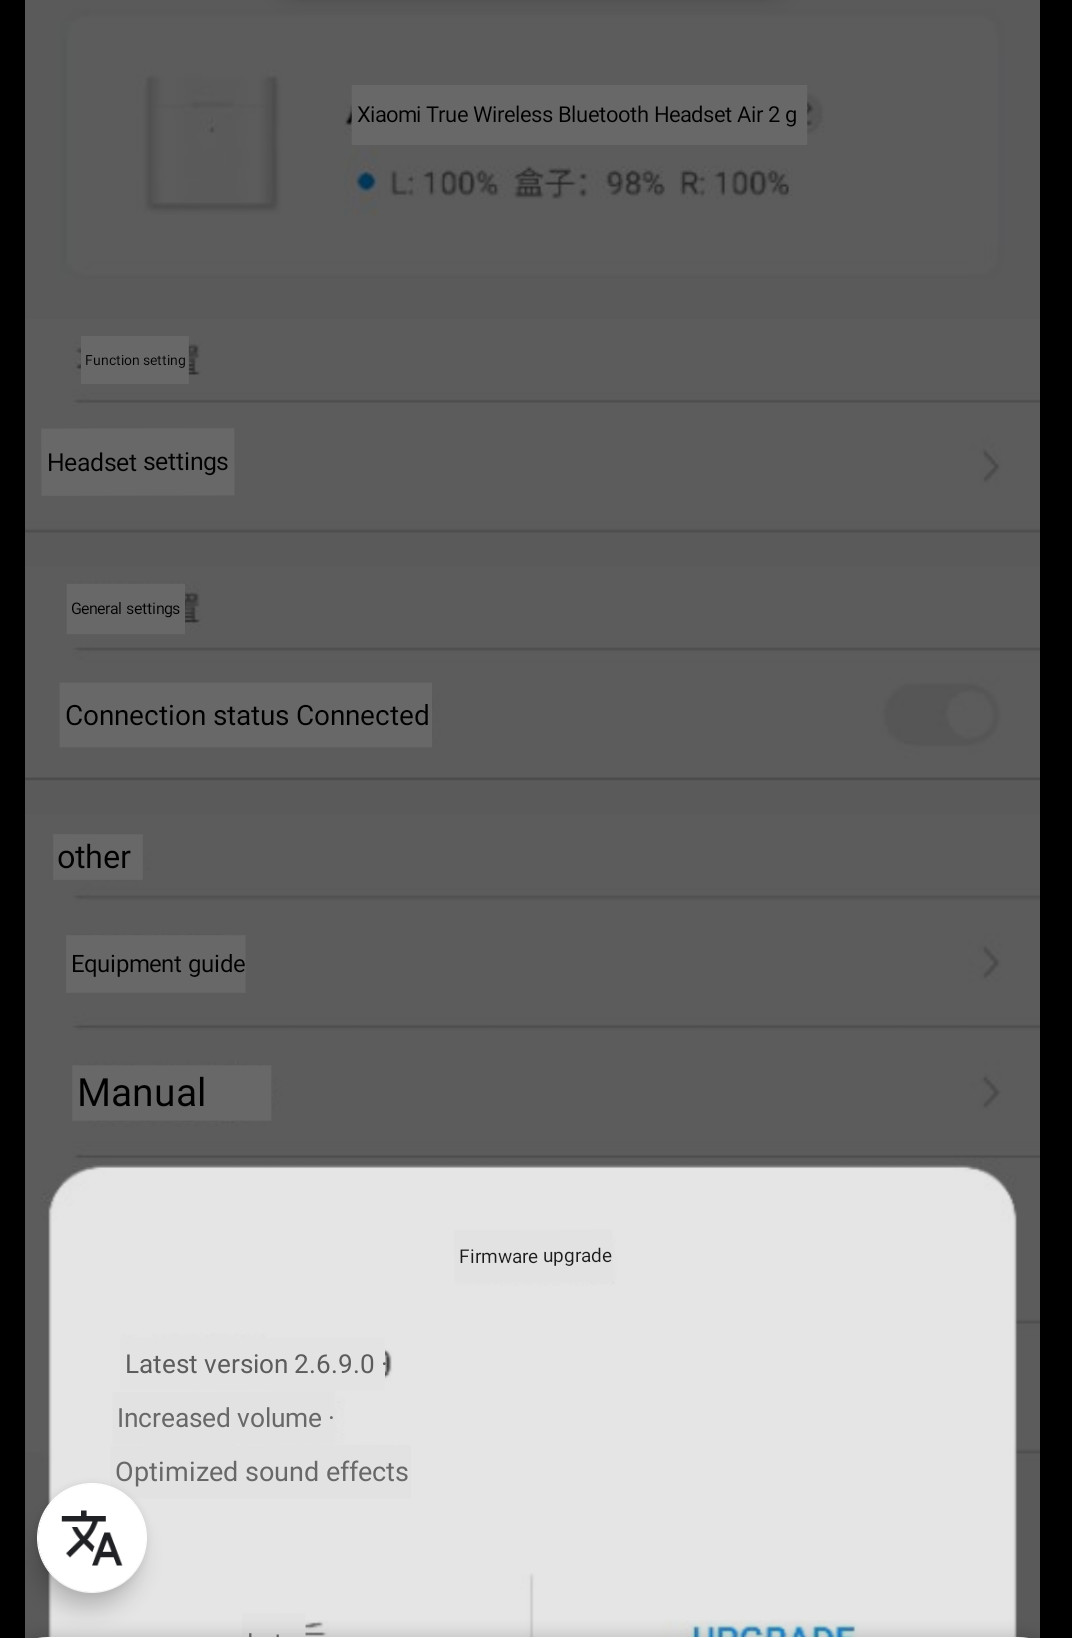
The firmware upgrade to v2.6.9.0 significantly improved the acoustic pattern of the headphones by tuning up the low bands (base) and thus general sound quality.
This results in a very noticeable noise reduction compared to v2.6.2.0 – especially in the lower frequencies; things like your footsteps get filtered out. Higher frequencies like car motor sounds are still perceivable though. This is however a good compromise for me.
Addendum: previously I stated that the headphones provide active noise cancellation. They do not. I was mistaken by the significantly improved noise shielding through the tuned up bases.
Compared to True Wireless Earphones 2 Basic / Air 2 SE (Addendum)
Ultimately my left earphone died (see below) – likely due to a deep discharge. The second pair of the Air 2 still works though. I will update this review when I find out whether I just had bad luck or whether there is a systematic issue.
Anyway.. as a replacement I ordered myself the Air2 SE earphones, given my phone does not support LHDC and other online reviews described them as “the Air2 without LHDC”.
Well, I guess some sites try to sell an unboxing story as a review..
Air2 SE – Air 2
As you can see on the image above the Air 2 SE are considerably longer than the normal Air 2 and also have different vents.
While they are slightly too long now for my taste, my largest complaint is the sound quality. Basically, the bases which improved sound quality and shielding on the Air2 after the firmware update are missing here. So we have no shielding and a noticeably worse sound quality here. Next, the microphones on the Air 2 SE are noticeable less sensitive and I had to raise my voice from normal level so my callees could here me. Finally, the Air2 SE are not supported by the XiaoAI app, so you get no firmware updates and no configurable tap-actions.
Given the small pricing difference between the Air 2 and the Air 2 SE, I therefore recommend to always go for the former.
Also, if you encounter some sites that tell you the Air2 and Air2 SE are the same, please enable your adblocker. Especially if they jabber about different touch zones, even though the marketing material makes it quite clear that up/ middle/ down means you can touch the single zone at any position.
Charging issues
Over time I noticed that the left earphone consistently runs out of battery before the right one. The issue seems to be that it discharges while stored inside the case. Putting it in and out resolves the issue – but only until it is fully charged. This makes keeping the earphones pre-charged and ready quite an issue.
Hopefully this can be addressed with a future firmware update. (reproduced with firmwares up to v2.7.1.0)
Addendum: the replacement pair (see above) do not have any charging issues. Therefore I guess the issue is just a singular manufacturing defect.